K4-Control for Elecraft
1. About the App
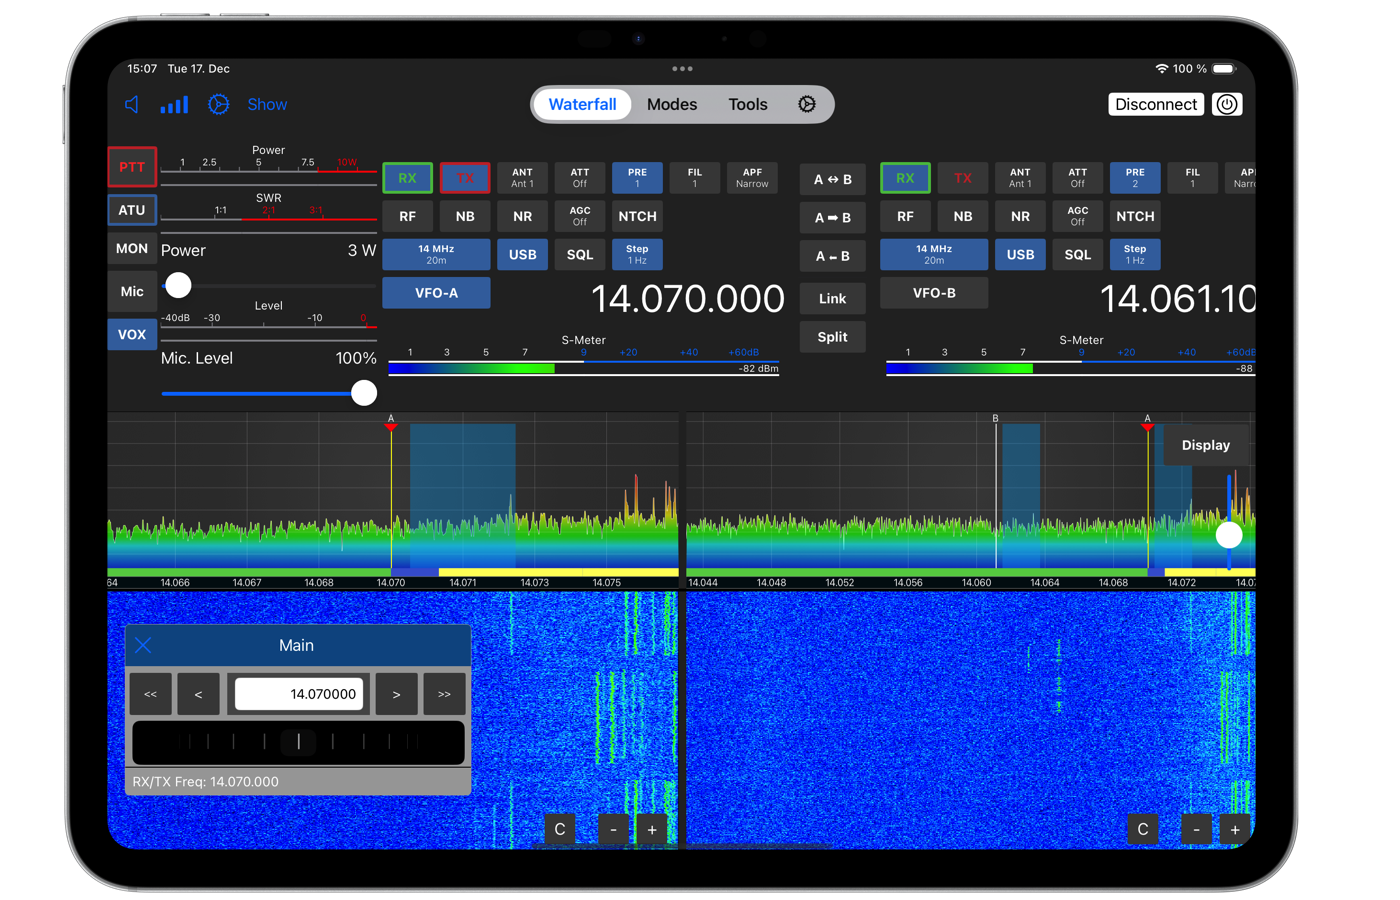
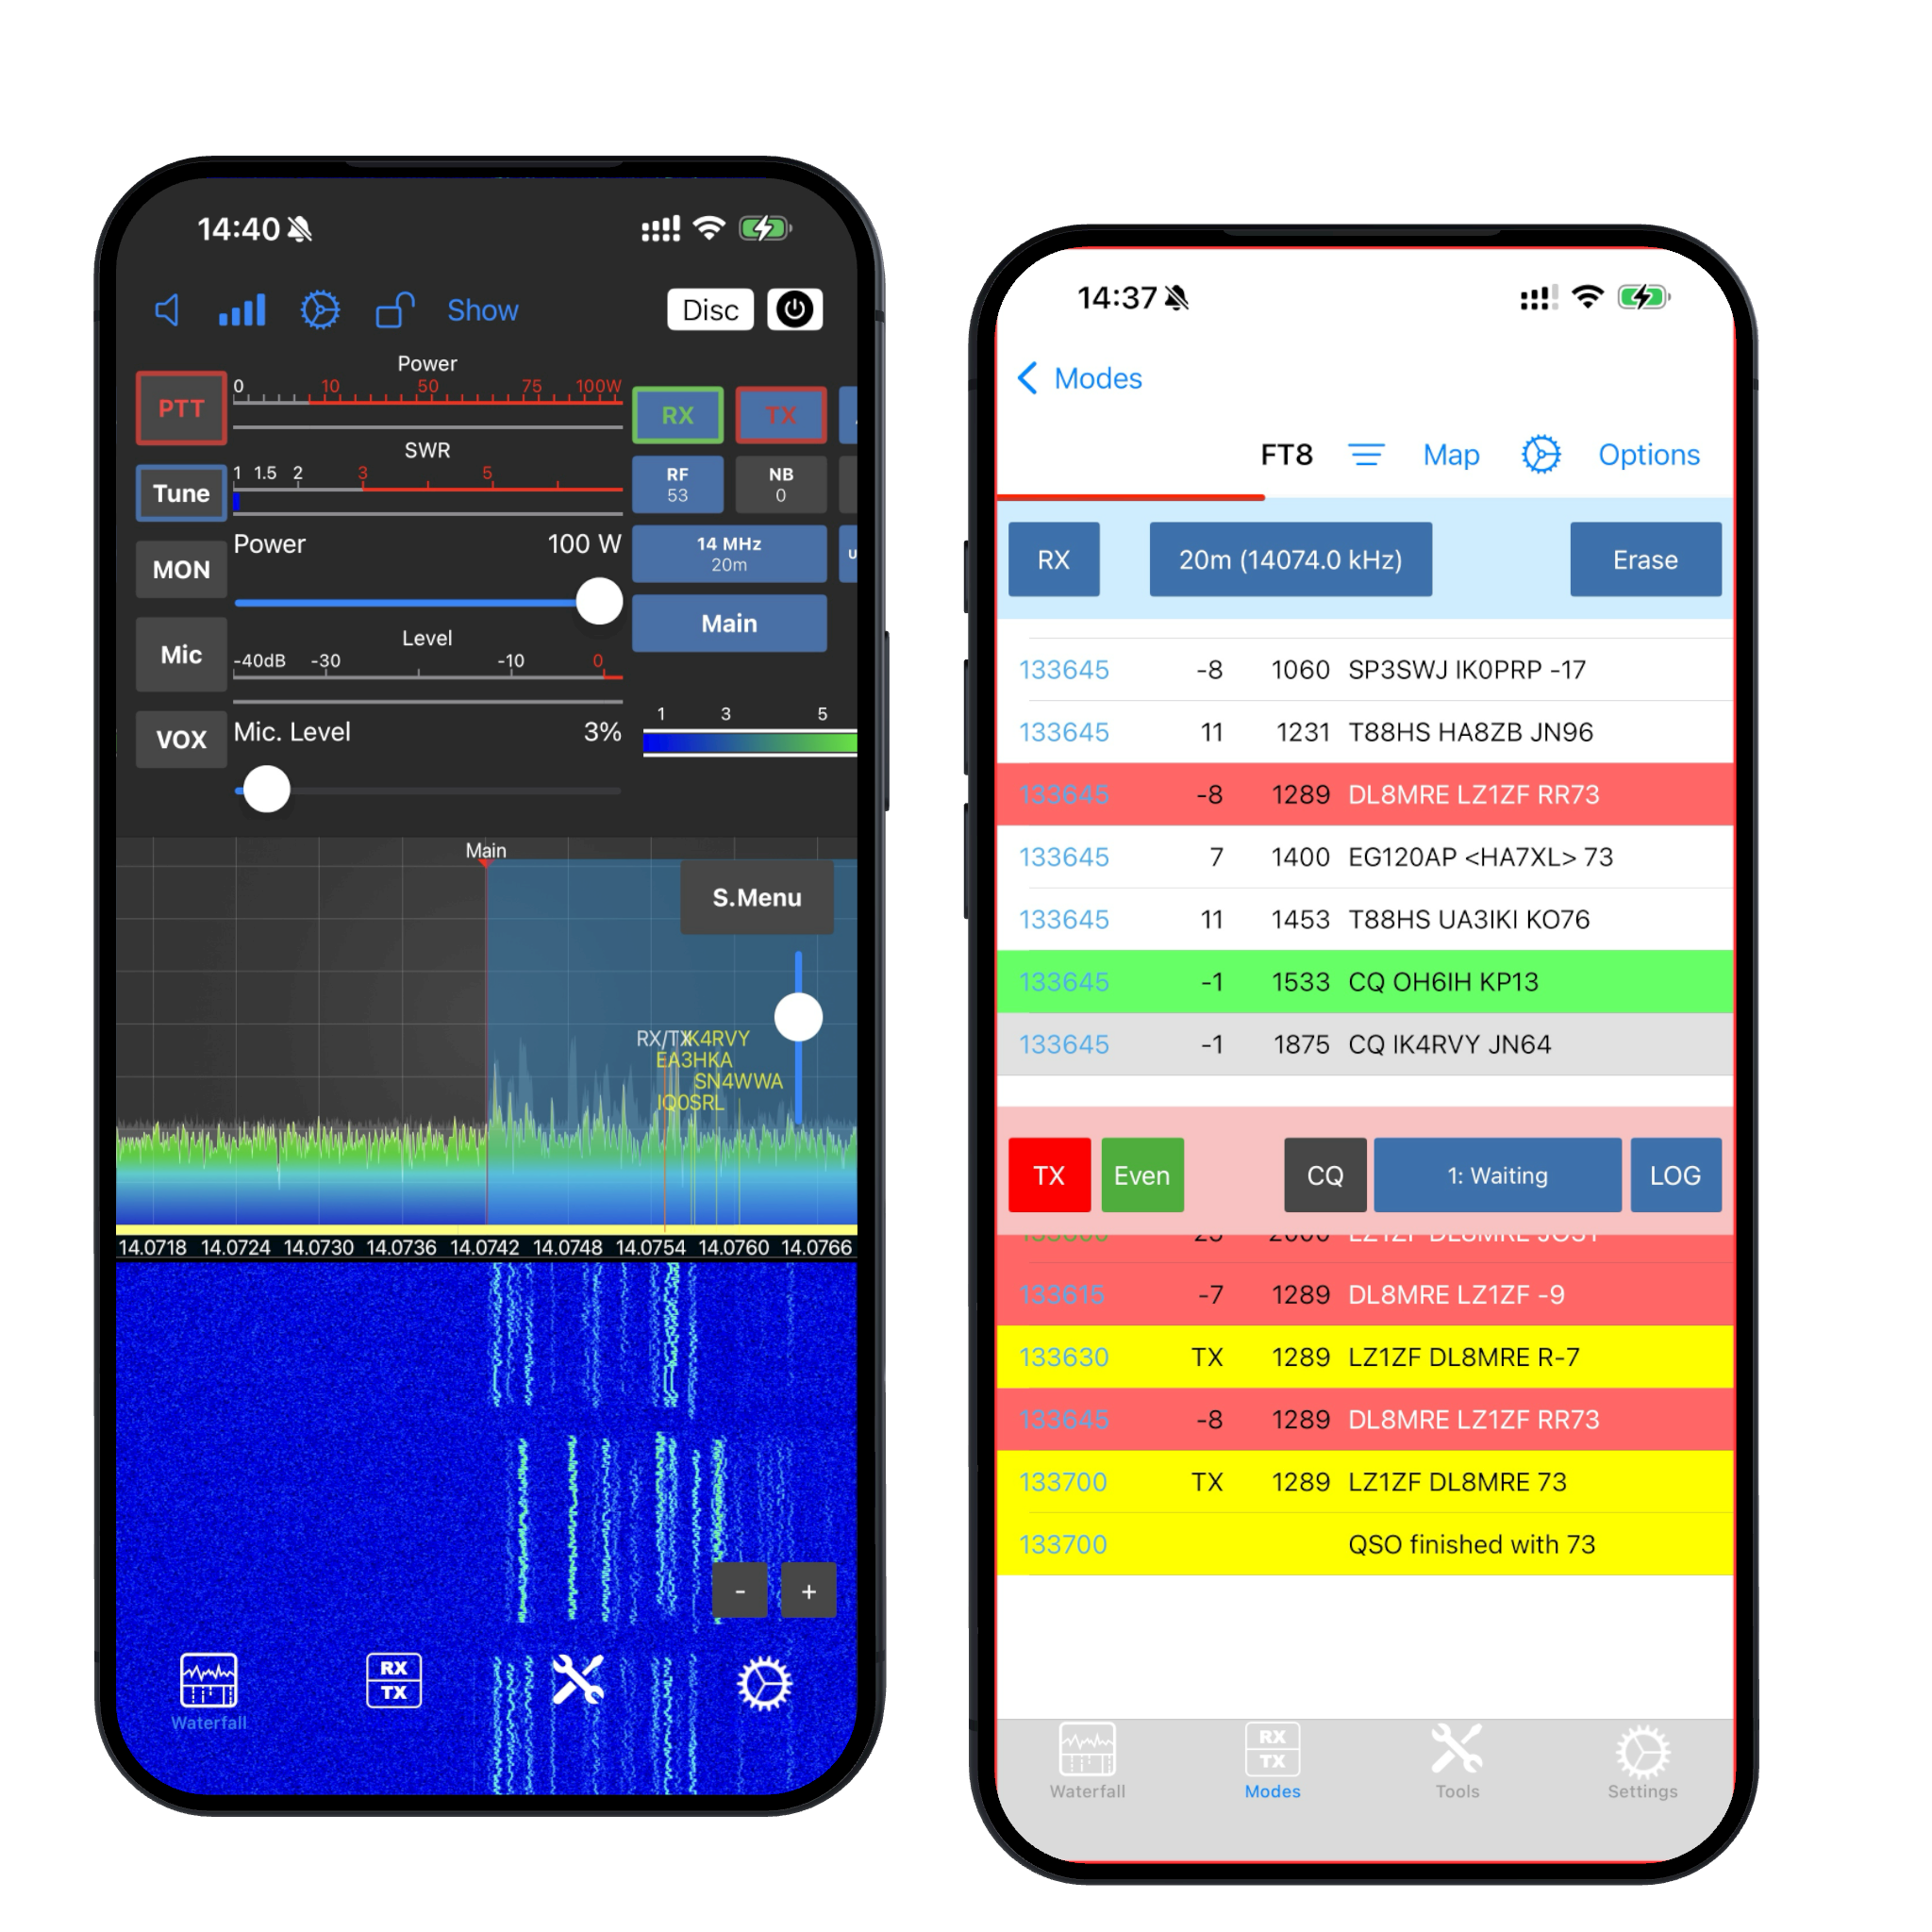
K4-Control for iOS is an application designed to enable iPad and iPhone users to control their Elecraft K4 radio over a network either at home or remote over the internet.
1.1. Operate in any Mode
Whether you’re using the iPad’s or iPhone’s internal microphone, Apple’s AirPods, another Bluetooth headset, you can operate in SSB mode with ease. For those interested in CW, the app includes an integrated Keyer and CW decoder. Additionally, you can engage in FT8/FT4 and other modes using the built-in decoding tools, eliminating the need for external software and cables.
1.2. Local or Remote
K4-Control allows you to connect to your radio either locally on your home network or remotely from anywhere in the world, without the necessity for additional hardware or software. No server, PC, or Mac needs to be running — simply connect your radio using a LAN cable to your local network for seamless operation.
1.3. Troubleshooting
Should you encounter any issues, please refer to the Common Issues section of the manual first. If you’re unable to find a solution there, feel free to use the app’s Contact Developer feature to reach out to me for assistance. I am always ready to help.
2. The manual
This manual explains how to setup your Radio and the app and how to work with the app. Where possible and where it makes sense, the app uses the same abbreviations and terms for buttons and menus that are used by Elecraft for physical knobs and Buttons on the Touch screen.
This manual can be opened from inside the App or directly following this link: https://go-to.me/k4-control-ios-manual .
If you prefer a printed version, just tap here. This can also be used to save a PDF file of the Manual.
But please keep in mind, that this manual will be updated from time to time.
2.1. iPad and iPhone Version of the App
This app is compatible with both iPad and iPhone. If you purchase the app on one device, you can download it for free on the other device. However, the macOS version requires a separate purchase because it is a completely different application.
The app synchronizes settings and logbooks across devices, including your Mac.
This manual primarily displays iPad screens, but the iPhone interface is very similar in appearance and functionality. Where necessary, specific differences for the iPhone will be highlighted, sometimes accompanied by iPhone screenshots.
3. Requirements
K4-Control for Elecraft can be used with the Elecraft K4 Transceiver.
Note
The K3 or other radios are not supported.
Your radio needs to be connected to your local network using a LAN cable.
Your iPad or iPhone must be connected to the local network, which typically happens automatically as the iPad and iPhone uses WiFi to connect to your home network.
Any iPhone or iPad can be used, including all models and variants (such as standard, Plus, Pro, Pro Max, Mini, Air, and Pro).
The minimum requirement for the app is iOS 18. The app will always support the latest iOS version, so updating to the most recent iOS version is highly recommended.
Once you have purchased the app on the App Store (thank you!), you can use it on multiple iPads for any number of radios you own, without any additional charges. Just ensure you are using the same Apple ID across all your devices. The app also supports family sharing, allowing family members, even with different Apple IDs, to use the app without extra charge.
4. Setting everything up
To utilize the app, you must first configure your Elecraft K4 for remote access.
4.1. Setting up the Radio
First, connect your radio to your local network using a LAN cable. Insert one end of the cable into the socket on the back of the radio labeled LAN. The other end should be connected to a network switch or directly to your Cable/DSL modem.
Start the K4 as usual and hit the Globe Icon on the left bottom side right of the Help (?) Icon.
If you don’t see the Server Settings screen, tap on Server Settings.
Enter a password of your choice which will be needed to connect remotely to your radio.
Adjust the Max Clients as desired. This is the number of concurrent remote connections.
Close this screen.
Next, tap on Menu and scroll until you see the IP Address setting. Take down this IP Address.
Once these settings have been set and you have noted the IP Address, you are ready to connect to your Radio locally via WiFi from your iPad.
For connecting to your Radio remotely, over the internet, some additional settings are necessary which are described in a separate chapter Remote Access .
Hint
If you encounter any issues while setting up your Radio, please refer to the Common Issues section of this manual.
Note
At least Radio Firmware R37 is required. Beta versions are not supported.
4.2. Adding the Radio to the App
Once your Radio is configured, open the app.
Note
If prompted for microphone permission, please grant it by clicking Ok, and do the same for any notifications regarding recent updates.
Click on Connect or the center of the screen to open the Radio chooser, which will initially be empty. Click on Add to enter details about your K4:
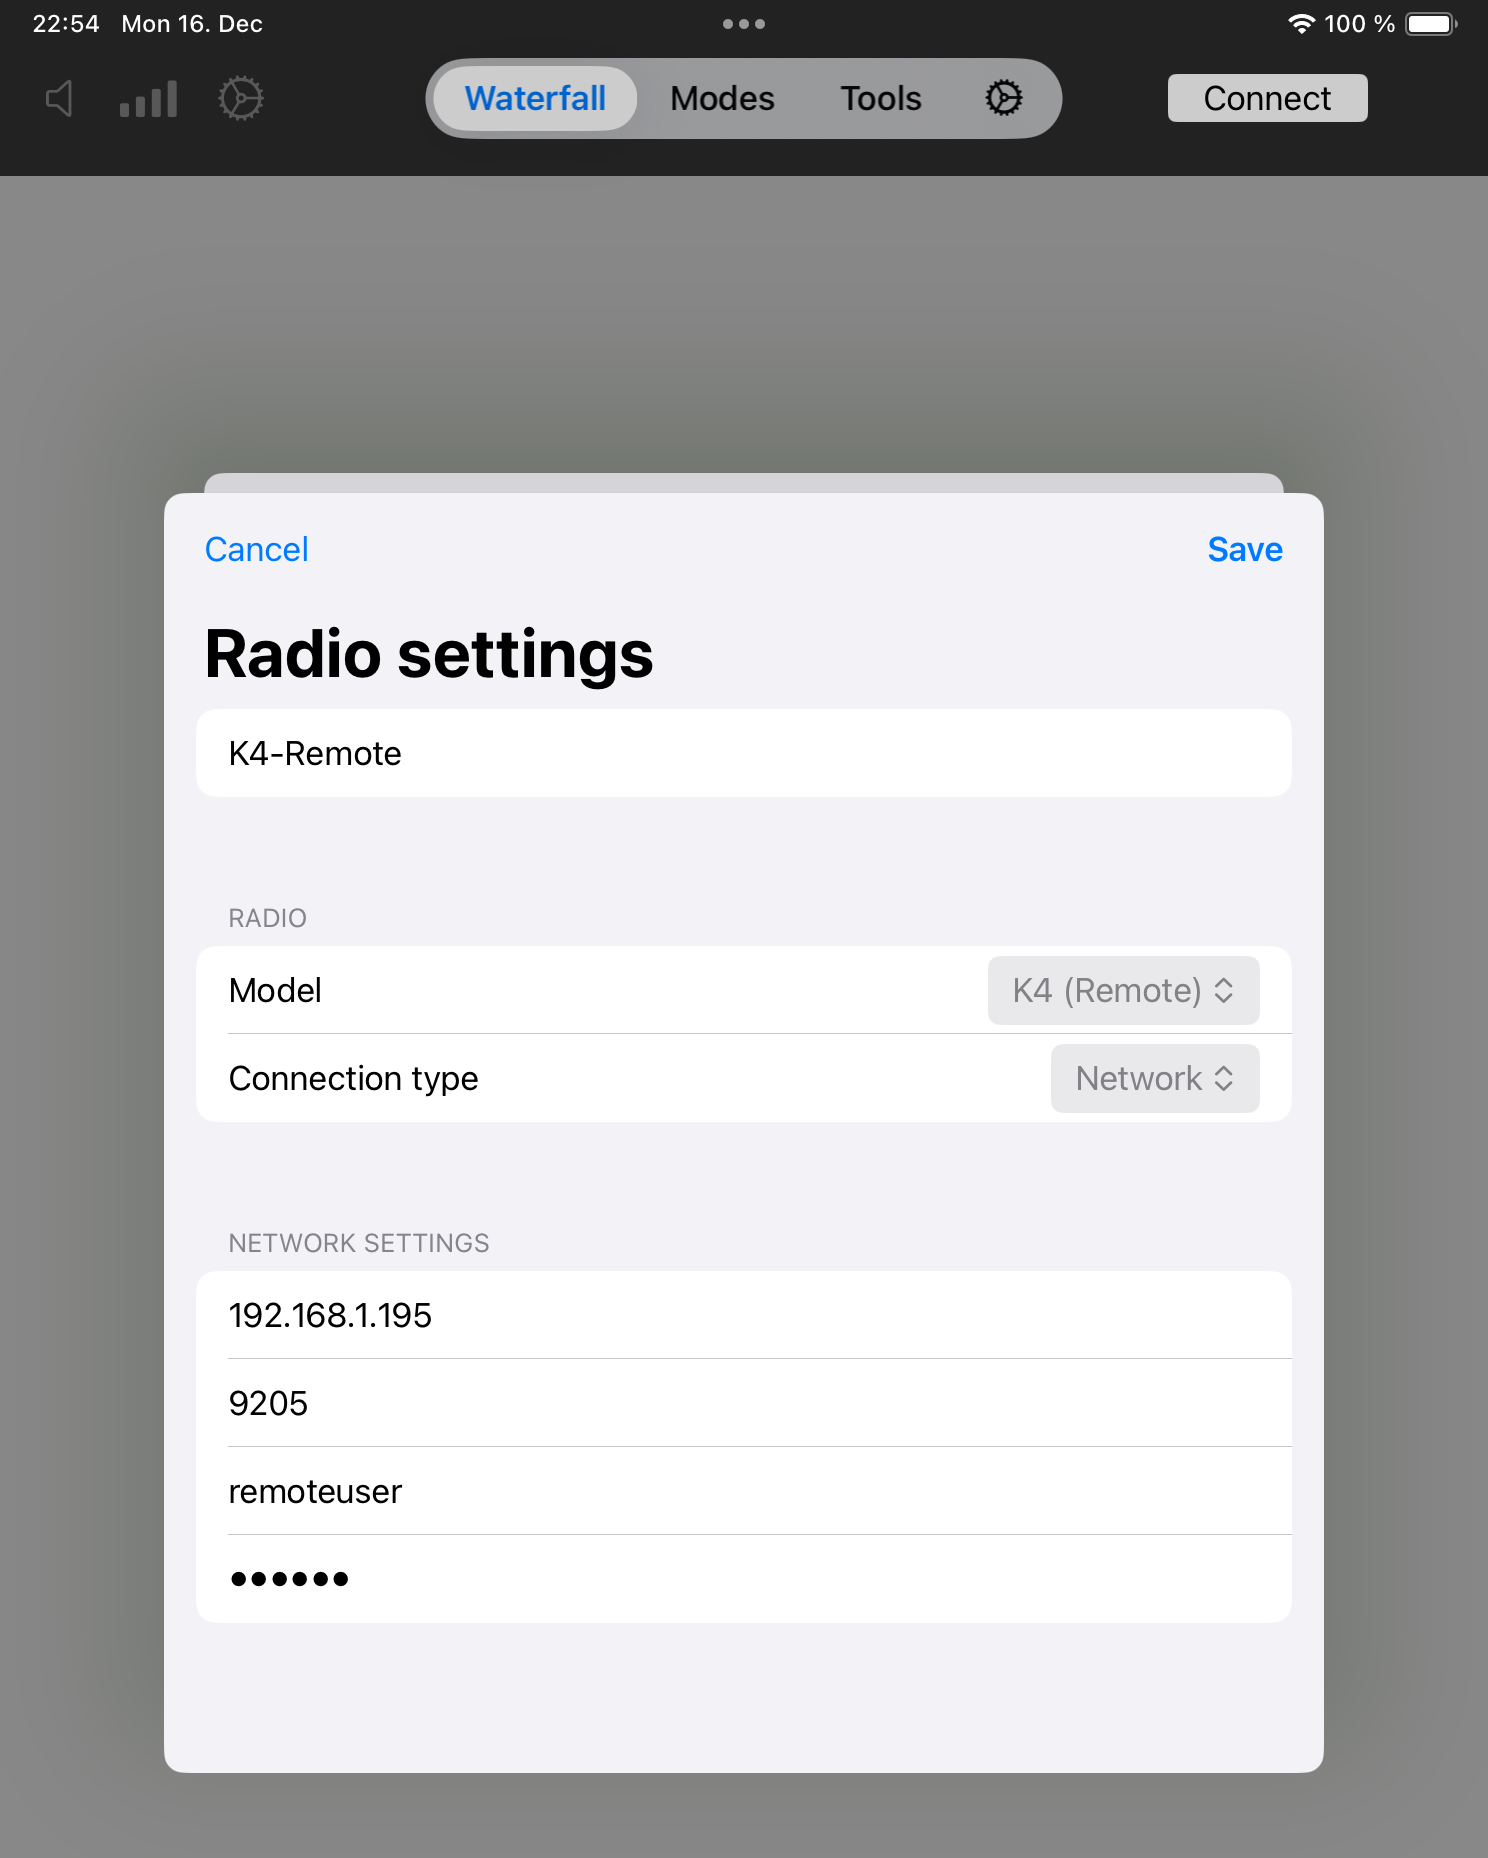
Here, select K4 (Remote) as Model and input the IP Address noted during the previous Radio setup.
For Port enter the number 9205
The Username field can stay blank / empty.
Enter the Password you just assigned to the K4.
After clicking Save and returning to the previous screen, you will see your newly added Radio listed.
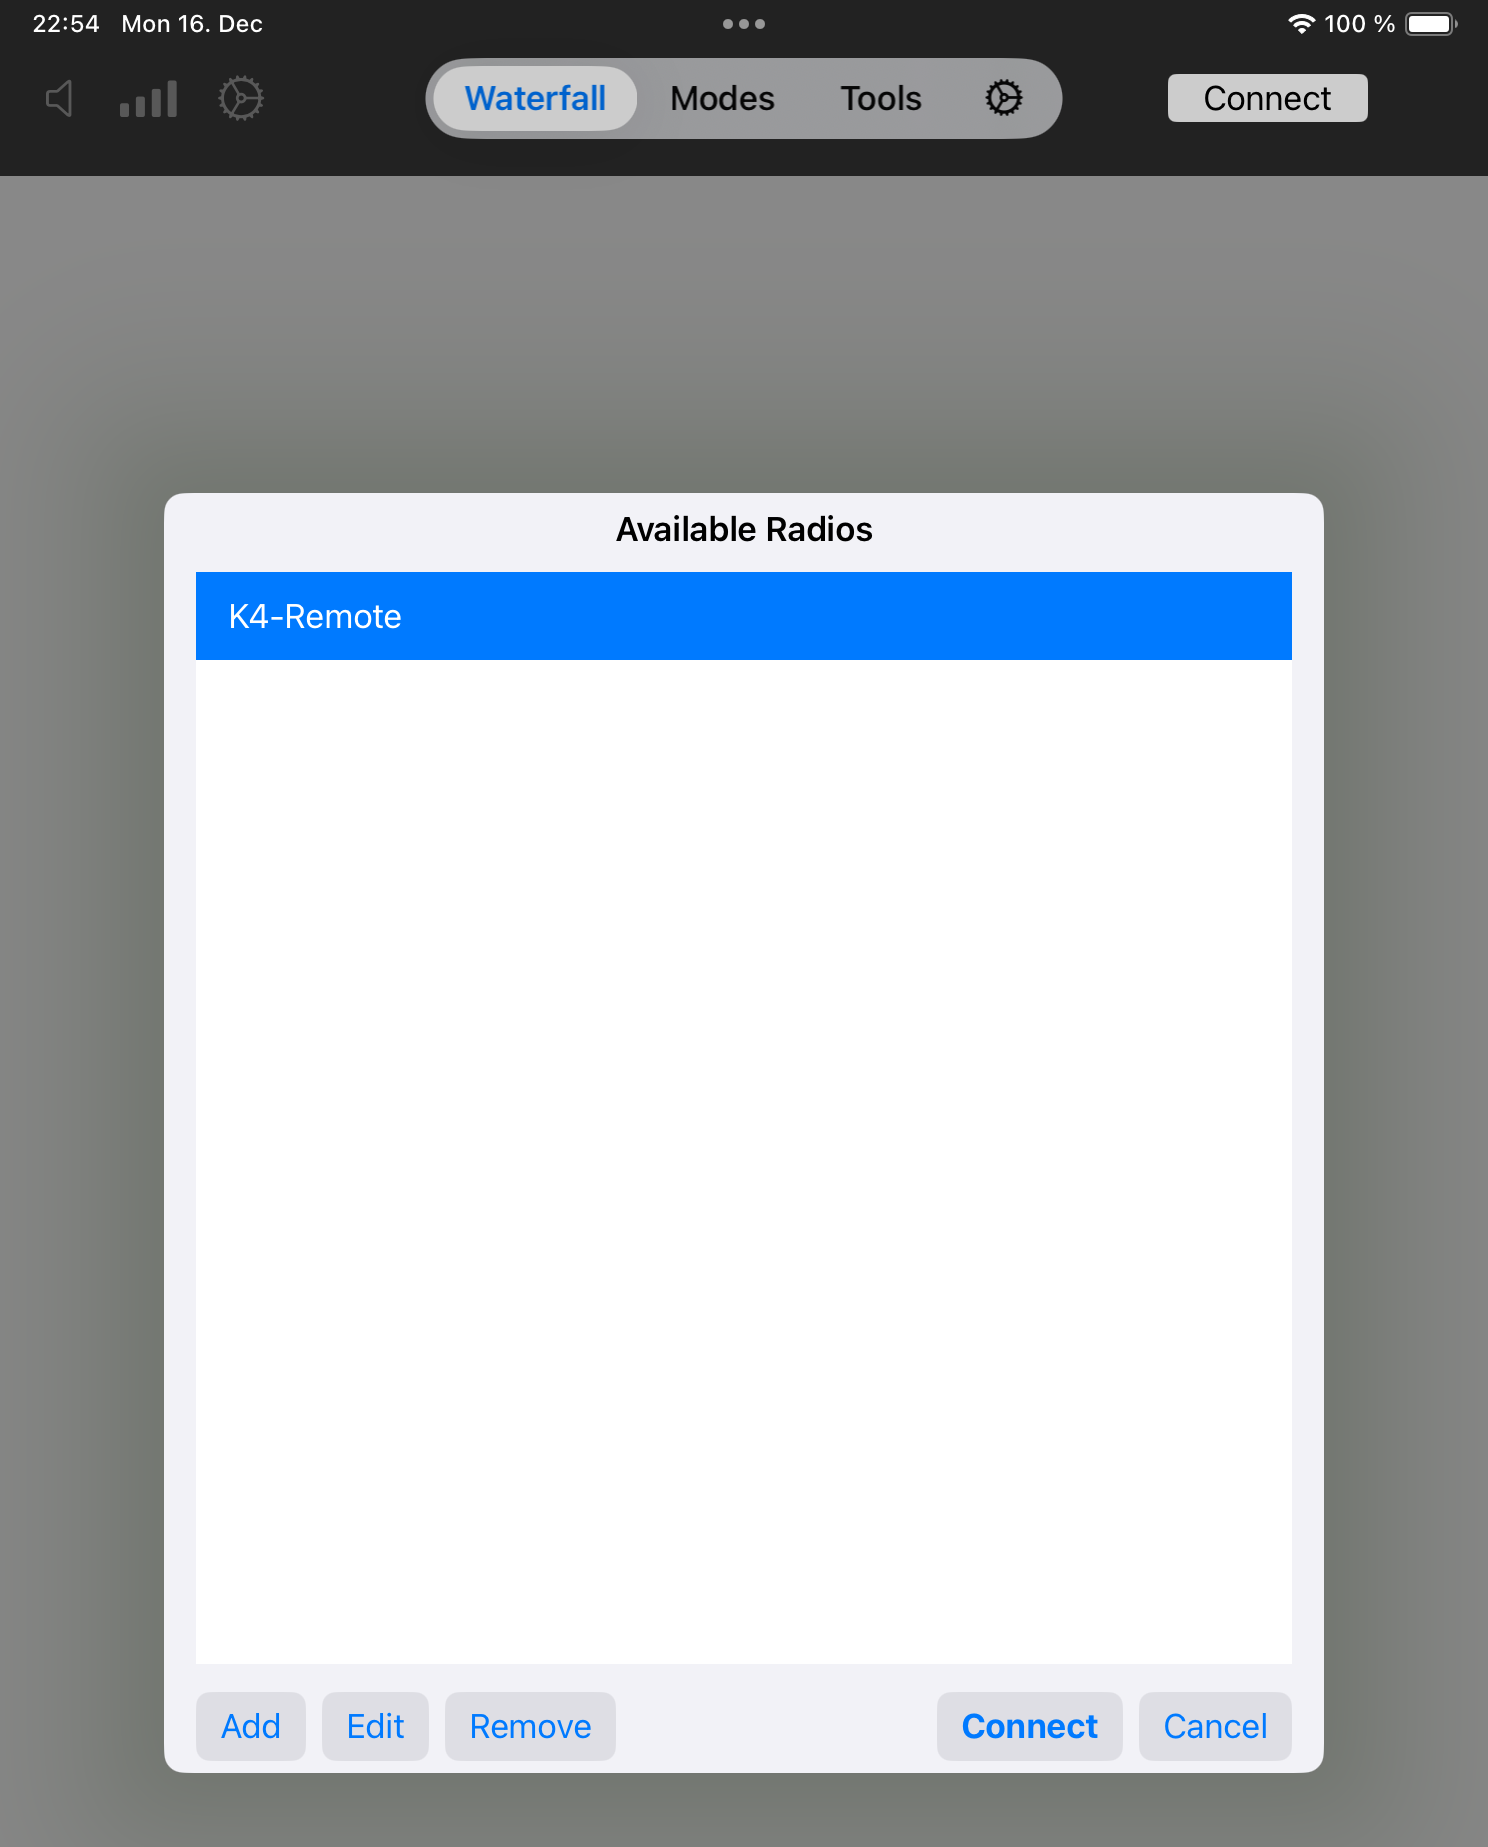
To connect, simply select (highlight) the Radio entry and click on Connect – or double-click on the listing.
5. The Main Window
After connecting to your radio, you will see the main window which includes all the frequently used functions for controlling the radio and the waterfall display, as shown below:
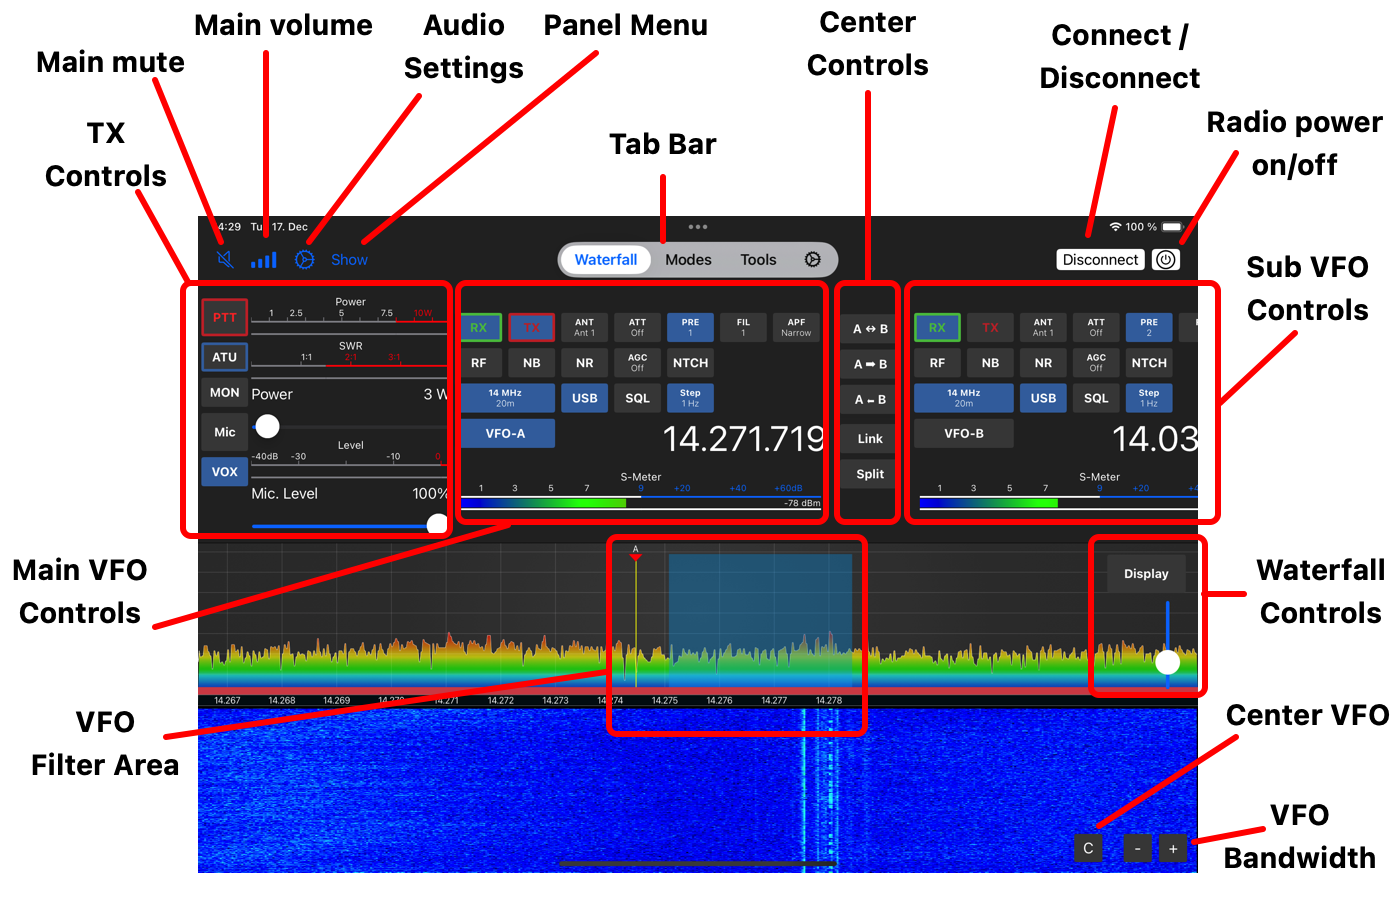
The main window is divided into various sections, each with buttons, sliders, and meters.
Most buttons are labeled the same and function similarly to the physical or software buttons on the radio, and for this reason, they are not explained here in detail. Other buttons are unique to the app and will be explained below.
5.2. TX Controls
The functions of these buttons are mostly self-explanatory. The Mic button toggles the use of the local microphone, which is selected in the Audio Settings of the app.
Long tapping the power meter allows you to switch this meter with others, such as ALC, Compressor, etc.
5.3. Main VFO and Sub VFO Controls
The two VFOs are referred to as VFO A and B.
The K4 supports simultaneous adjustments for both VFOs.
Tapping on the frequency display opens a screen for direct frequency input. Remember to enter the frequency in MHz or kHz, according to the app’s settings.
5.4. Center Controls
These buttons mimic those found on your radio and primarily manage the relationship between the left and right VFO. For example, the A <> B button swaps the left and right VFOs.
5.5. Waterfall Controls and the Waterfall Display
The slider at the top right of the Waterfall section adjusts the waterfall reference level.
Tapping the S.Menu button opens various scope settings, akin to the S.Menu on the radio.
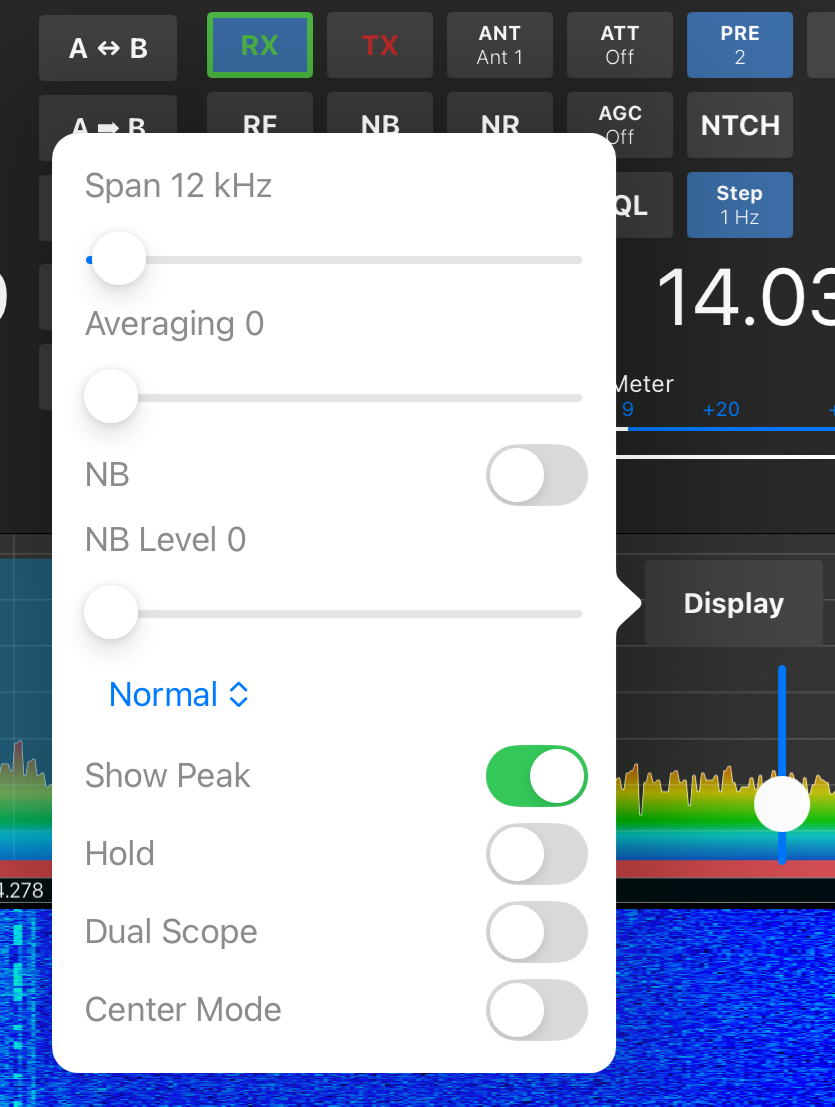
Note
Only the Center mode is supported.
Further details can be found later in the Frequency Tuning section of this manual.
5.6. Tab Bar
Using the tab bar, you can switch between the main radio waterfall window, mode tools like FT8 or the CW Decoder, tools such as the logbook, and the settings screen.
The tab bar remains visible at the top, allowing you to easily switch back and forth between these app sections.
7. Settings
In this app, you can maintain different types of Settings. First, there are general App Settings which are App and not Radio specific such as your HAM Radio information like Call-sign, Country, Locator etc. and your credentials for the integrated Call-Sign lookup features. These settings can be maintained from the tab bar Settings (gear) icon.
And there are the Audio settings which can be used to define your Microphone and Speaker source and volume.
7.1. App settings
The App settings can be found under the gear icon in the tab bar.
Most of these settings are self-explanatory. It might be worth to go though these settings and add / select your personal information and preferences.
In the HAM-Radio section, you can maintain your station information. It is important to maintain these settings as they are used for QSO logging and other Tools like the FT8 Tool which needs your QTH-Locator (Grid) for instance.
Under Call Lookup you can maintain your QRZ.com or HamQTH credentials which are used for Call lookup.
In the Information & Support section, you can find the “Contact Developer” button in case you have questions or issues.
7.2. Audio settings
The Audio Settings can be reached by clicking the top gear Icon.
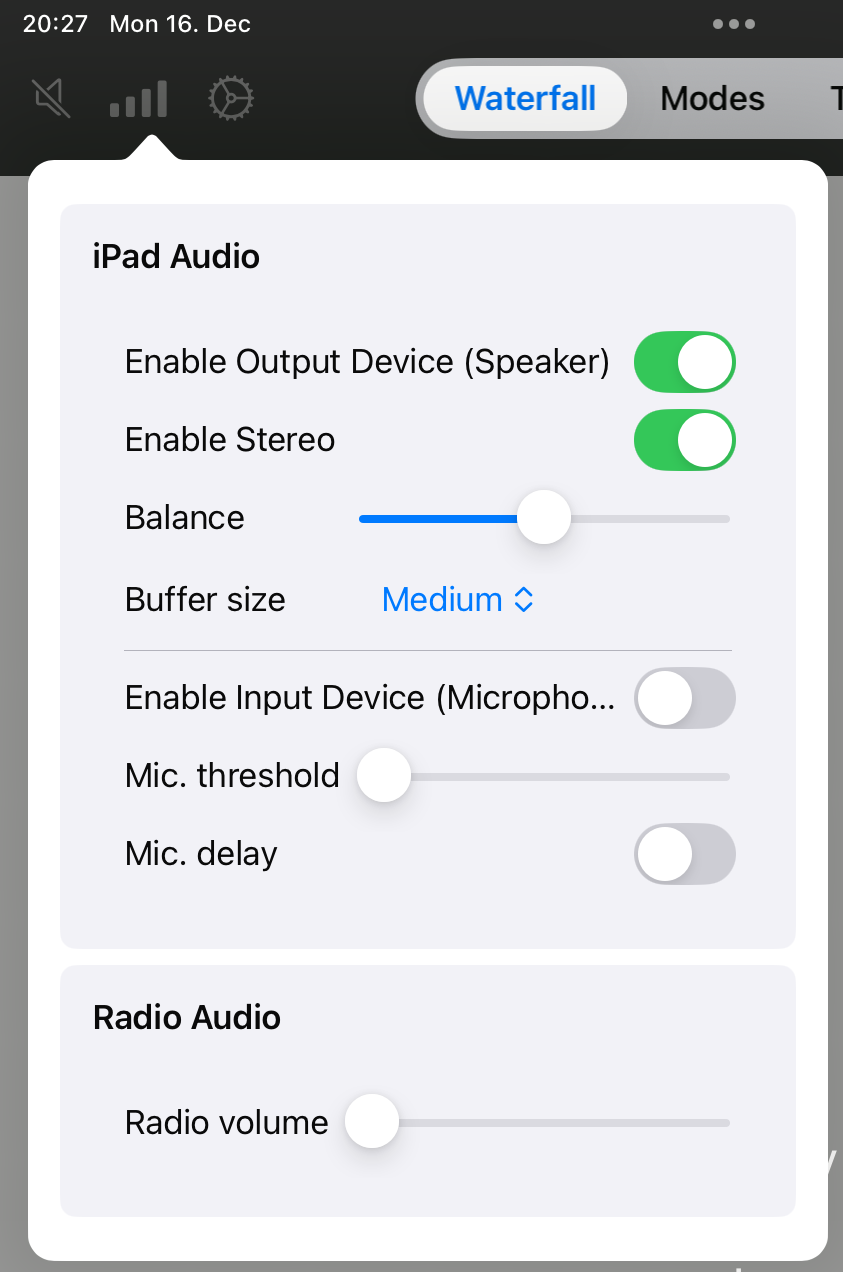
From here, you can enable or disable the iPad speaker or mic for the app.
If supported by the radio, you can enable stereo output and adjust the balance between the two VFO’s.
The Mic Threshold slider lets you mitigate ambient noise interference. Simply raise the slider to the desired level to filter out unwanted background noise.
The Radio volume slider can be used to adjust the volume of the radio’s internal speaker.
Should you experience audio dropouts, consider modifying the Buffer Size setting to improve performance.
Note
If you notice static noise at the beginning of your transmission, activating the Mic Delay setting may resolve the issue. This static is typically residual receive noise captured by the microphone as you start transmitting. If you’re using a headset, this option is generally not necessary and can remain disabled.
8. Frequency Tuning
Frequency tuning is probably one of the main activities when using the App. For this reason, there are several possibilities for frequency tuning:
Move the waterfall to change the Center Frequency. Just tap and move somewhere at the waterfall and move to the left or right
Double-tap somewhere on the waterfall to move the currently active VFO to that frequency
Tap on the VFO Frequency and get an input screen to enter a frequency manually
Use the supplemental Tuning Panel window to fine tune a frequency (Show Menu → Tuning Panel)
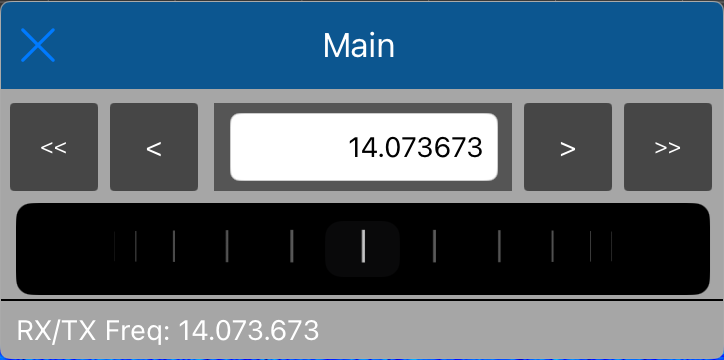
Here you can use the <<, <, > or >> buttons to tune the frequency down or up based on the Step settings.
You can use the tuning wheel for tuning as well. Depending on your personal preference, you can reverse the wheel direction in the app settings.
In addition, you can also tune the frequency by
Attach a Controller like the CTR2 or a MIDI controller such as the DJ2GO2 to your iPad via USB cable and use it for frequency tuning and more
1. Tools
Under Tools of the tab bar you will find several helpful features which are extending this app.
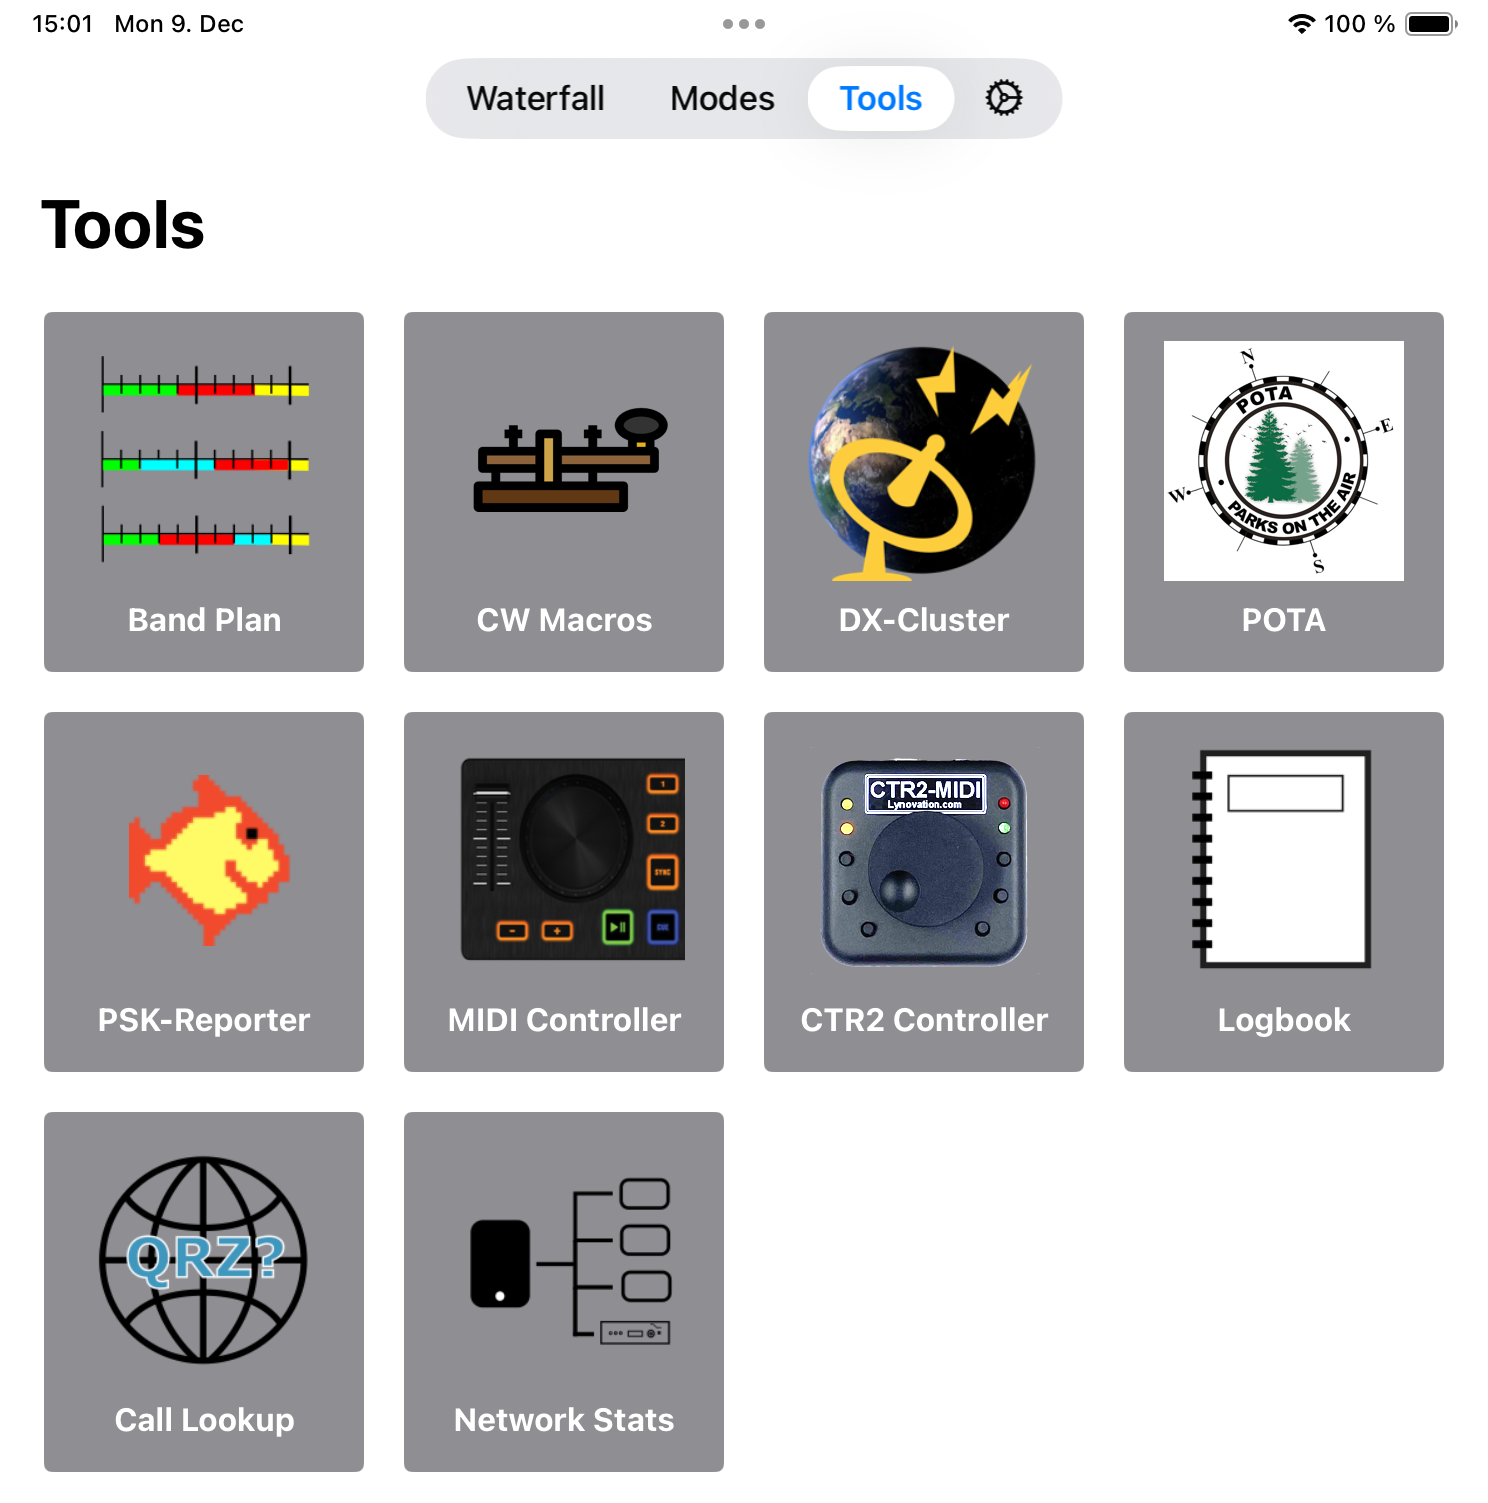
Some Tools like the Network Stats Tool are for informational and debugging purposes. Some Tools like the MIDI Controller will add additional controlling capabilities to the App. Other Tools like the Logbook can even be used separately, without being connected to the Radio but all Tools are fully integrated and work seamlessly together with the App and your Radio.
2. Band Plan
The Band Plan tool provides a frequency overview of all HF HAM Bands for your particular region as well as the modes and maximum bandwidth as suggested by the IARU.
Note
You need to select your particular IARU region under the app Settings in order to see the correct Band Plan for your region.
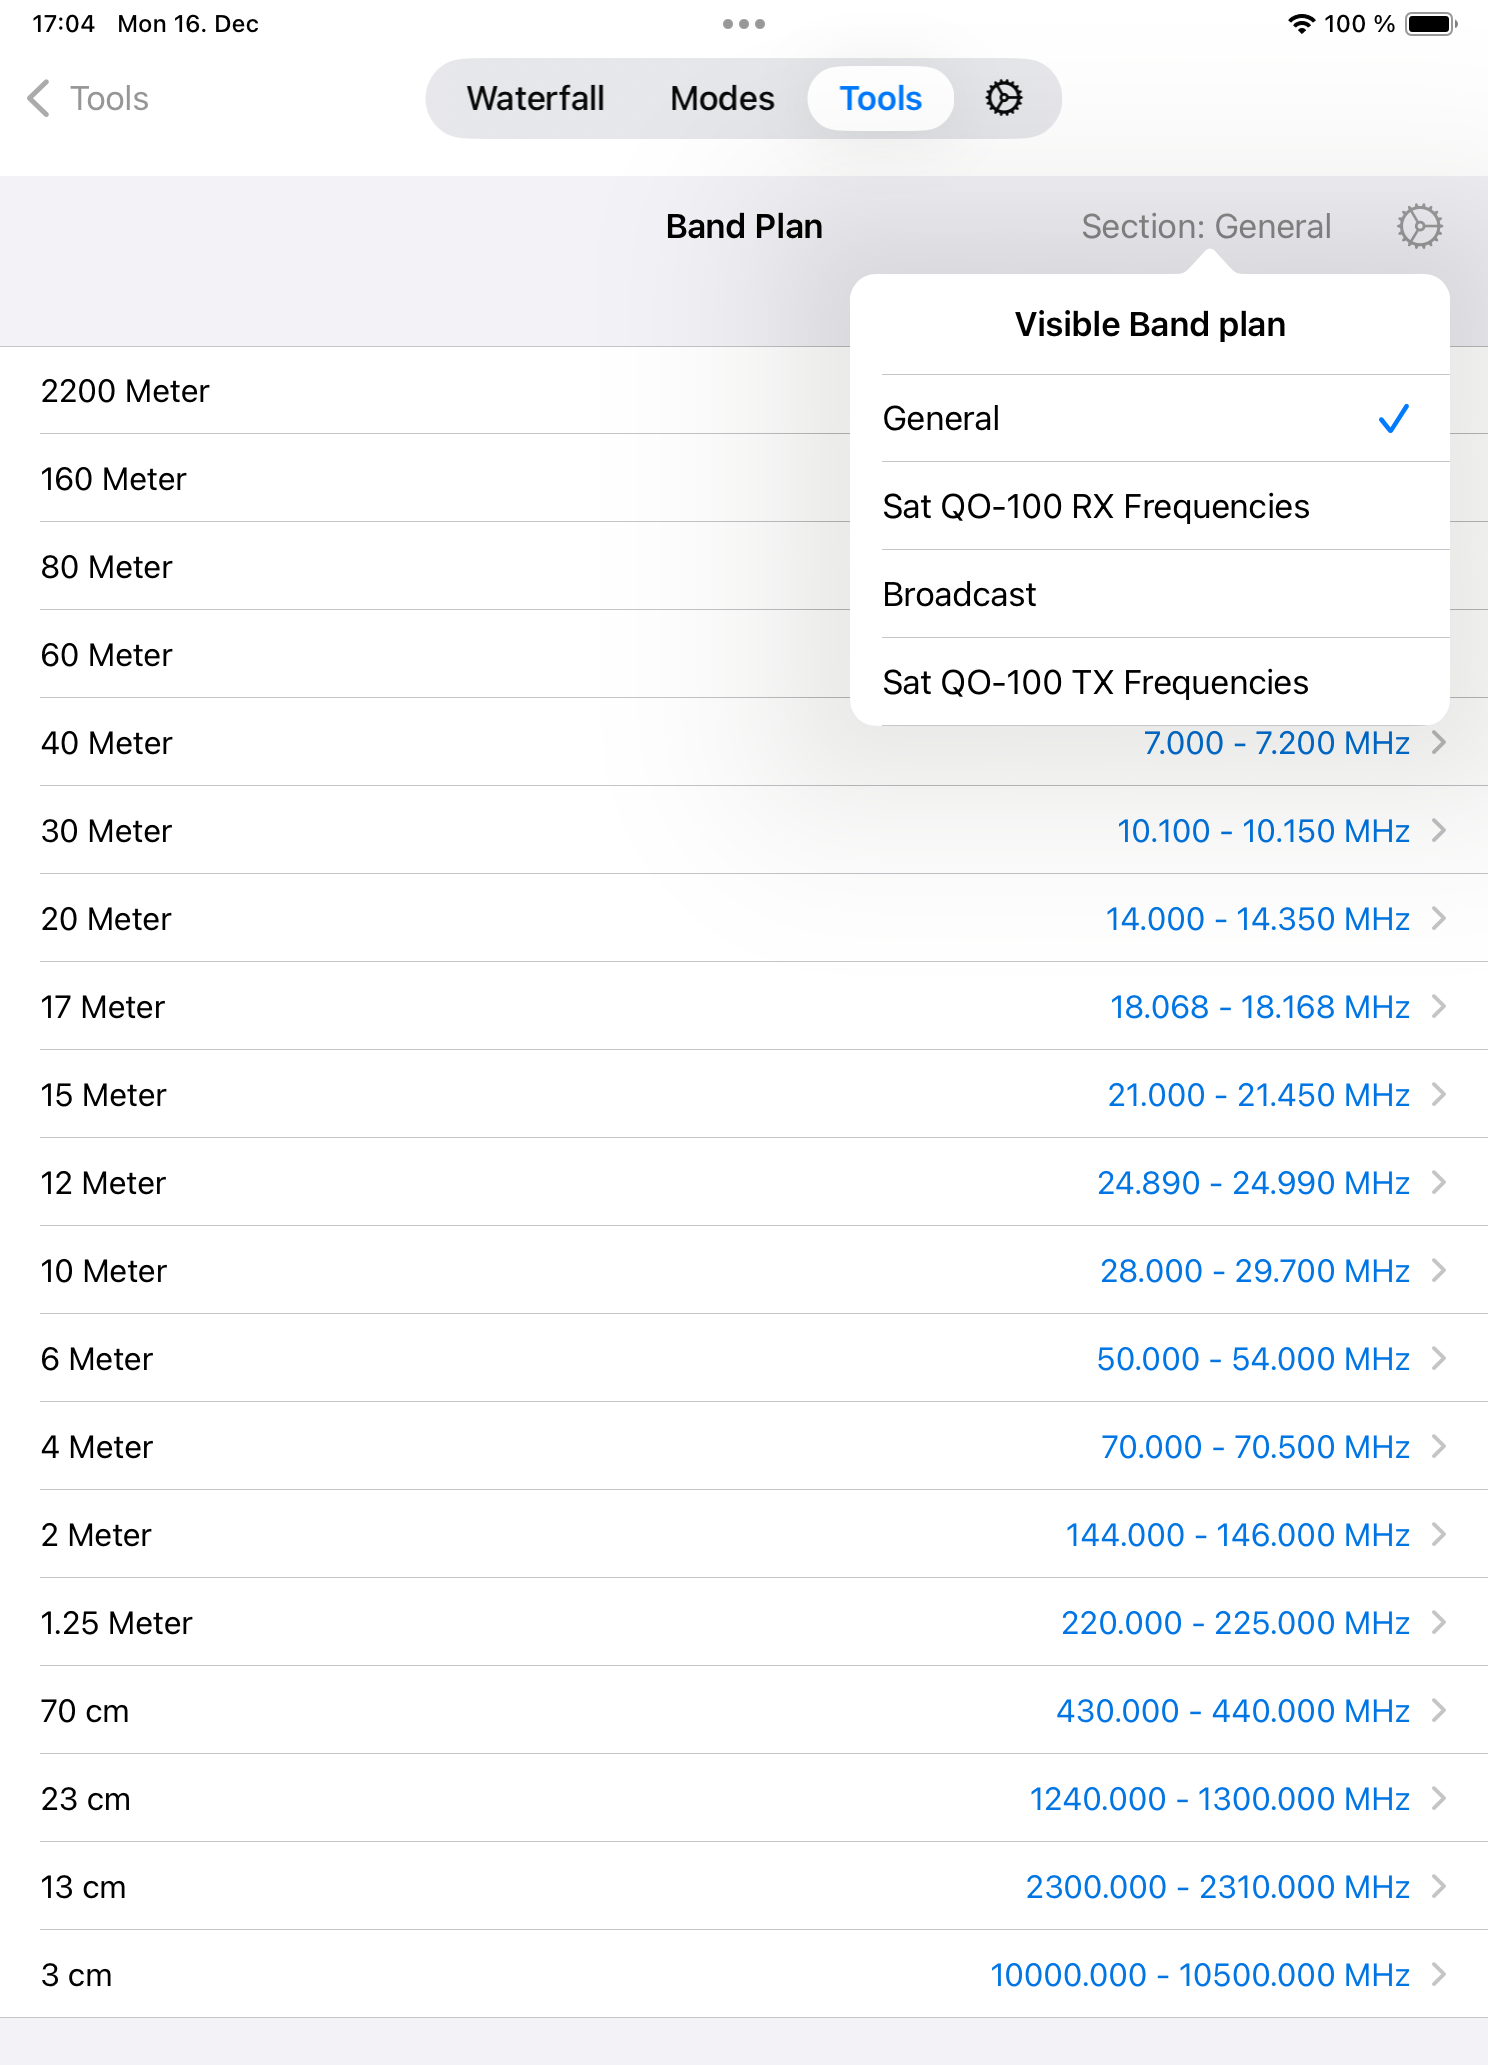
At the top, you can select if you like to see the General or QO-100 Sat Band Plan, which is also included.
If you tap on a band, you can see more details for the selected band.
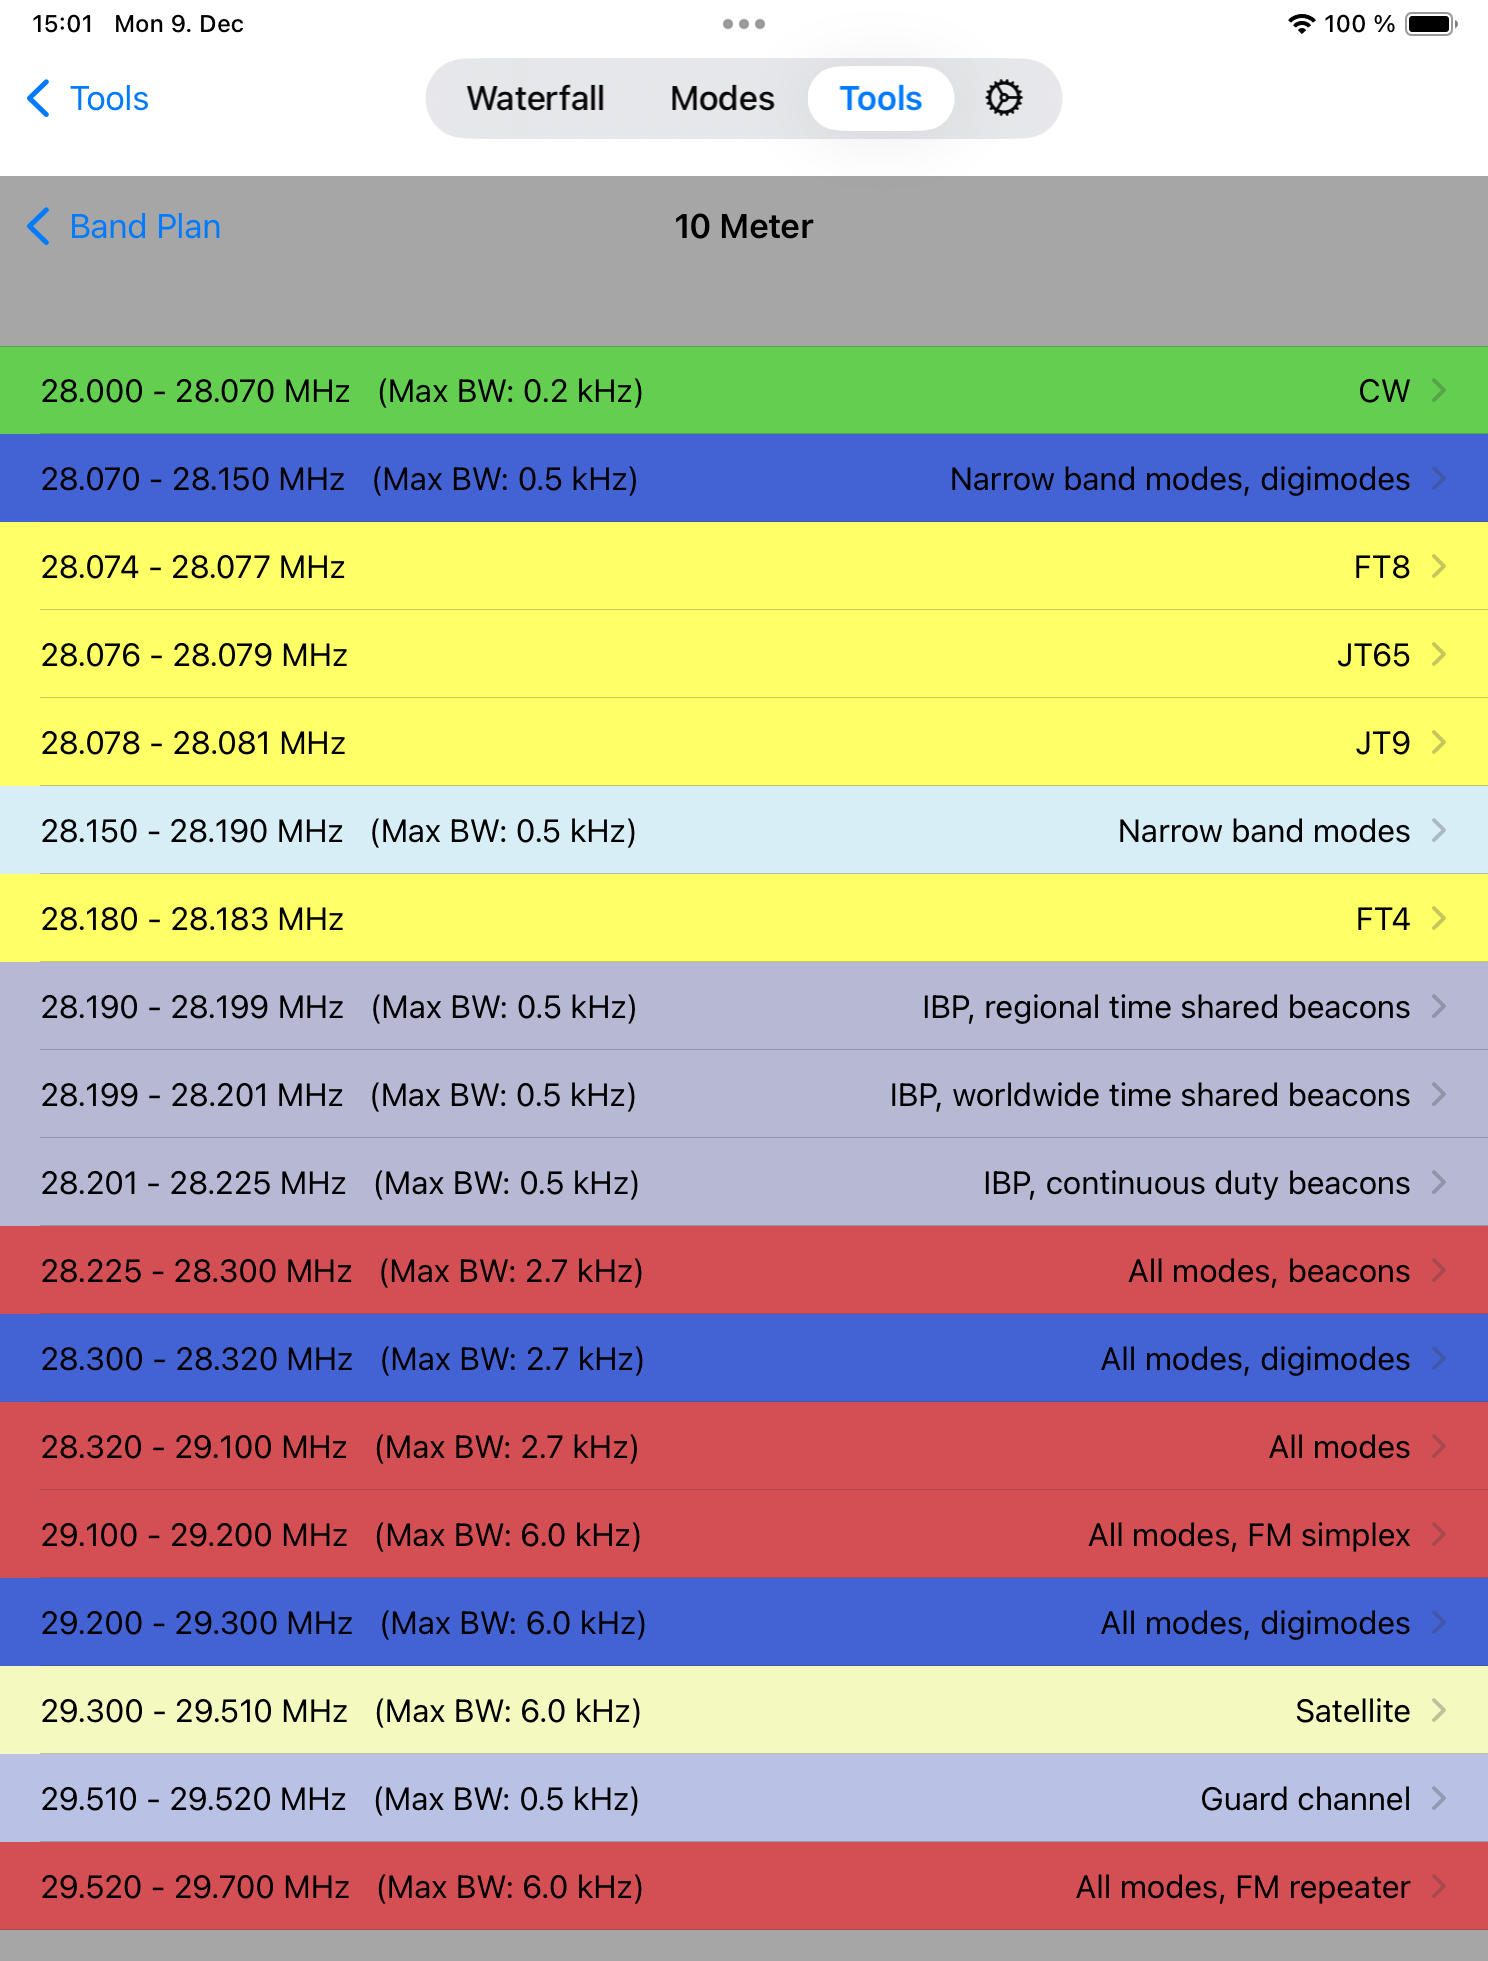
If enabled under Settings, the Band limits and modes will be visible within the Waterfall as seen below:

The “10 Meter >” information represents the Band limits information and the colored line represent the various modes like CW (green), Digimodes (blue), Narrow modes (Cyan), All modes (red), Satellite (yellow), others such as Beacons or guard channels (gray).
3. CW Macros
It is possible to create CW-Macros for your CW QSOs. After opening the CW-Macros tool, you can maintain up to ten different macros which can use Placeholders like {MYCALL} which will be replaced before the Macro gets sent.
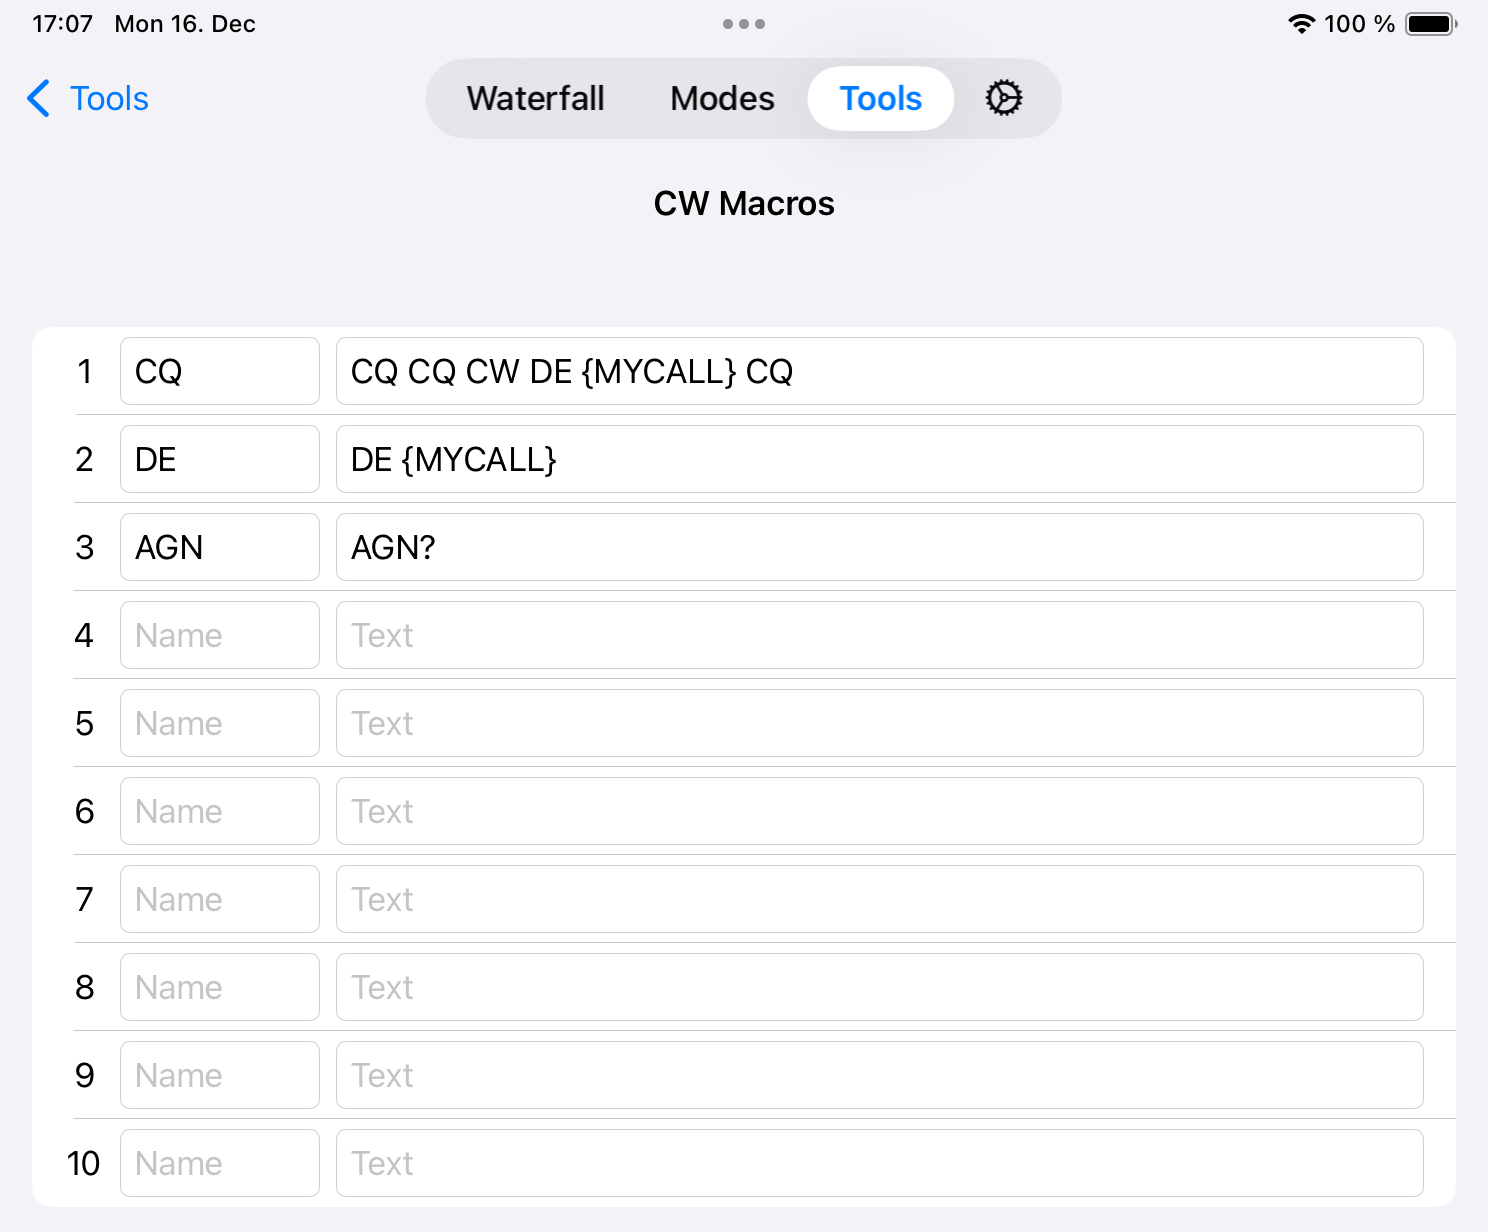
A list of available Variables can be found in the Attachment of this manual.
To use CW-Macros, you can open the supplemental Macros window (View → Macros) for easy access as seen below.
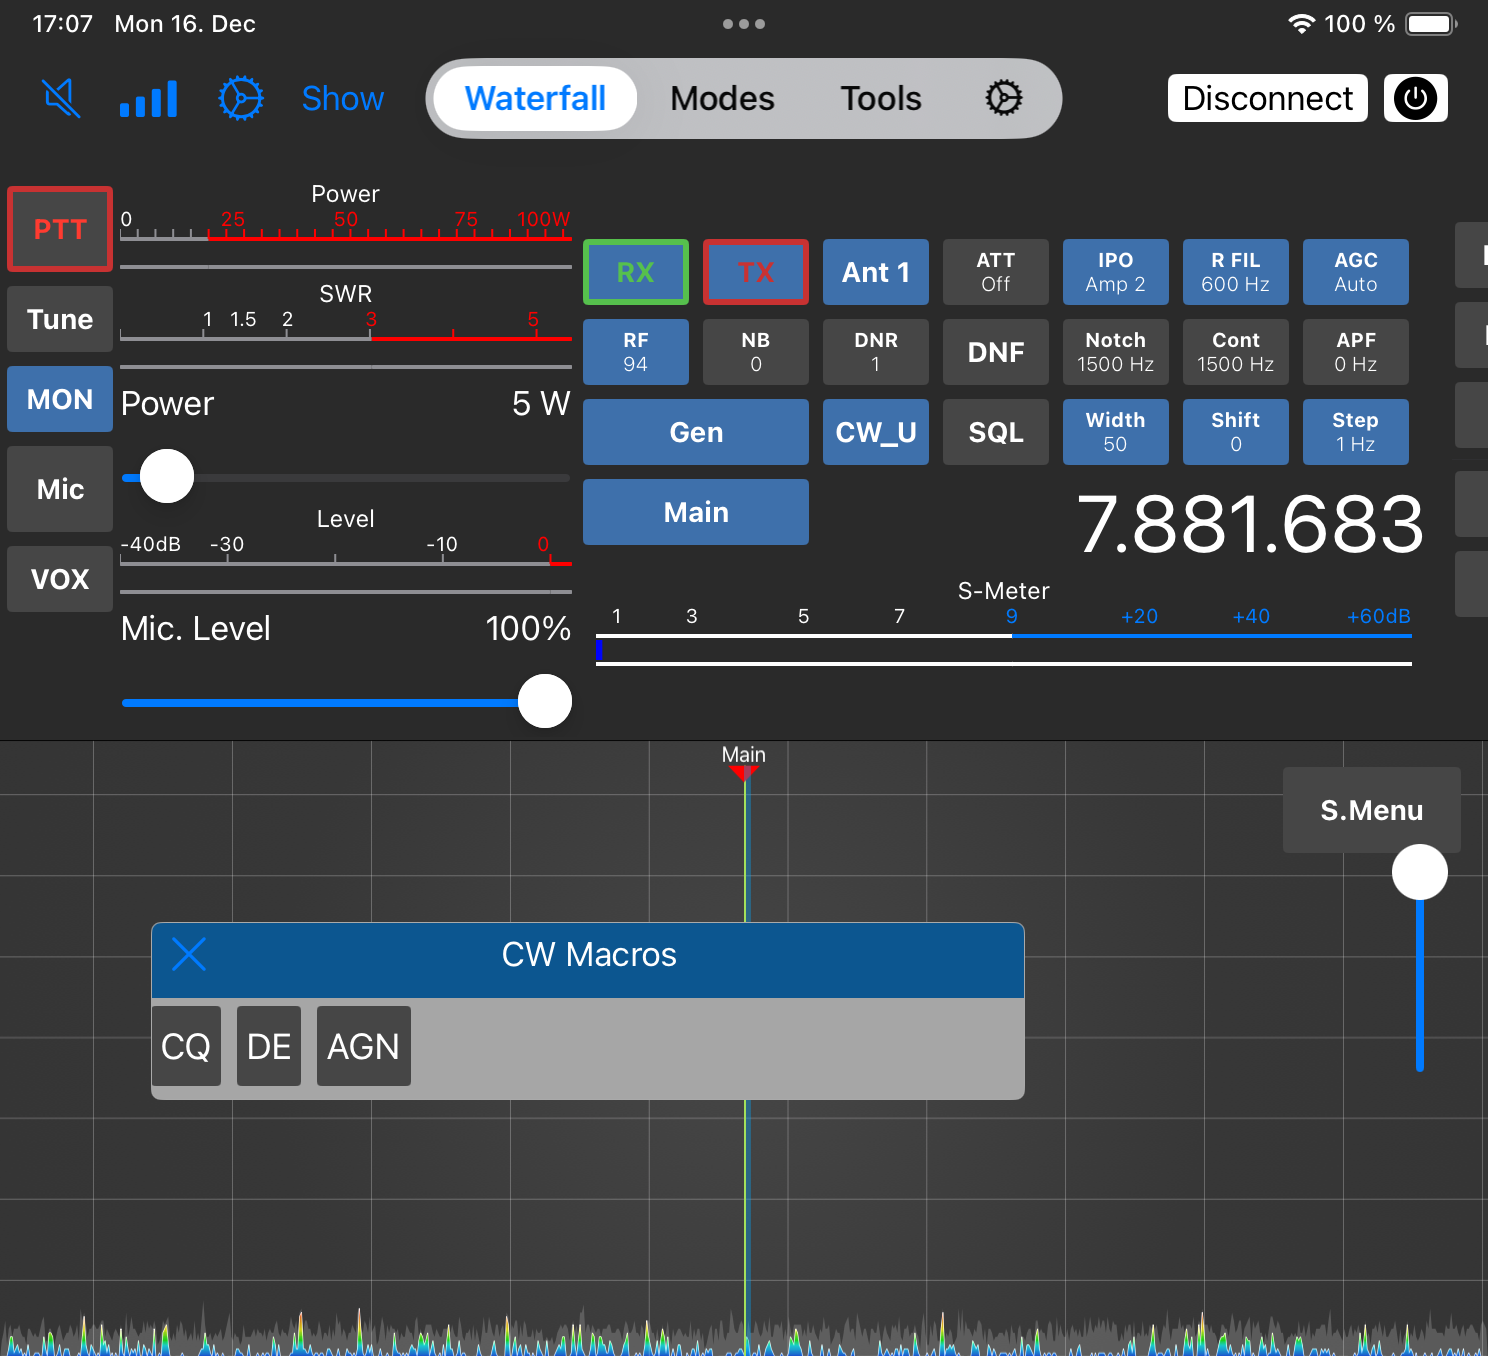
For CW Macros, you can send pro-signs like BK by using the ^ prefix character (e.g. ^BK).
Macros can also be sent using a physical keyboard and pressing the keys 1 to 0 along with the option key or a MIDI controller.
4. DX-Cluster
The DX-Cluster Tool connects to any of several pre-defined worldwide DX-Cluster Databases or even your local CW-Skimmer and displays results (Spots) directly on the Waterfall or let’s you directly jump to the frequency of a particular Spot by just tapping on an entry in the list.
After starting the DX-Cluster Tool, you need to click on Start to start querying the selected DX-Cluster server.
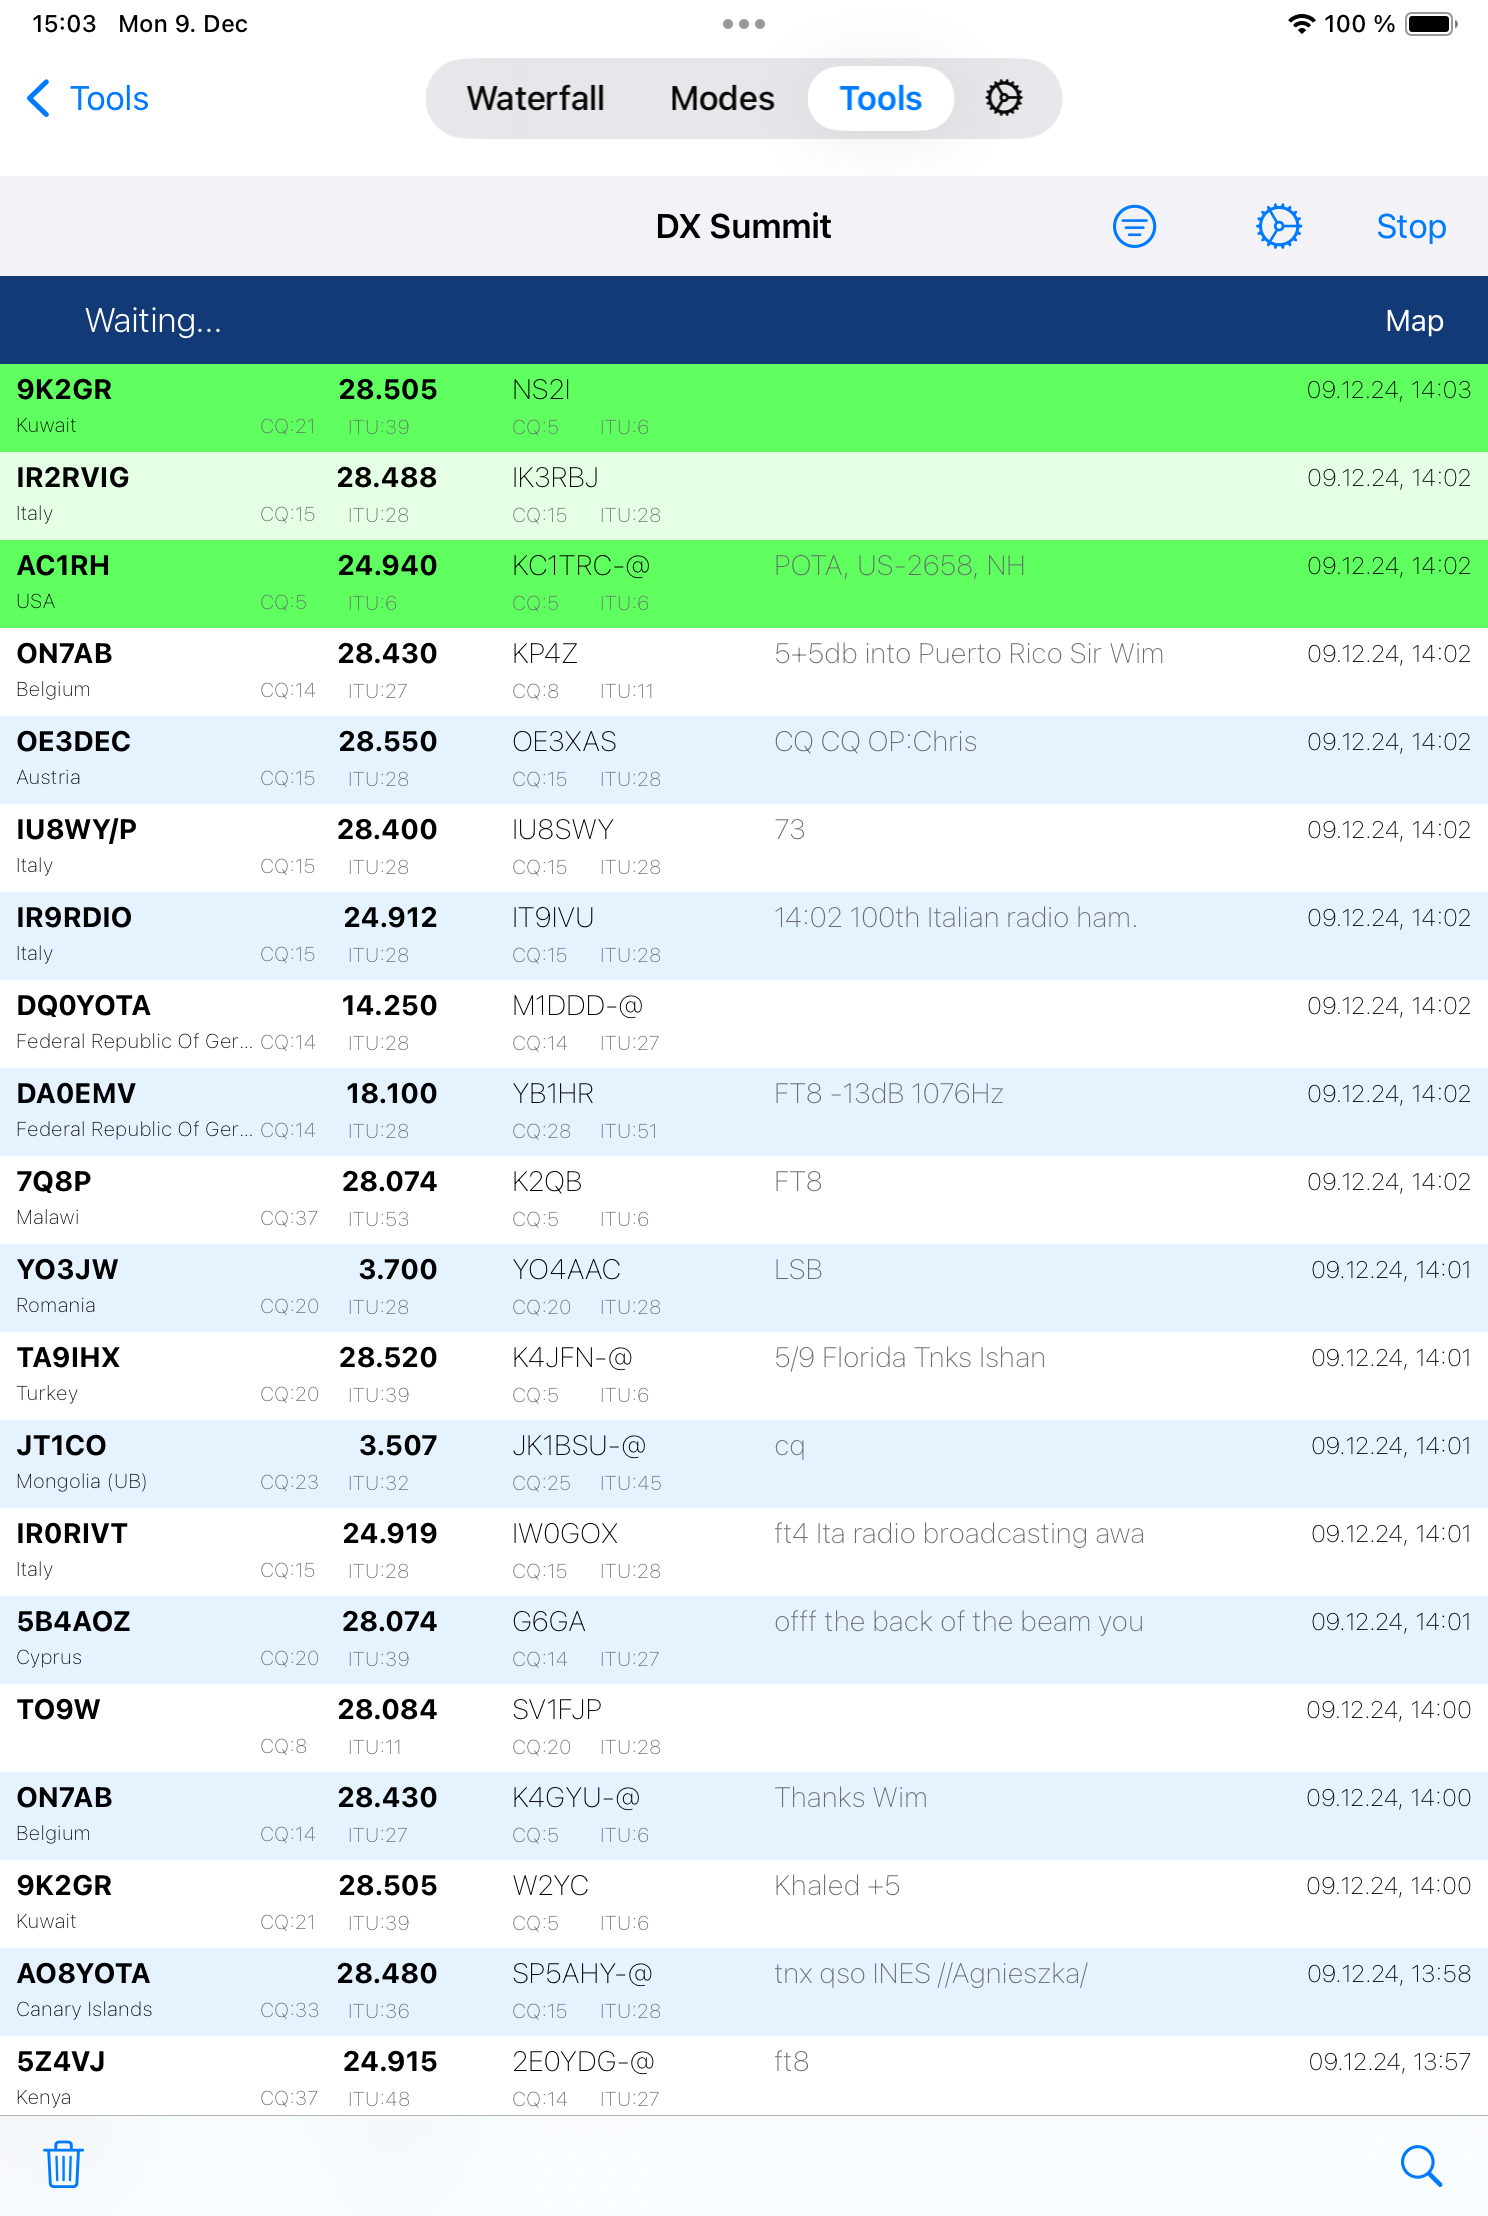
If you double-tap on a line in this list, the Transceiver will tune to the particular frequency of this spot.
If you single-tap a line, you will see more details about the Spotter and Call.
Tapping on the Filter Icon at the top will show the various Filter options:
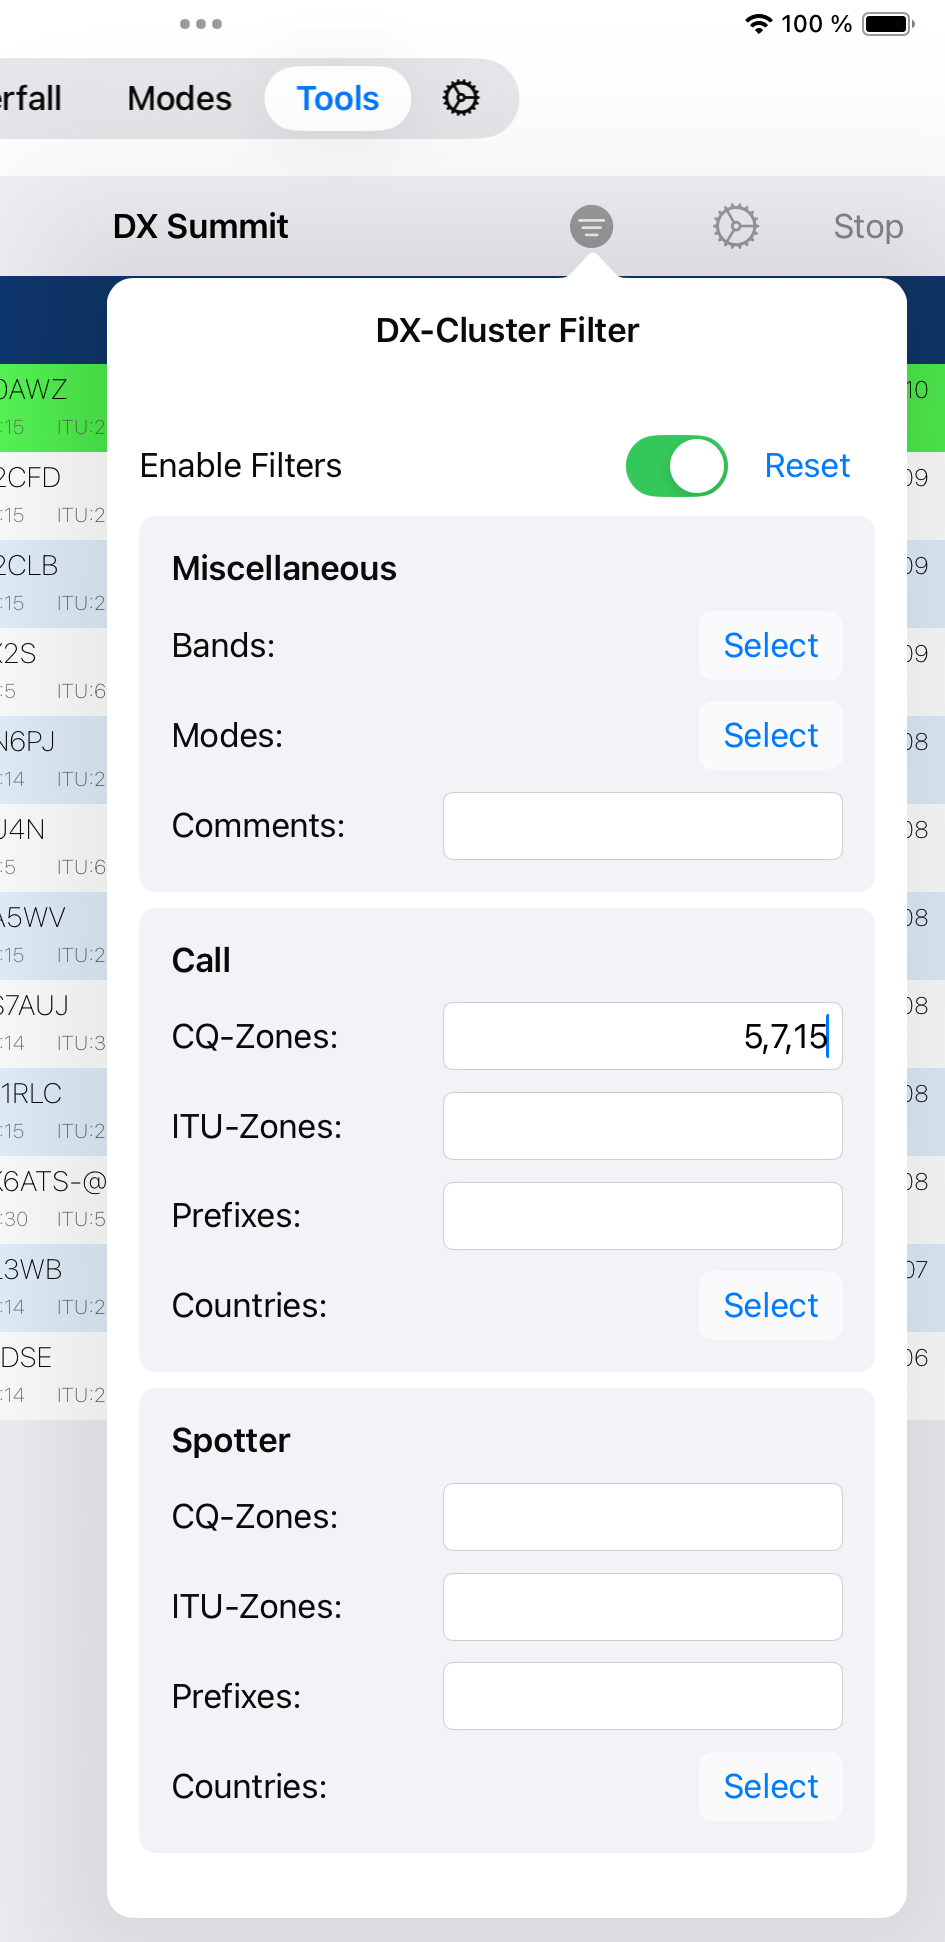
Here, you can select the Bands or Modes or Countries you are only interested in or enter CQ-Zones, ITU-Zones or prefixed of Spotter or Calls you only want to see. For those you can enter multiple values, separated by comma.
At the top of these filter settings, you can either enable or disable these filters.
The Settings menu will let you alter several options of the DX-Cluster Tool. From here, you can select a one of the predefined servers or add your own by clicking the Add button.
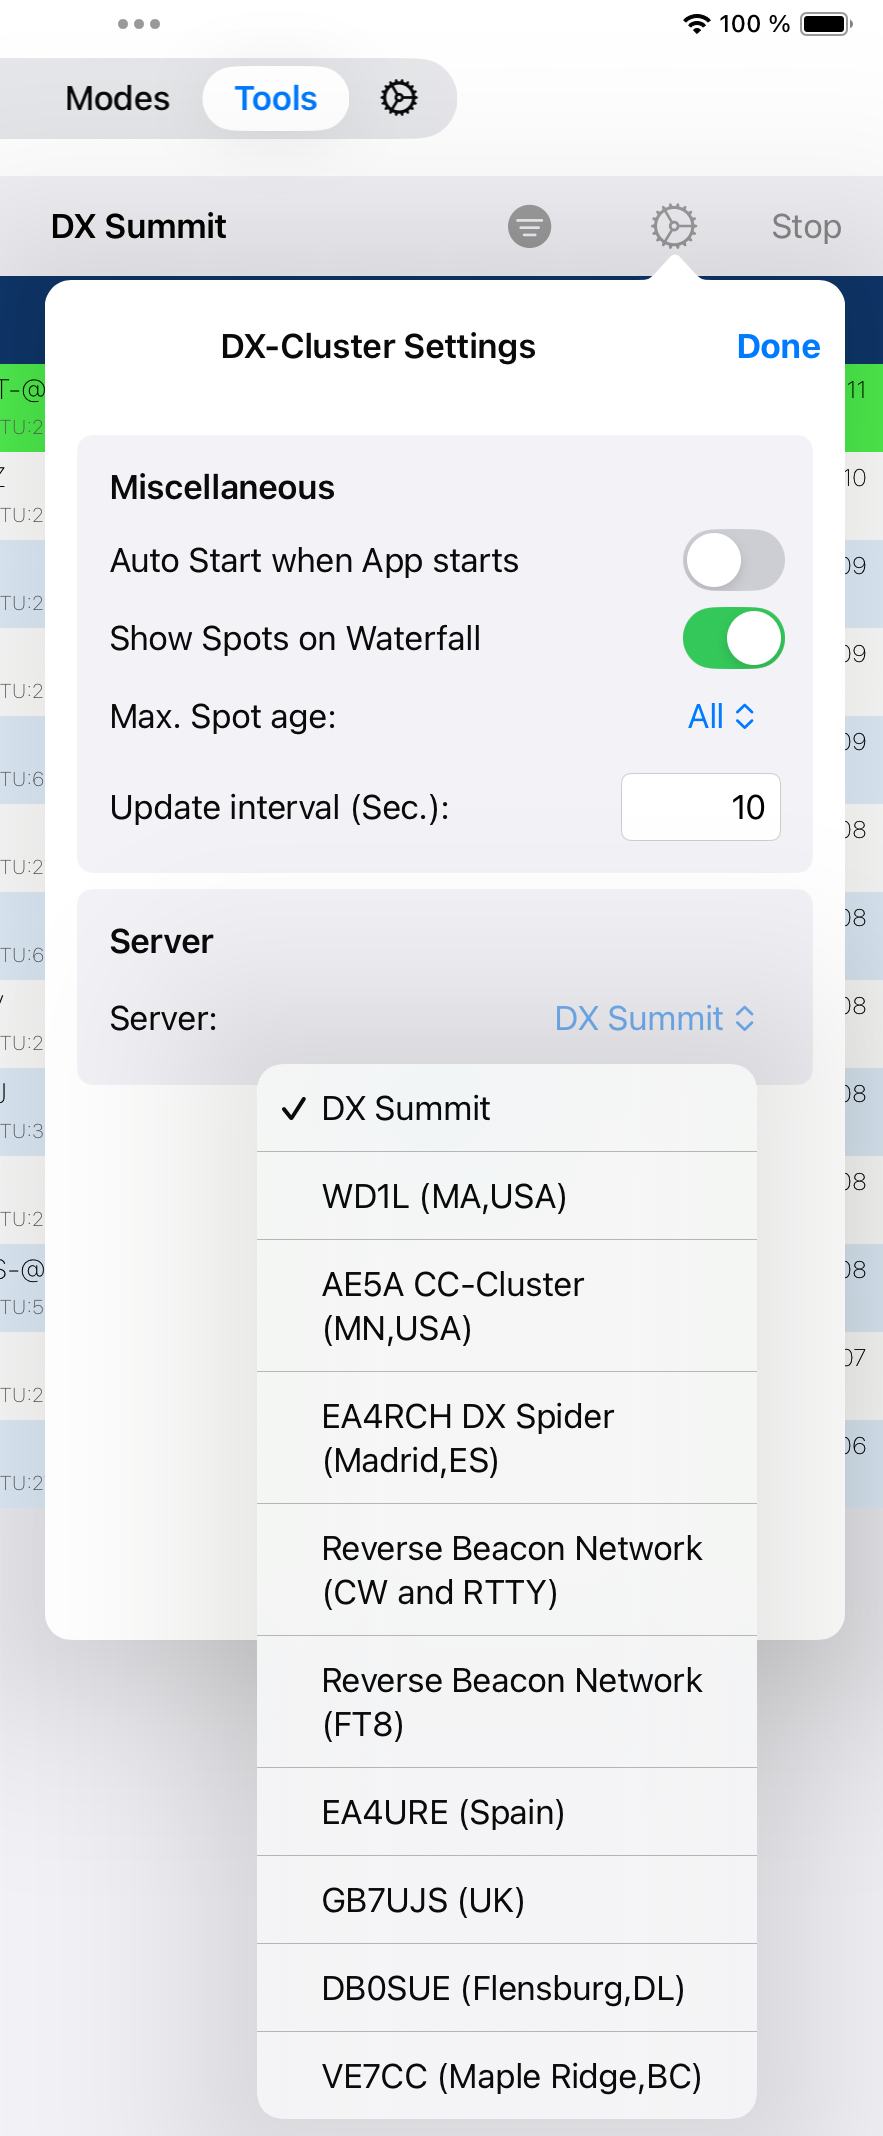
Note
When adding a new server, some servers require a login which is usually the call sign. This will get sent automatically if entered. If additional information needs to be sent, you can enter this information in the initial command field. A \n can be entered to send a new line. Some servers allow to use the initial command sh/fdx 100 to let the last 100 spots to get sent along with the first connection. To submit this command to the server uppon connection, enter \nsh/fdx 100\n as initial command (note the slash and backslash here).
4.1. Map
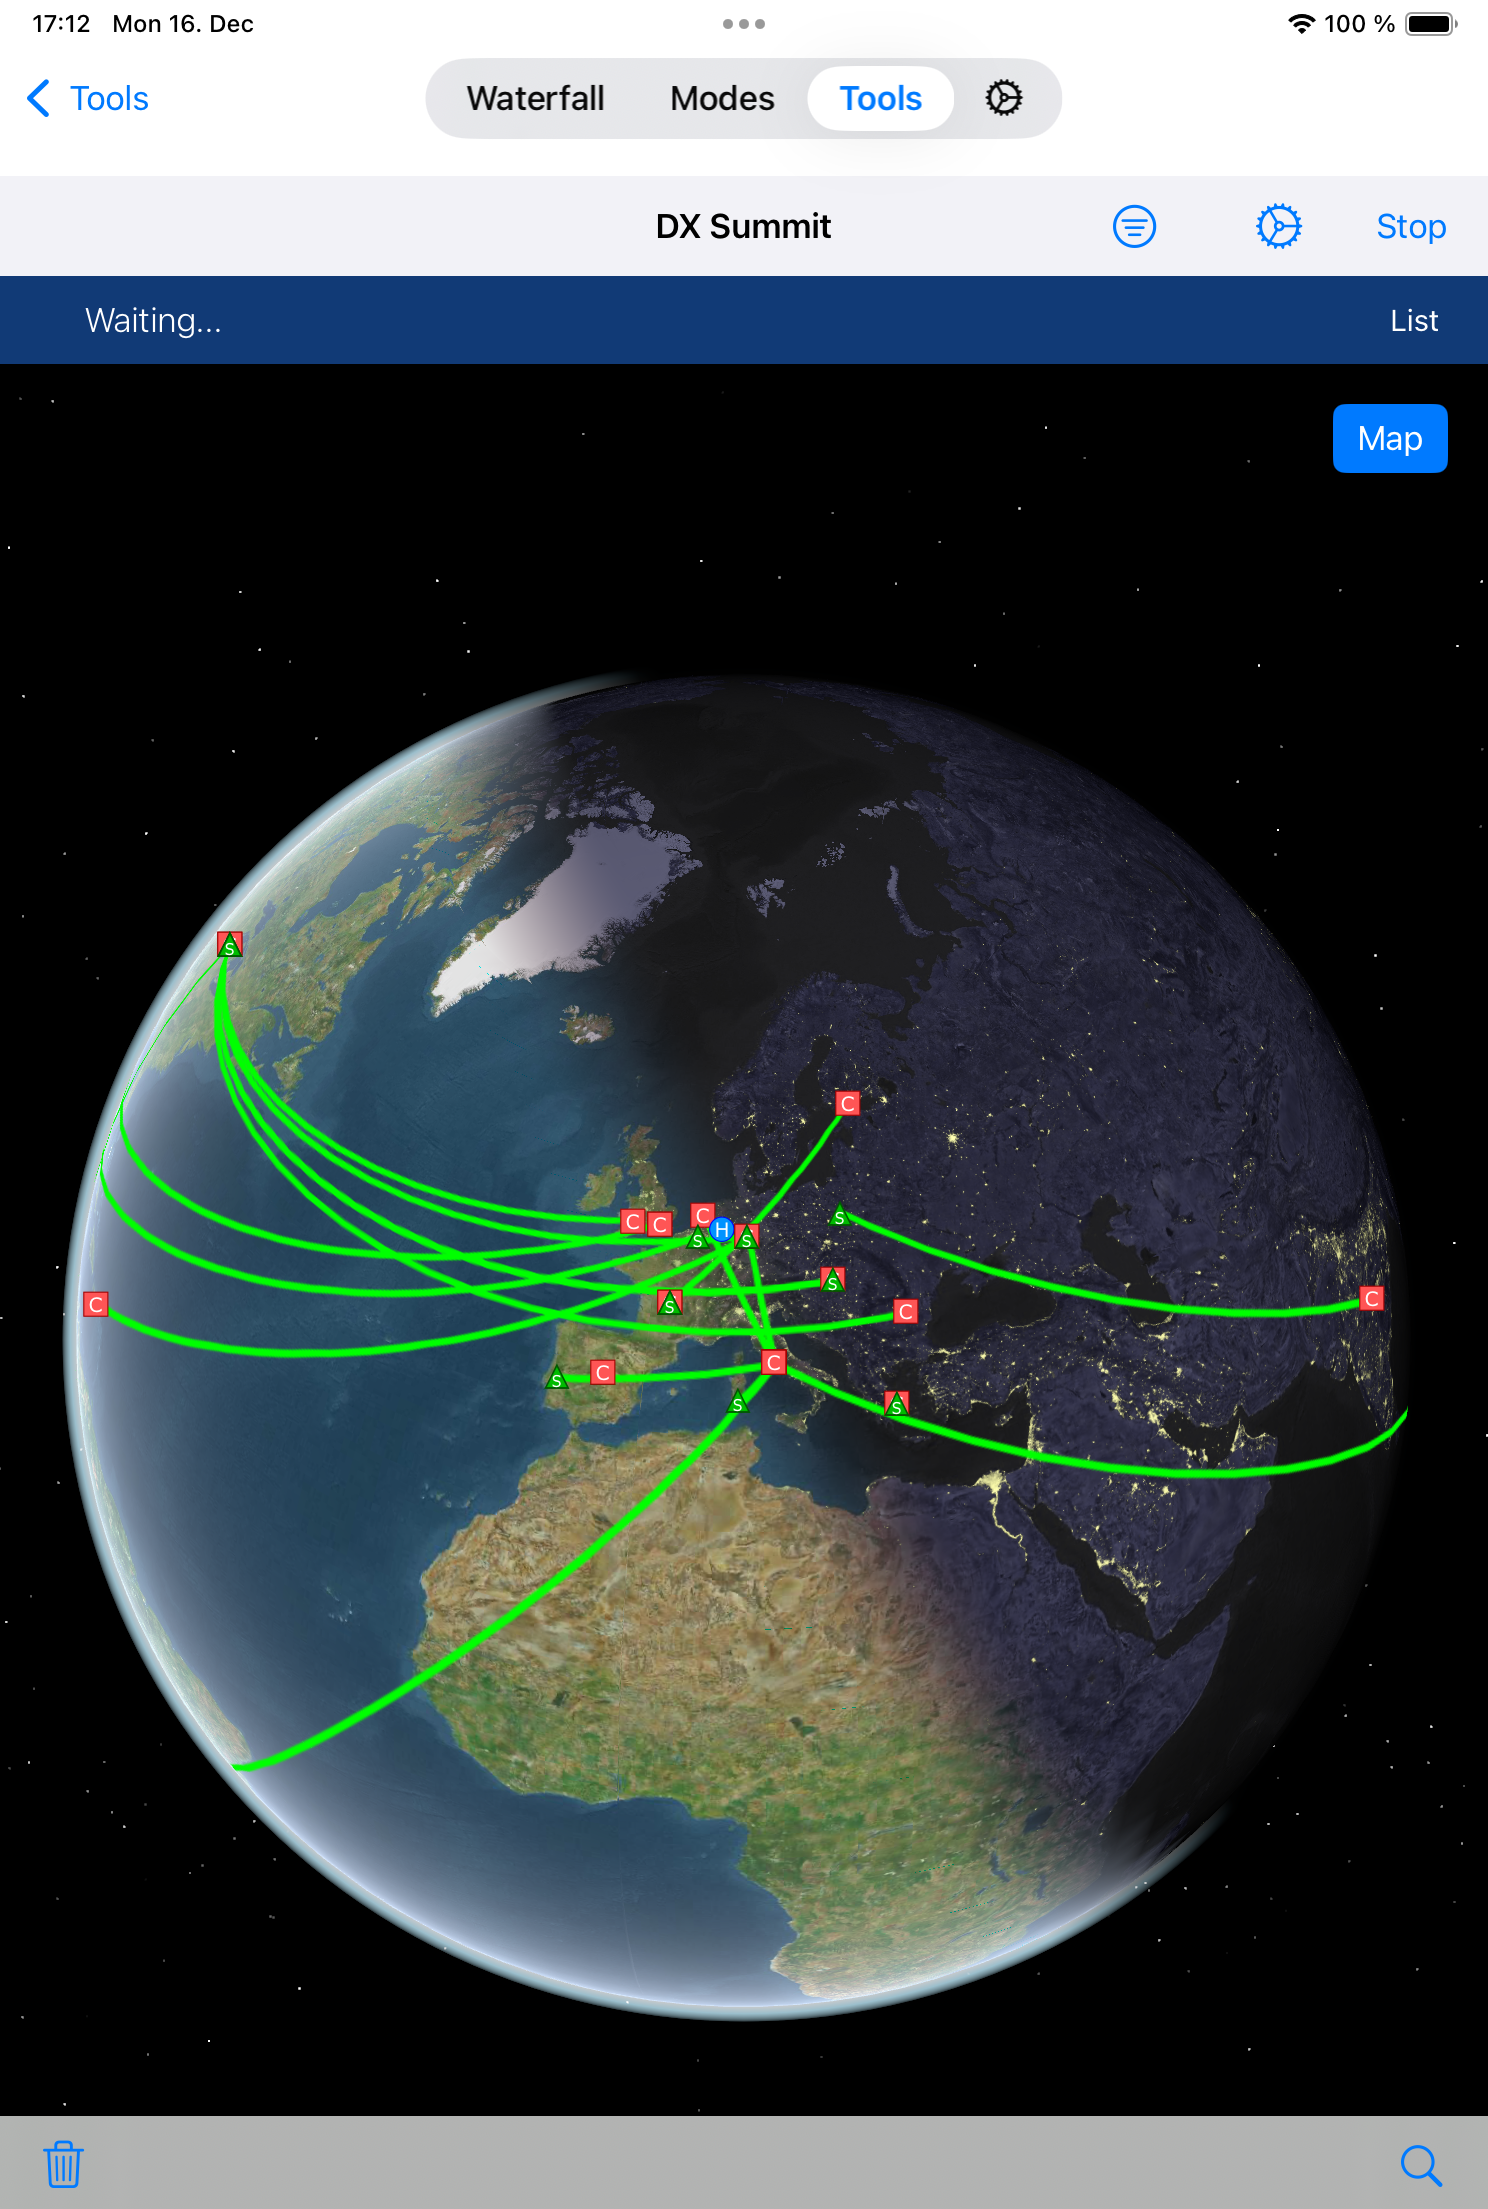
You can either see a list of all current DX-Cluster entries or a Map by tapping the Map / List button at the top.
5. POTA
The POTA Tool shows Parks on the Air (POTA) spots in a similar way like the DX-Cluster tool does for regular spots.
POTA Spots and be displayed on the Waterfall. You can directly jump to a certain frequency of a POTA Spot and take over Park information to the Logging Window.
Note
The POTA Tool can be unlocked along with the DX-Cluster Tool. Once any of these two tools have been unlocked, the other is unlocked too.
After starting the POTA Tool, after a short while, you will see all spotted POTA stations
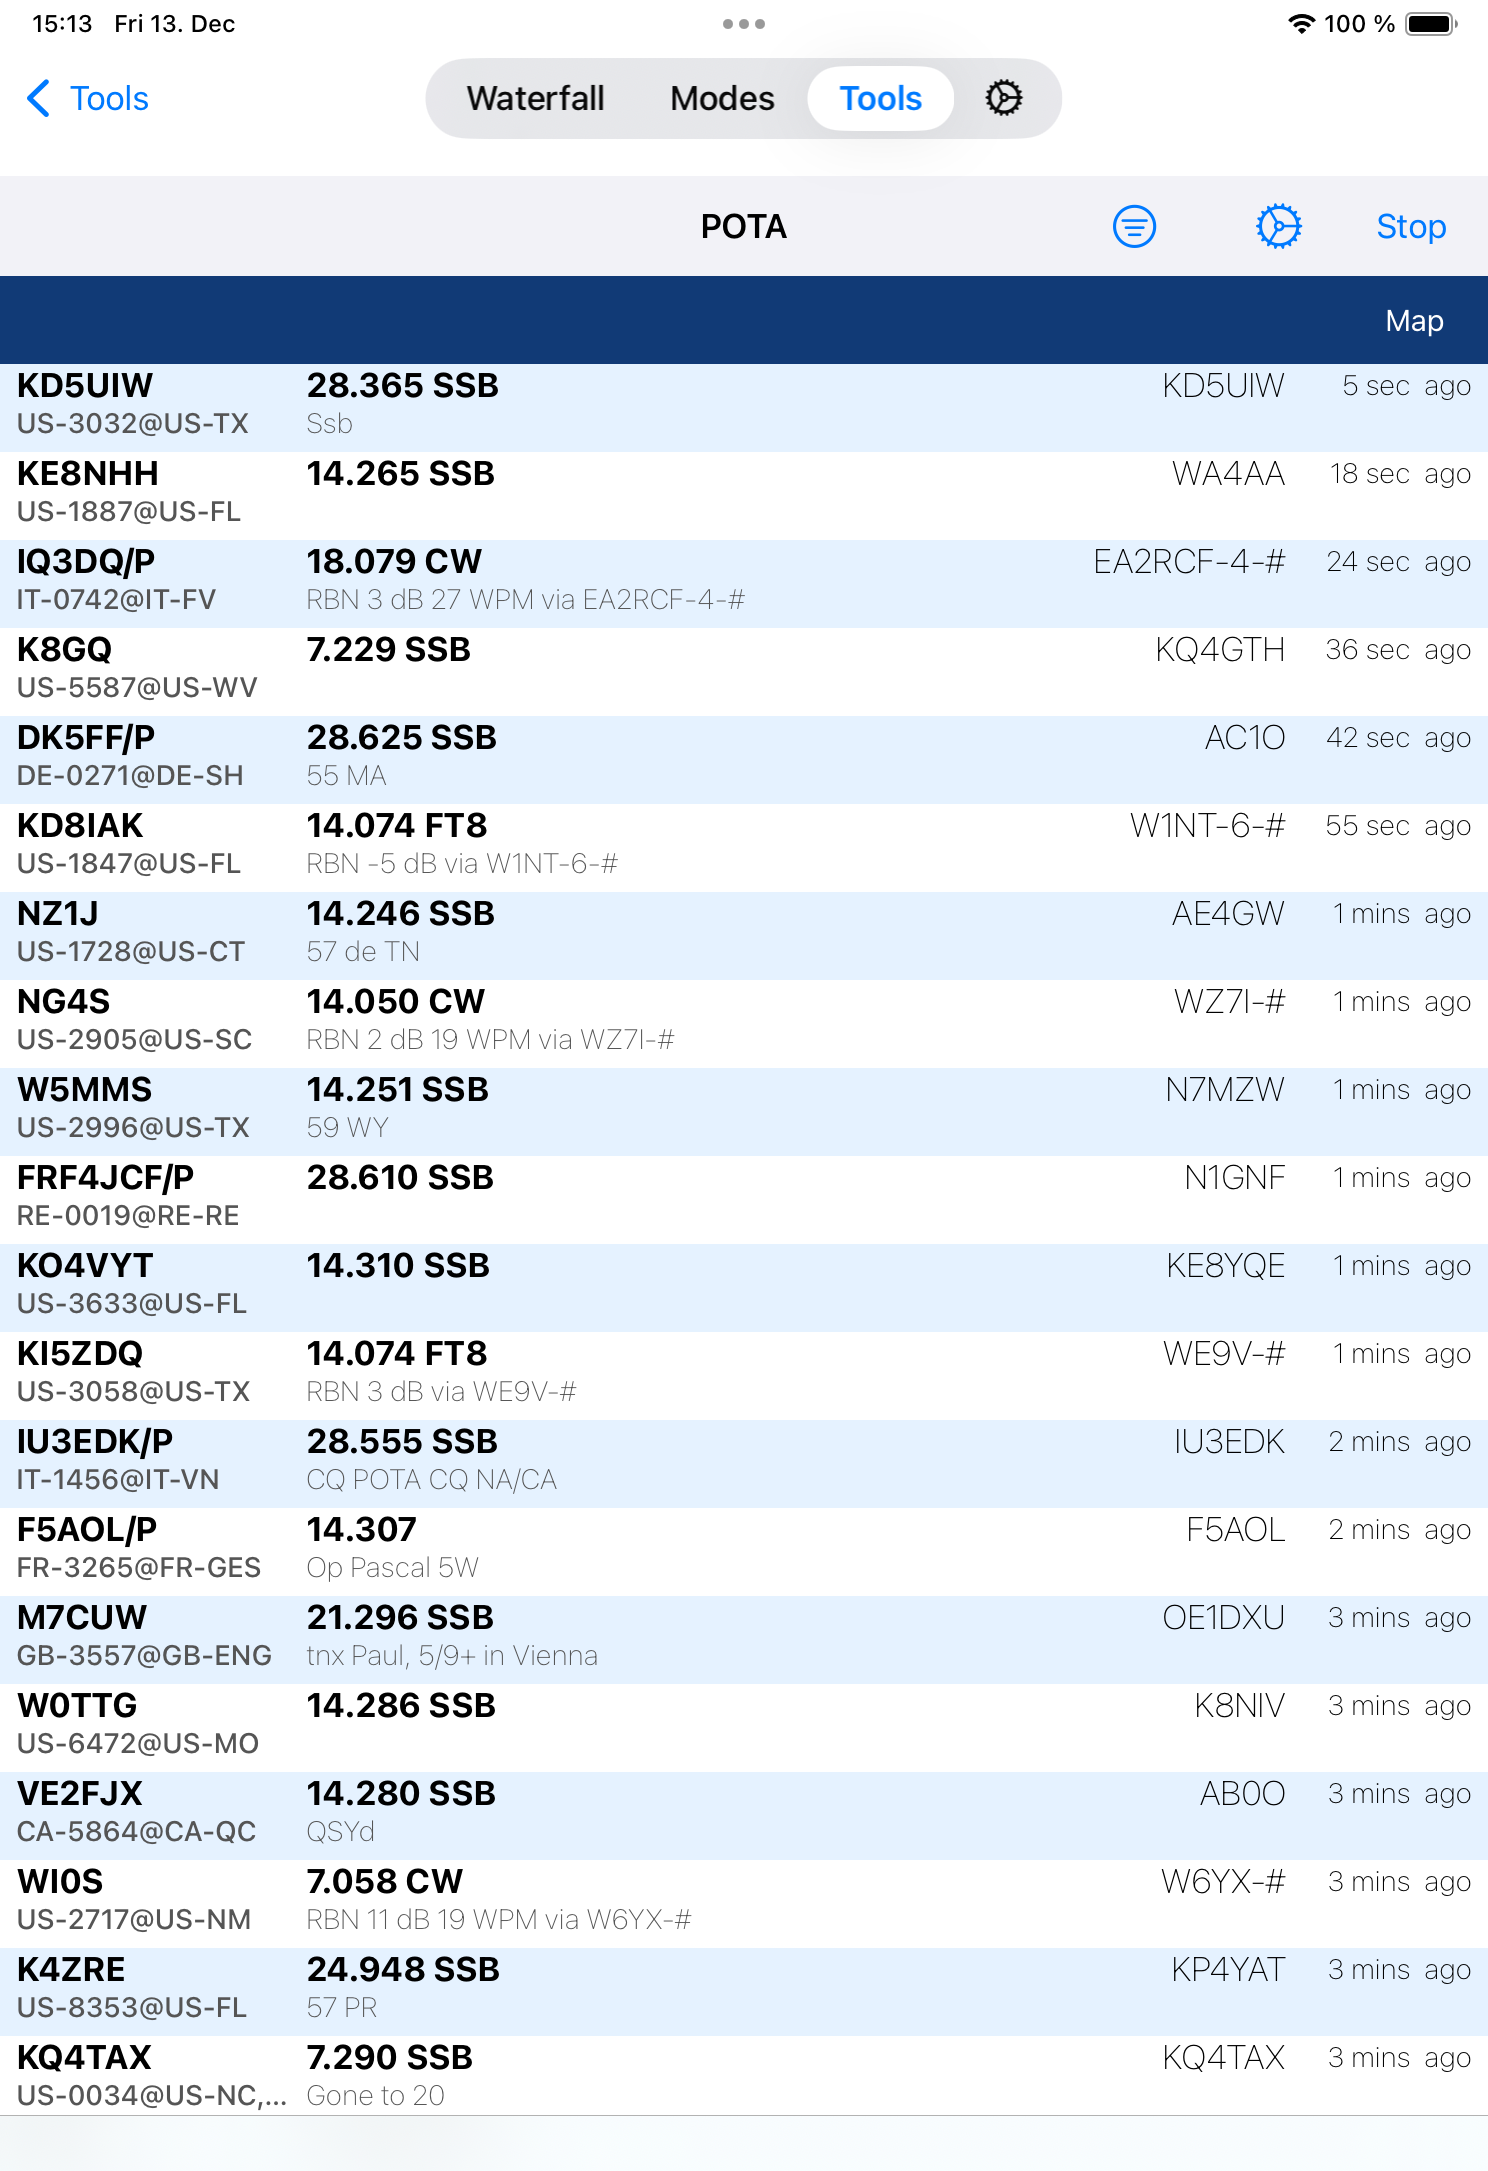
If you double-tap on a line in this list, the Radio will tune to the particular frequency of this spot.
Note
Tuning to the spot will not work for FT8 as the announced frequency is never the exact FT8 frequency. For FT8 Spots, you will need to open the FT8 Tool manually and look out for the POTA Activator.
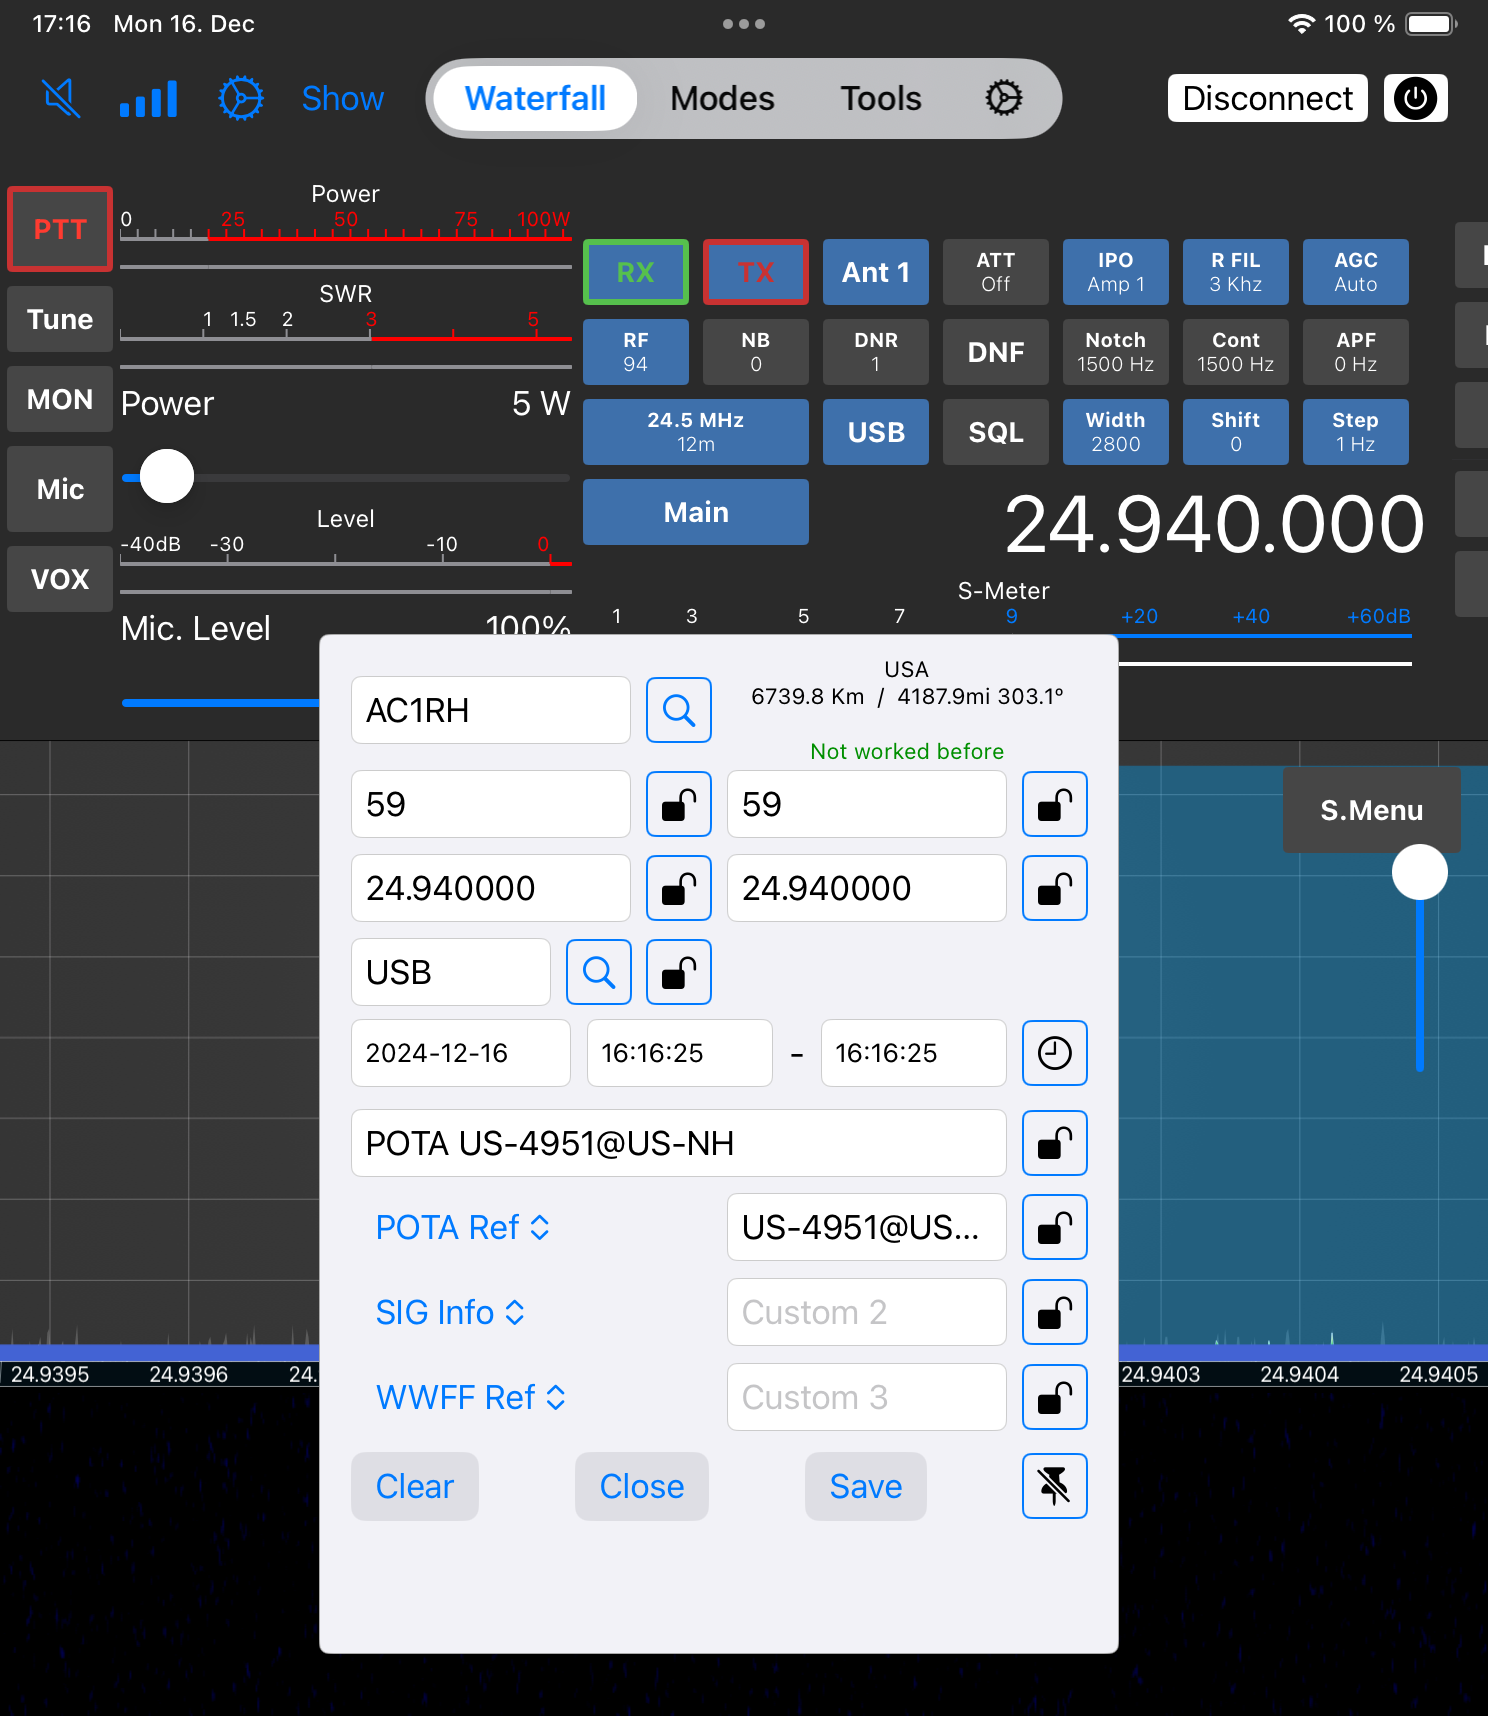
Second, logging information will be prefilled to the logging window, if it had been opened before.
Note
For FT8 and for using this feature, you need to turn both auto logging settings off as otherwise FT8 QSOs will be logged without the additional POTA information.
5.1. Map
You can also get all current POTA stations displayed on a Map by hitting the MAP button
6. PSK Reporter
PSK Reporter is a great automatic propagation reporter for digital modes, including FT8 / FT4.
You can use PSK Reporter to get an almost instant idea about the current DX conditions and who is able to copy you around the world.
This App integrates PSK Reporter in two ways.
6.1. Submitting PSK Reporter spots
PSK Reporter lives from the fact that many HAMs are contributing their reception reports to PSK Reporter. This App can automatically send FT8 reports to PSK reporter when enabled (under Settings inside the FT8 Tool or the PSK Reporter Tool).
If enabled, a list of received FT8/FT4 signals will be submitted to PSK Reporter every five minutes. Except for the information about your antenna (which is optional), nothing else has to be configured.
6.2. Viewing PSK Reporter results
The opposite side of PSK Reporter is to view a list of all stations who received your signal. This is, what the PSK Reporter Tool is for.
To get a report of stations that are able to copy you, first have a QSO or a test transmission on a band you are interested in. Next open this Tool and enter your callsign at the top of the window (it not already per-filled) and click on the start button.
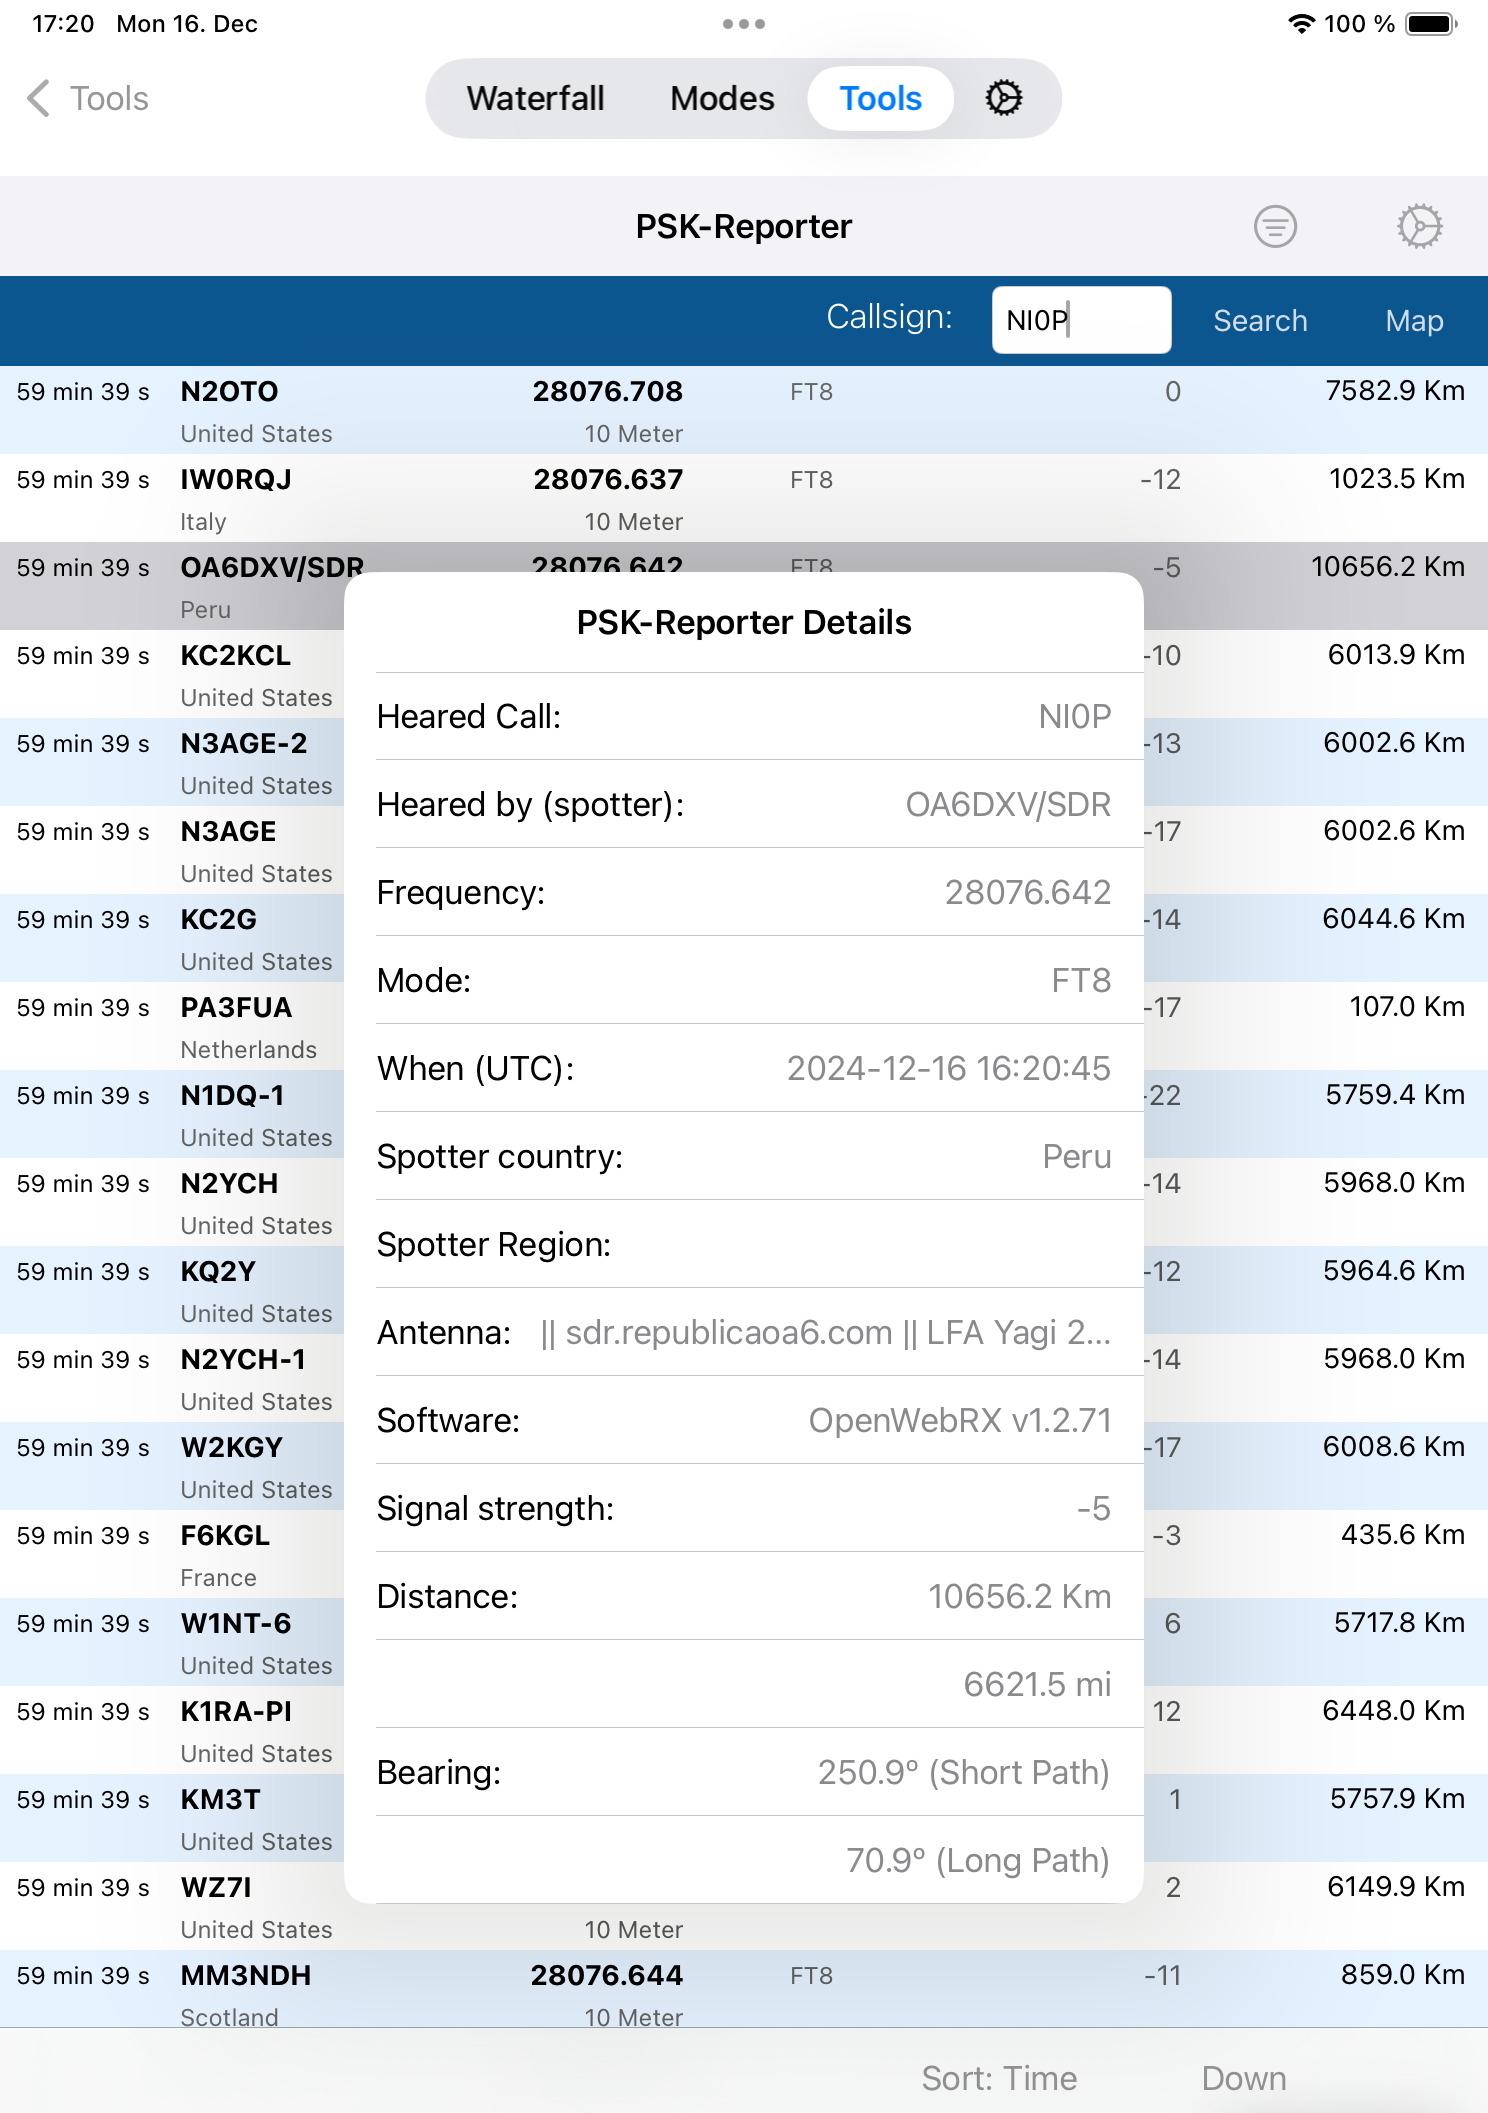
Once the list is filled with reports you can tap on a line for more details.
It may take up to 15 minutes after your transmission until you will see your results. This is because every contributing listener will update their reports every five minutes and it is not possible to download reports from PSK Reporter sooner than every 5 minutes as well. If you would request an update sooner than after five minutes, you will see an according message at the bottom of this window.
You can narrow down the results by using the Filter Icon at the top and selecting a Mode and Time.
You can also visualize all locations on a map by switching to the map mode using the Icon at the top.
7. CTR2 MIDI and Dial Controller
These two tools enable the use of the CTR2-MIDI and CTR2-Dial Controllers, which are available for purchase from Lynn Hansen, KU7Q at https://ctr2.lynovation.com.
The controller serves as an interface for the radio, allowing operators to tune frequencies, adjust volume, activate PTT, and access several other features.
Additionally, it provides the capability to connect a CW paddle to your device.
The CTR2-Controller offers the flexibility of wireless connectivity via Bluetooth-LE or a wired connection through a USB adapter.
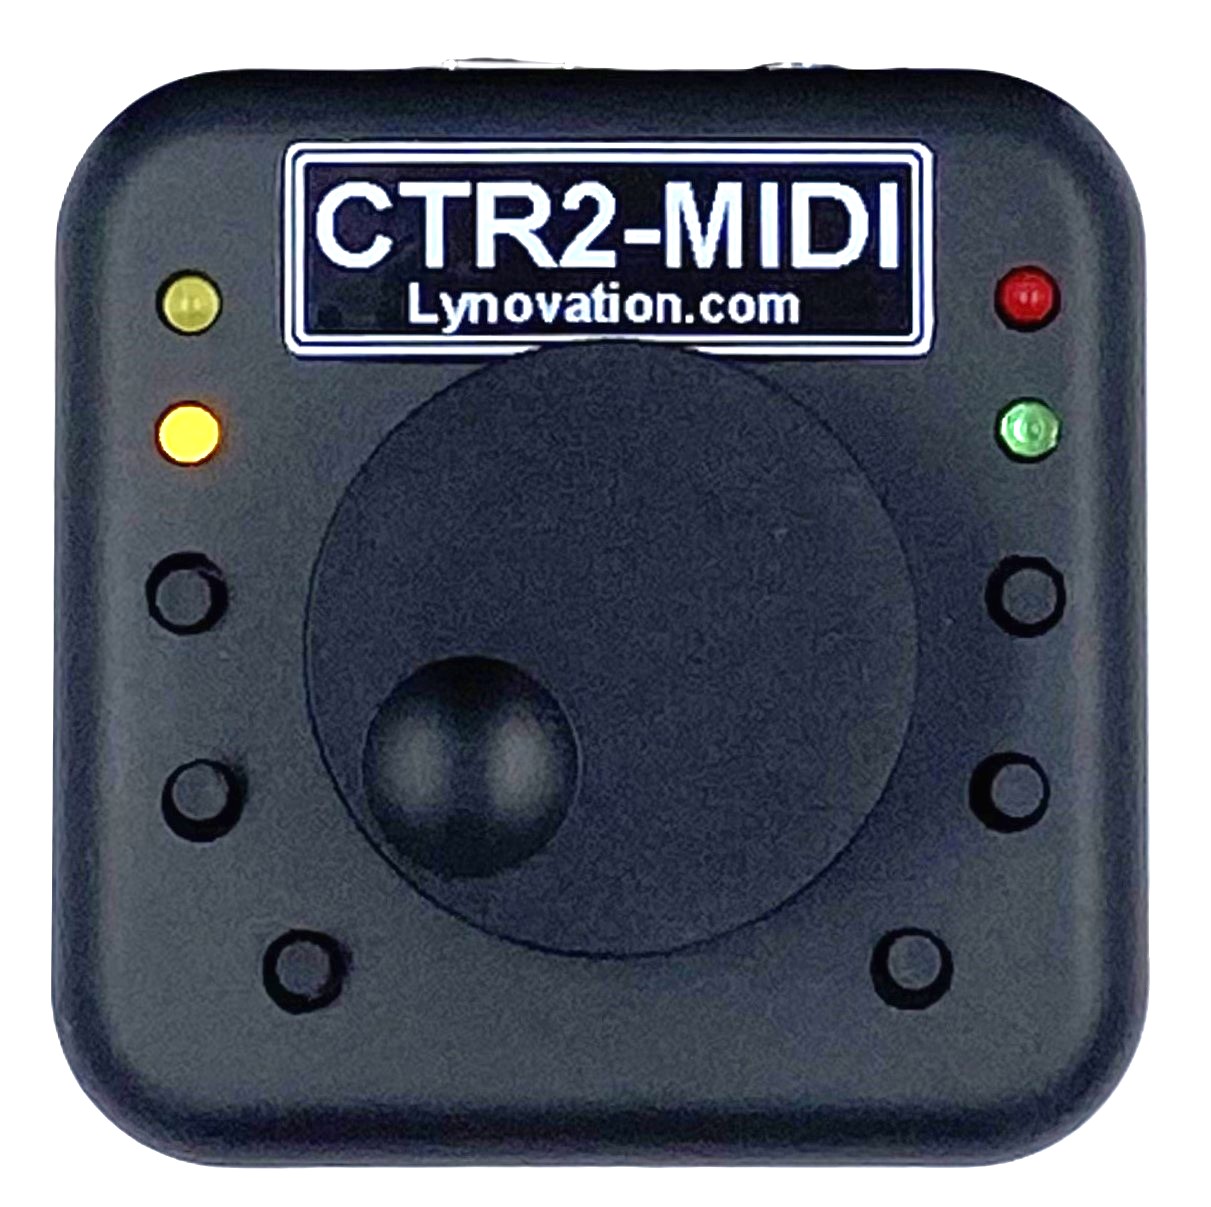

To pair a CTR-MIDI with your device via Bluetooth, ensure that the controller is powered on and in proximity to your device. Then, launch the CTR2 Controller or CTR2-Dial tool and click the “Find Bluetooth-LE Device” button at the top. The CTR2 should be detected within a few seconds and appear in the Device list. If the initial attempt is unsuccessful, close the tool, reopen it, and try again. Once the controller is detected, you can select it from the Device list under the name CTR2_xxxx whereas xxxx is a unique identifier different for each controller.
If you are connecting the CTR2 via USB, it will be listed as XIAO_ESP32S3 for the CR2-MIDI or STAMP-S3 for the CTR2-Dial Controller in the Device list.
After selecting the appropriate device and toggling the Enabled switch on, the status should update to Connected.
The controller comes with default mappings that allow you to use the knob for tuning, volume adjustment, and more. You can view and modify these mappings to suit your specific needs by clicking the Edit Mapping button.
Should you wish to revert to the default mappings after making changes in the Mapping editor, simply delete all mappings, close the editor, and reopen it.
When a paddle is connected to the CTR2-MIDI, it is ready for immediate CW operation. To adjust CW and paddle settings, such as CW Speed, Iambic mode, or paddle swapping, open the CW Decoder Mode Tool and click the Options button in the TX section.
For additional information and a comprehensive manual, please visit Lynn’s website. Lynn has also predefined mappings available for the different Controller variants.
8. MIDI Controller
Using the MIDI Controller Tool you can configure so called MIDI Controllers such as the DJ2GO2 or Behringer CMD Micro MIDI Controller for use with the Radio.

The following MIDI Controllers are supported:
Numark DJ2GO2
Behringer CMD Micro
Behringer CMD PL-1
Hercules DJ Controller Compact
Other controllers may work as well but they are not tested.
The MIDI Controller needs to be connected to your device using a USB Cable. You may need an Adapter to connect the controller supplied USB cable to your iPad (e.g. USB-A to USB-C or USB-A to Lightning). The DJ2GO2 doesn’t need extra power so a direct connection would be all you need. Other Controllers may need more power so you may need to use a powered USB Adapter.
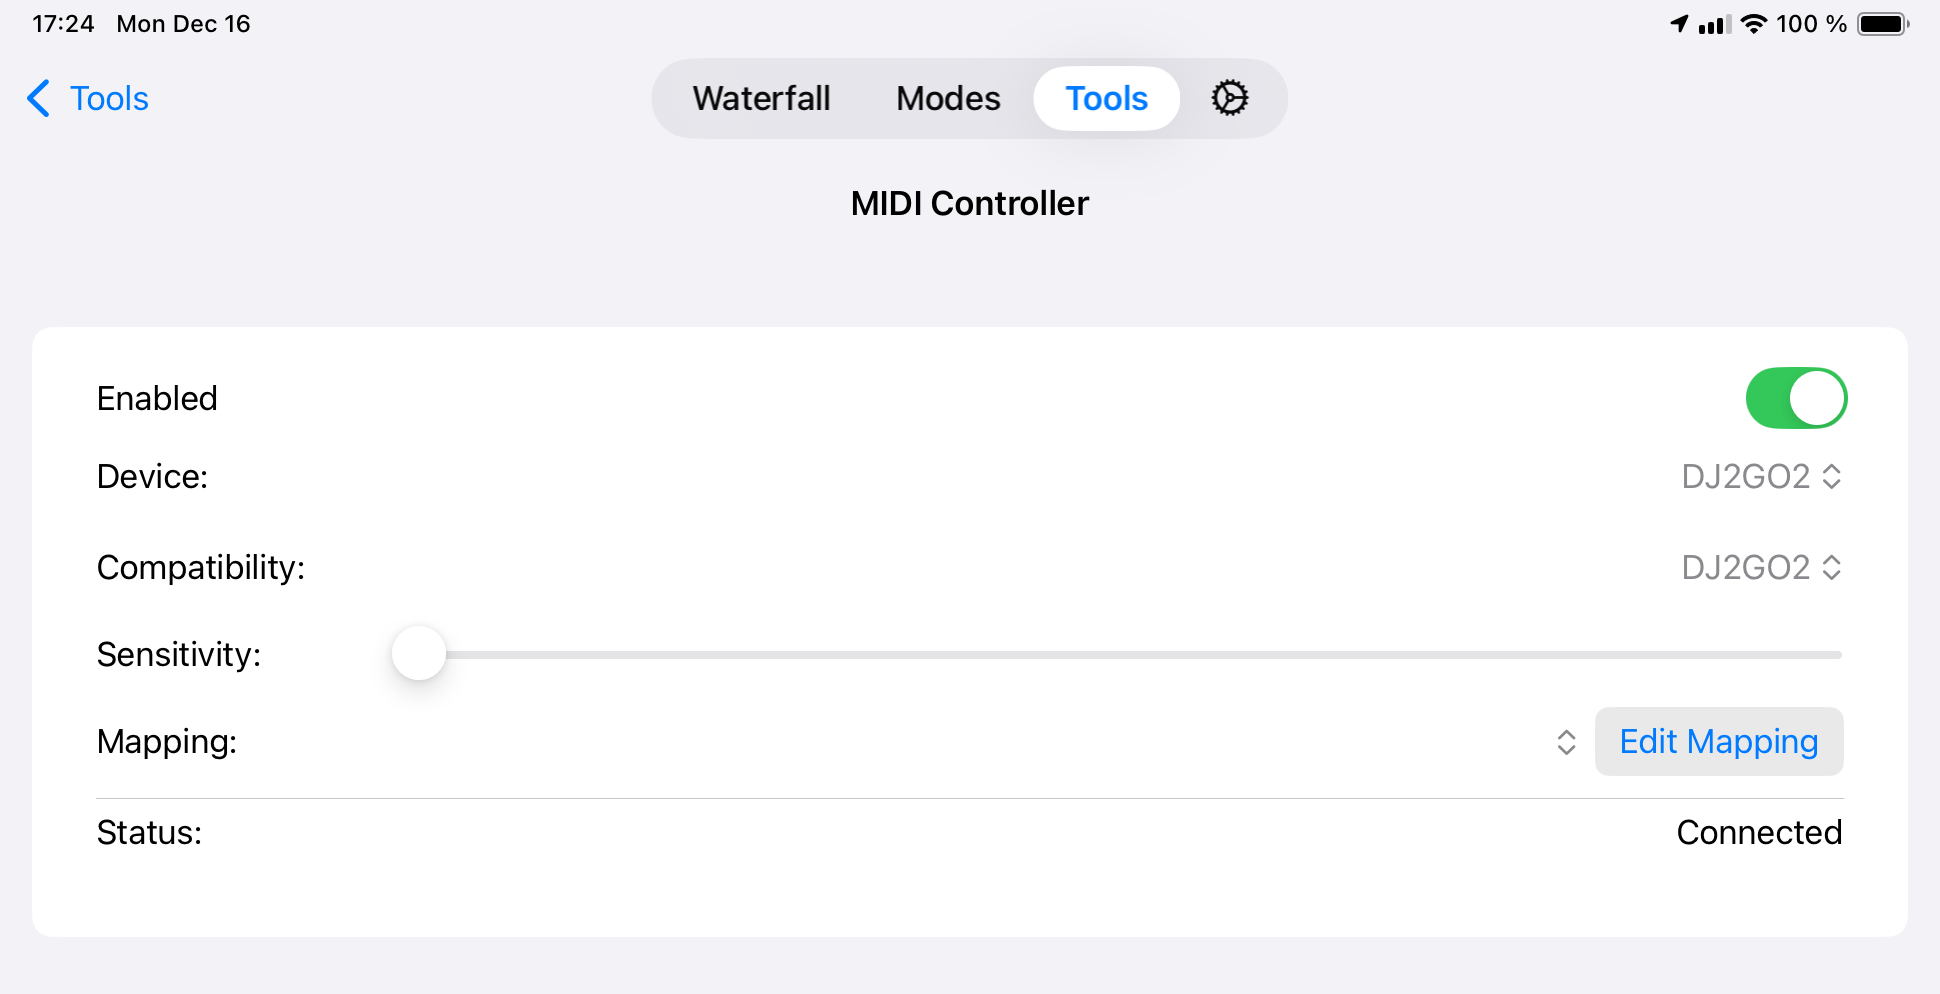
Once your MIDI controller is connected, you should be able select your Controller in the Device: selection.
If you then switch on the Enabled: switch, the Status should change to Connected as shown above.
To assign functions to each button, you need to open the Mapping Editor by tapping on Edit Mapping.
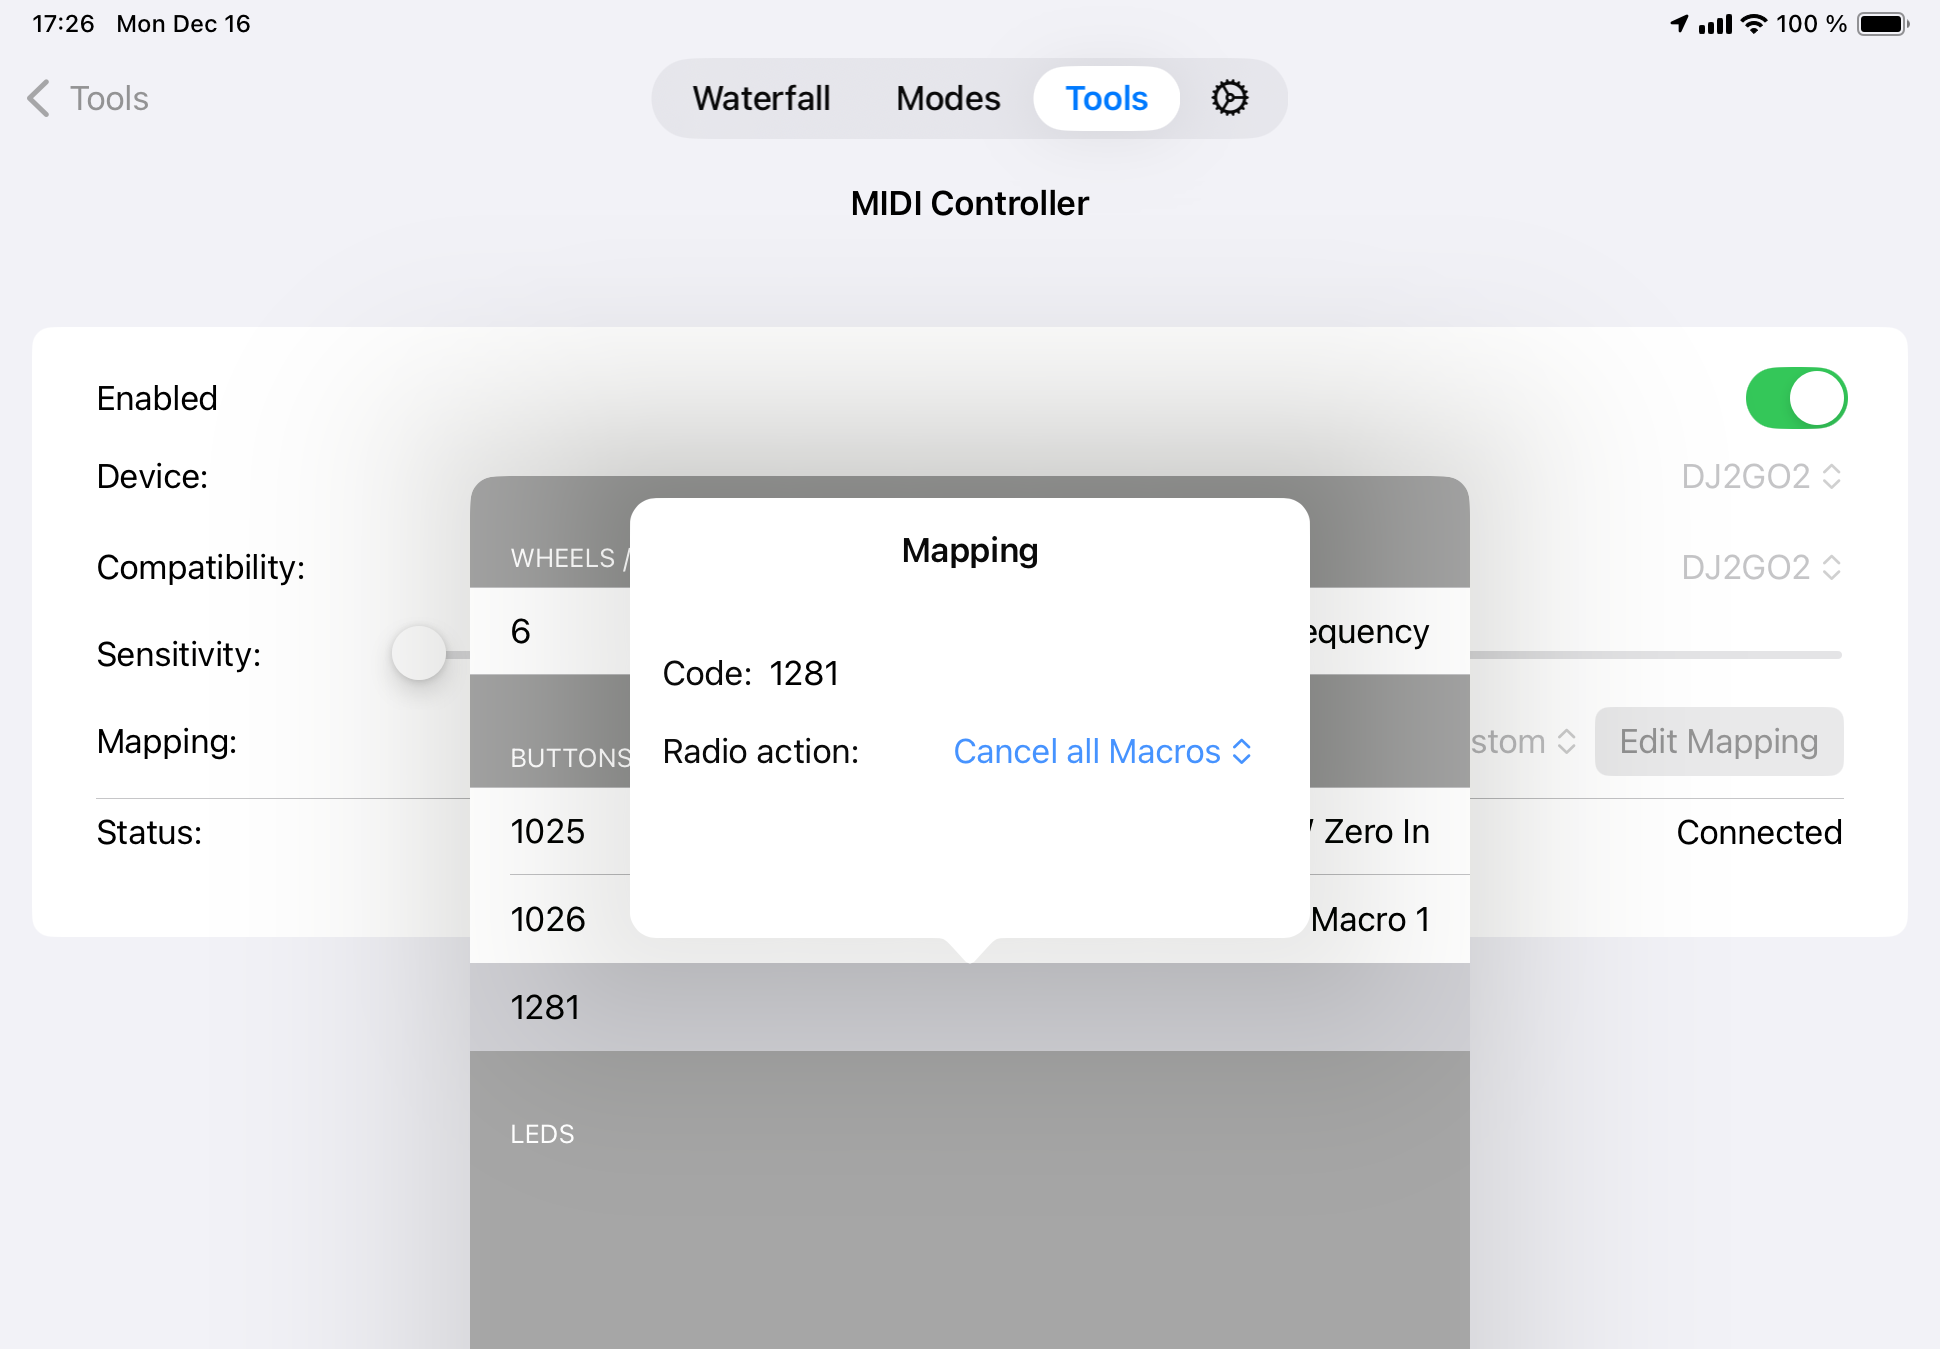
From here, you can assign Functions on Buttons, Controls (or Wheels and Sliders) and LEDs.
For assigning functions to Buttons or Controls, just hit the corresponding Button or turn the knob or slider on your Midi controller. A line with the corresponding code of the Control will be added, if necessary and highlighted.
Now, tap on the line and select a Radio action like “Adjust Main Volume” as shown above.
9. Command Bar
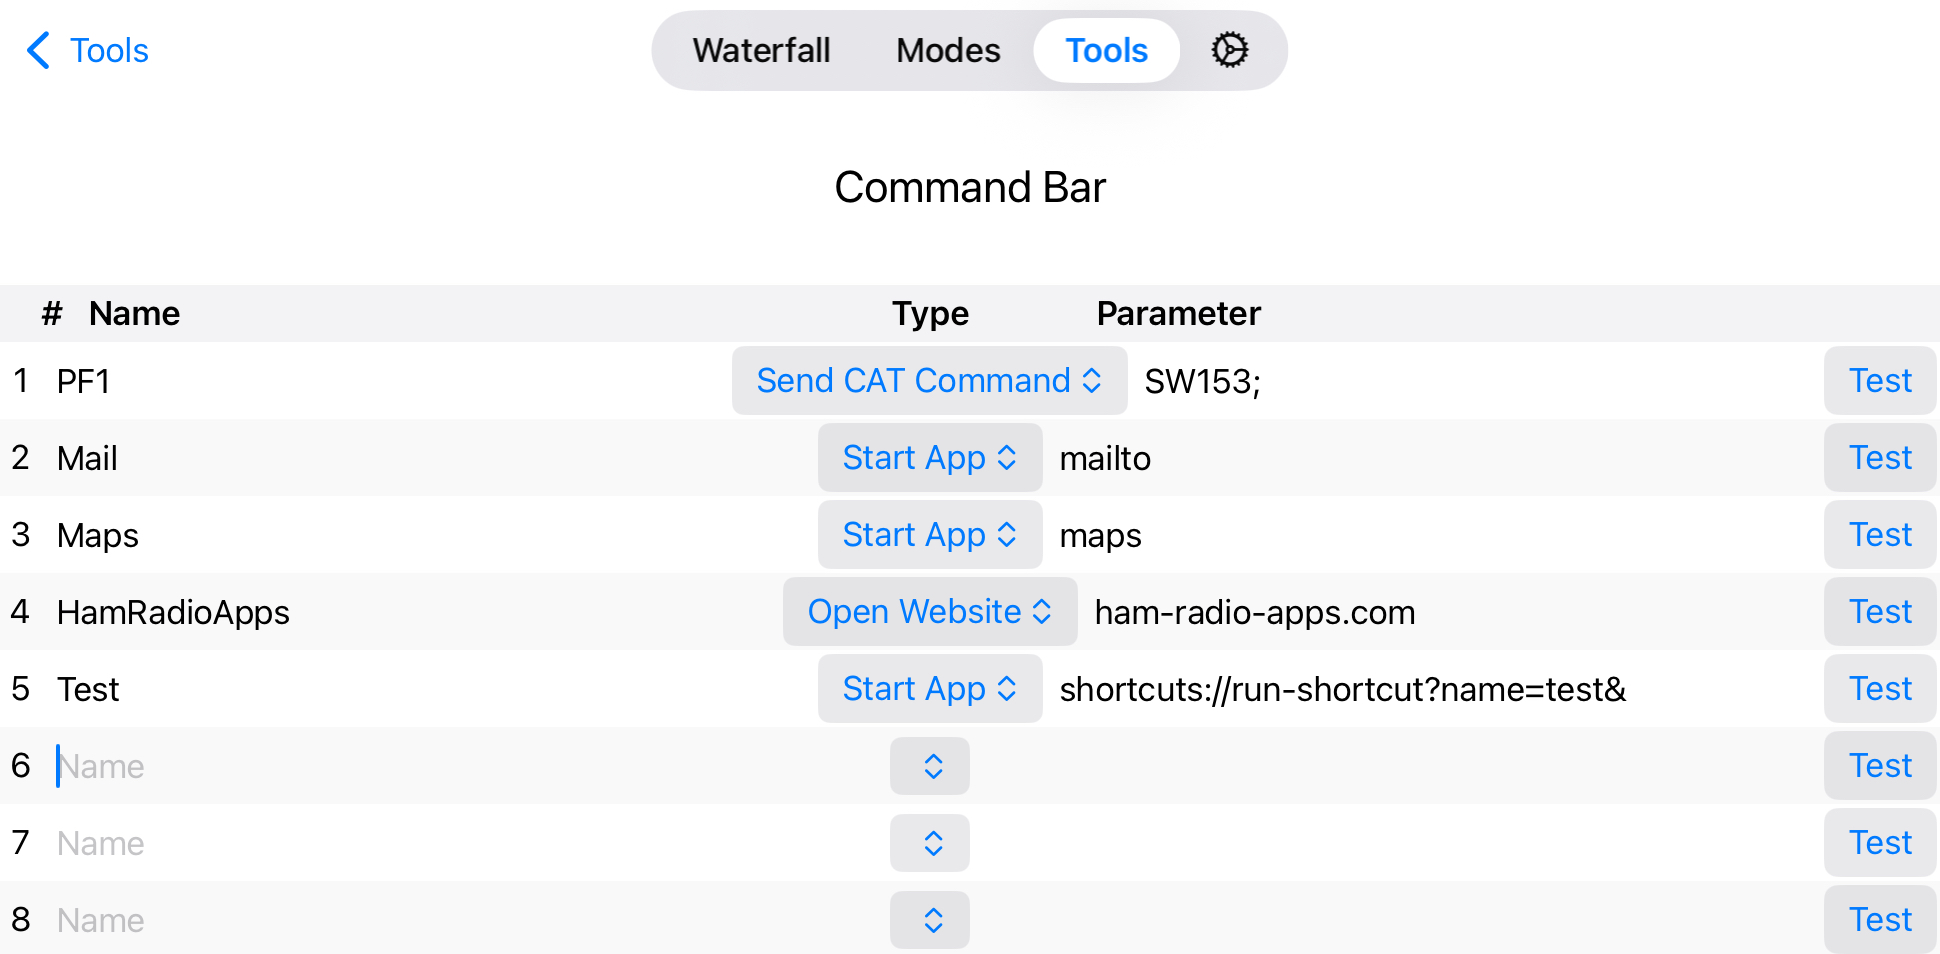
The Command Bar feature is designed to maintain buttons that can be displayed on the Waterfall Main Screen. These buttons can open websites, start other apps, or send CAT commands to the radio. It is also possible to use keyboard shortcuts for start these commands.
The feature consists of two parts: the screen where you maintain the buttons which can be opened from the Tools screen.
And the screen where the buttons are displayed.

To maintain a button, you can enter a Title, select a Type such as Start App, Open Website, or Send CAT Command. Depending on the type, you must enter a parameter which represents the app name, the website URL, or the CAT command.
The Title will be displayed on the Command Bar when shown on the Waterfall. You can leave the Title blank, in which case the button will not appear on the Command Bar, although it’s still possible to use keyboard shortcuts to start it.
To start apps, you need to enter the so called URL-Scheme for the app. For Apple’s Mail app the urlscheme is mail, for the Maps app it is maps. The most useful URL-Scheme on iOS is schortcuts://run-shortcut?name=<Name of the Shortcut>&<parameter> which can be used to start a Shortcut on your device. For this, replace <Name of the Shortcut>> by the title of the Shortcut. If the title contains spaces, replace a space by %20. Replace <parameter> by a possible parameter of your Shortcut. If the shortcut doesn’t require a parameter, just leave it out but keep the & character.
Other apps you have downloaded from the App Store may offer additional URL-Schemes.
The commands to enter for the Send CAT Command type depend on the radio you are using. Please refer to the radio’s programmer’s reference documentation to learn which commands can be used.
Note
This tool is only available for the iPad as it requires a larger screen.
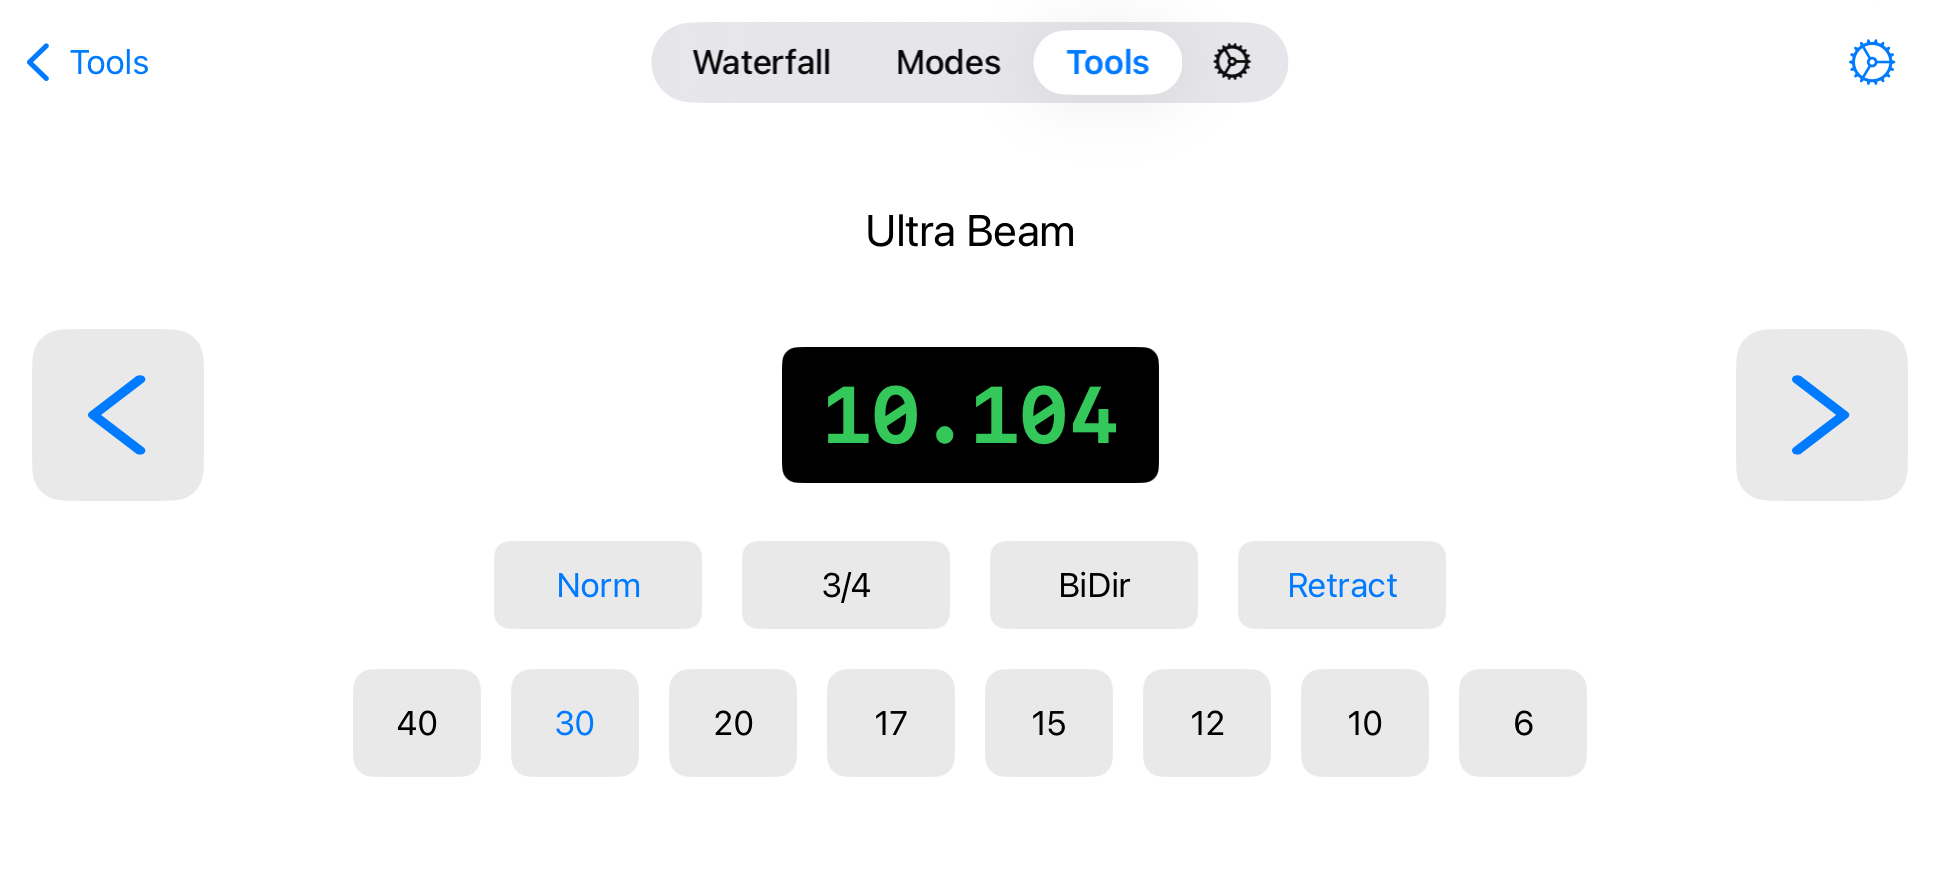
10. Ultra Beam
This feature is designed to control Ultra Beam Antennas. For more information on the different models and specifications, visit WiMo’s Ultra Beam page https://go-to.me/ultrabeam.
The Ultra Beam is often regarded as a more robust and dependable European alternative to the Stepp-IR.
10.1. Requirements
To utilize this feature, you need an Ultra Beam RCU-06 Control Unit and the UltraBeam Remote Controller software installed on a Raspberry Pi.
To set up this tool, hit the settings icon at the top of the interface.
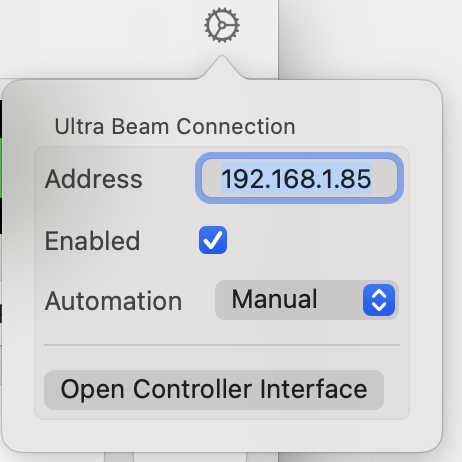
Here, input the IP address of your UltraBeam Remote Controller (the Raspberry Pi).
To test the IP Address, click the Open Controller Interface button to access the Controller’s web interface.
The ‘Automation’ section offers three options: ‘Manual’ allows you to control the frequency of your Ultra Beam directly from the main Tool screen. ‘Follow RX’ or ‘Follow TX’ will automatically adjust the frequency based on the current RX or TX frequency, respectively.
To control the frequency on the main Tool screen, simply hit one of the Band buttons or hit the frequency display at the center to manually enter a frequency. You can also adjust the frequency in 5 kHz increments by hitting the buttons to the left and right of the frequency display.
You can also remote-access your Ultra Beam over the internet. To do this, open port 80 on your router for the IP address of your Ultra Beam Controller. It is recommended to use a different port than 80 externally, for example, 20001. In this tool, you would then need to enter your public IP address (or a DynDNS name - see the chapter Remote Access for more details) followed by a colon and the port number (20001 in the example).
Note
No CAT cable or CAT connection to the Ultra Beam Controller is required for this tool to function. You can switch radios and still be able to adjust the frequency for the radio you are currently connected to.
For further details, please refer to the Ultra Beam manuals.
Note
This tool is only available for the iPad as it requires a larger screen.
11. Logbook
The included Logbook was implemented with the idea in mind to offer a quick and easy logging feature to this App which should already provide all basic requirements for day to day logging.
You can export (and import) ADIF files to exchange logbook contents with other logbook software.
Note
If you wish to export only a portion of your complete log file, utilize a filter to refine your logbook and enable the Export only filtered Log entries setting under Settings.
After starting the Logbook tool you will see your last logs.
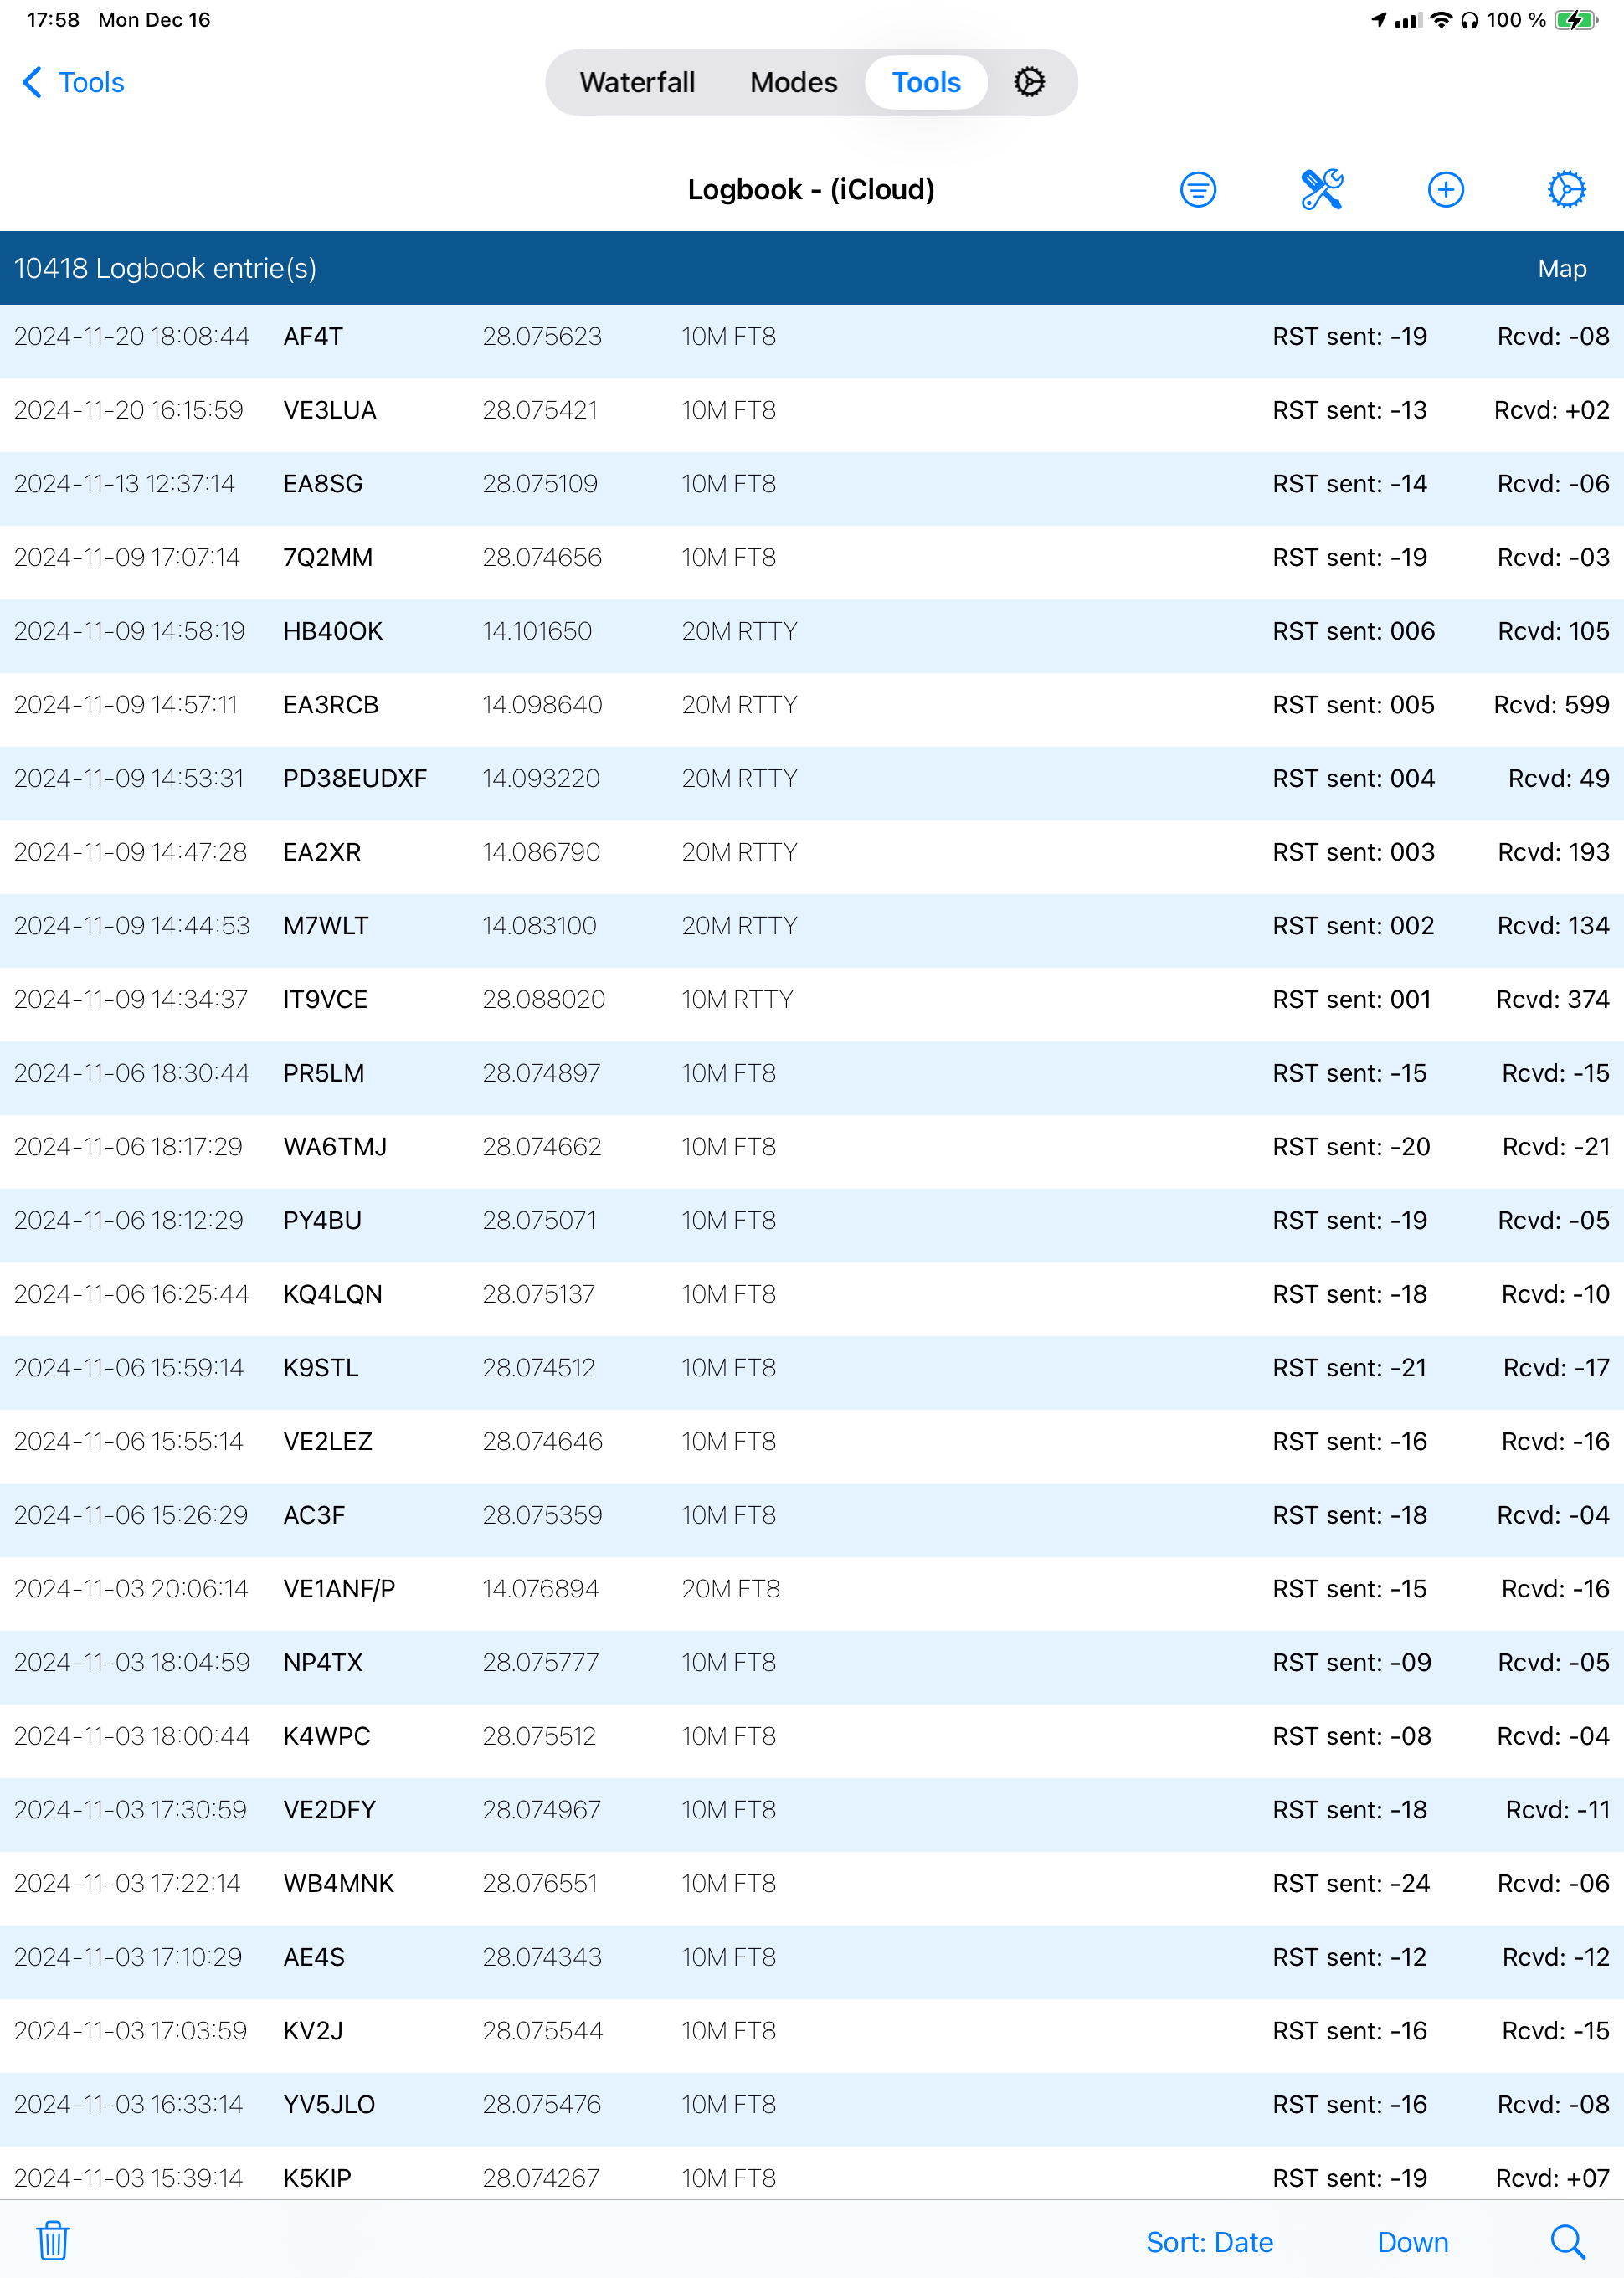
At the bottom, you see a trash-can which can be use to delete the whole logbook if you like and a sort menu. The Spy-glass will open a search field where you can enter a call-sign you are looking for.
To edit an already logged QSO, just tap on a line.
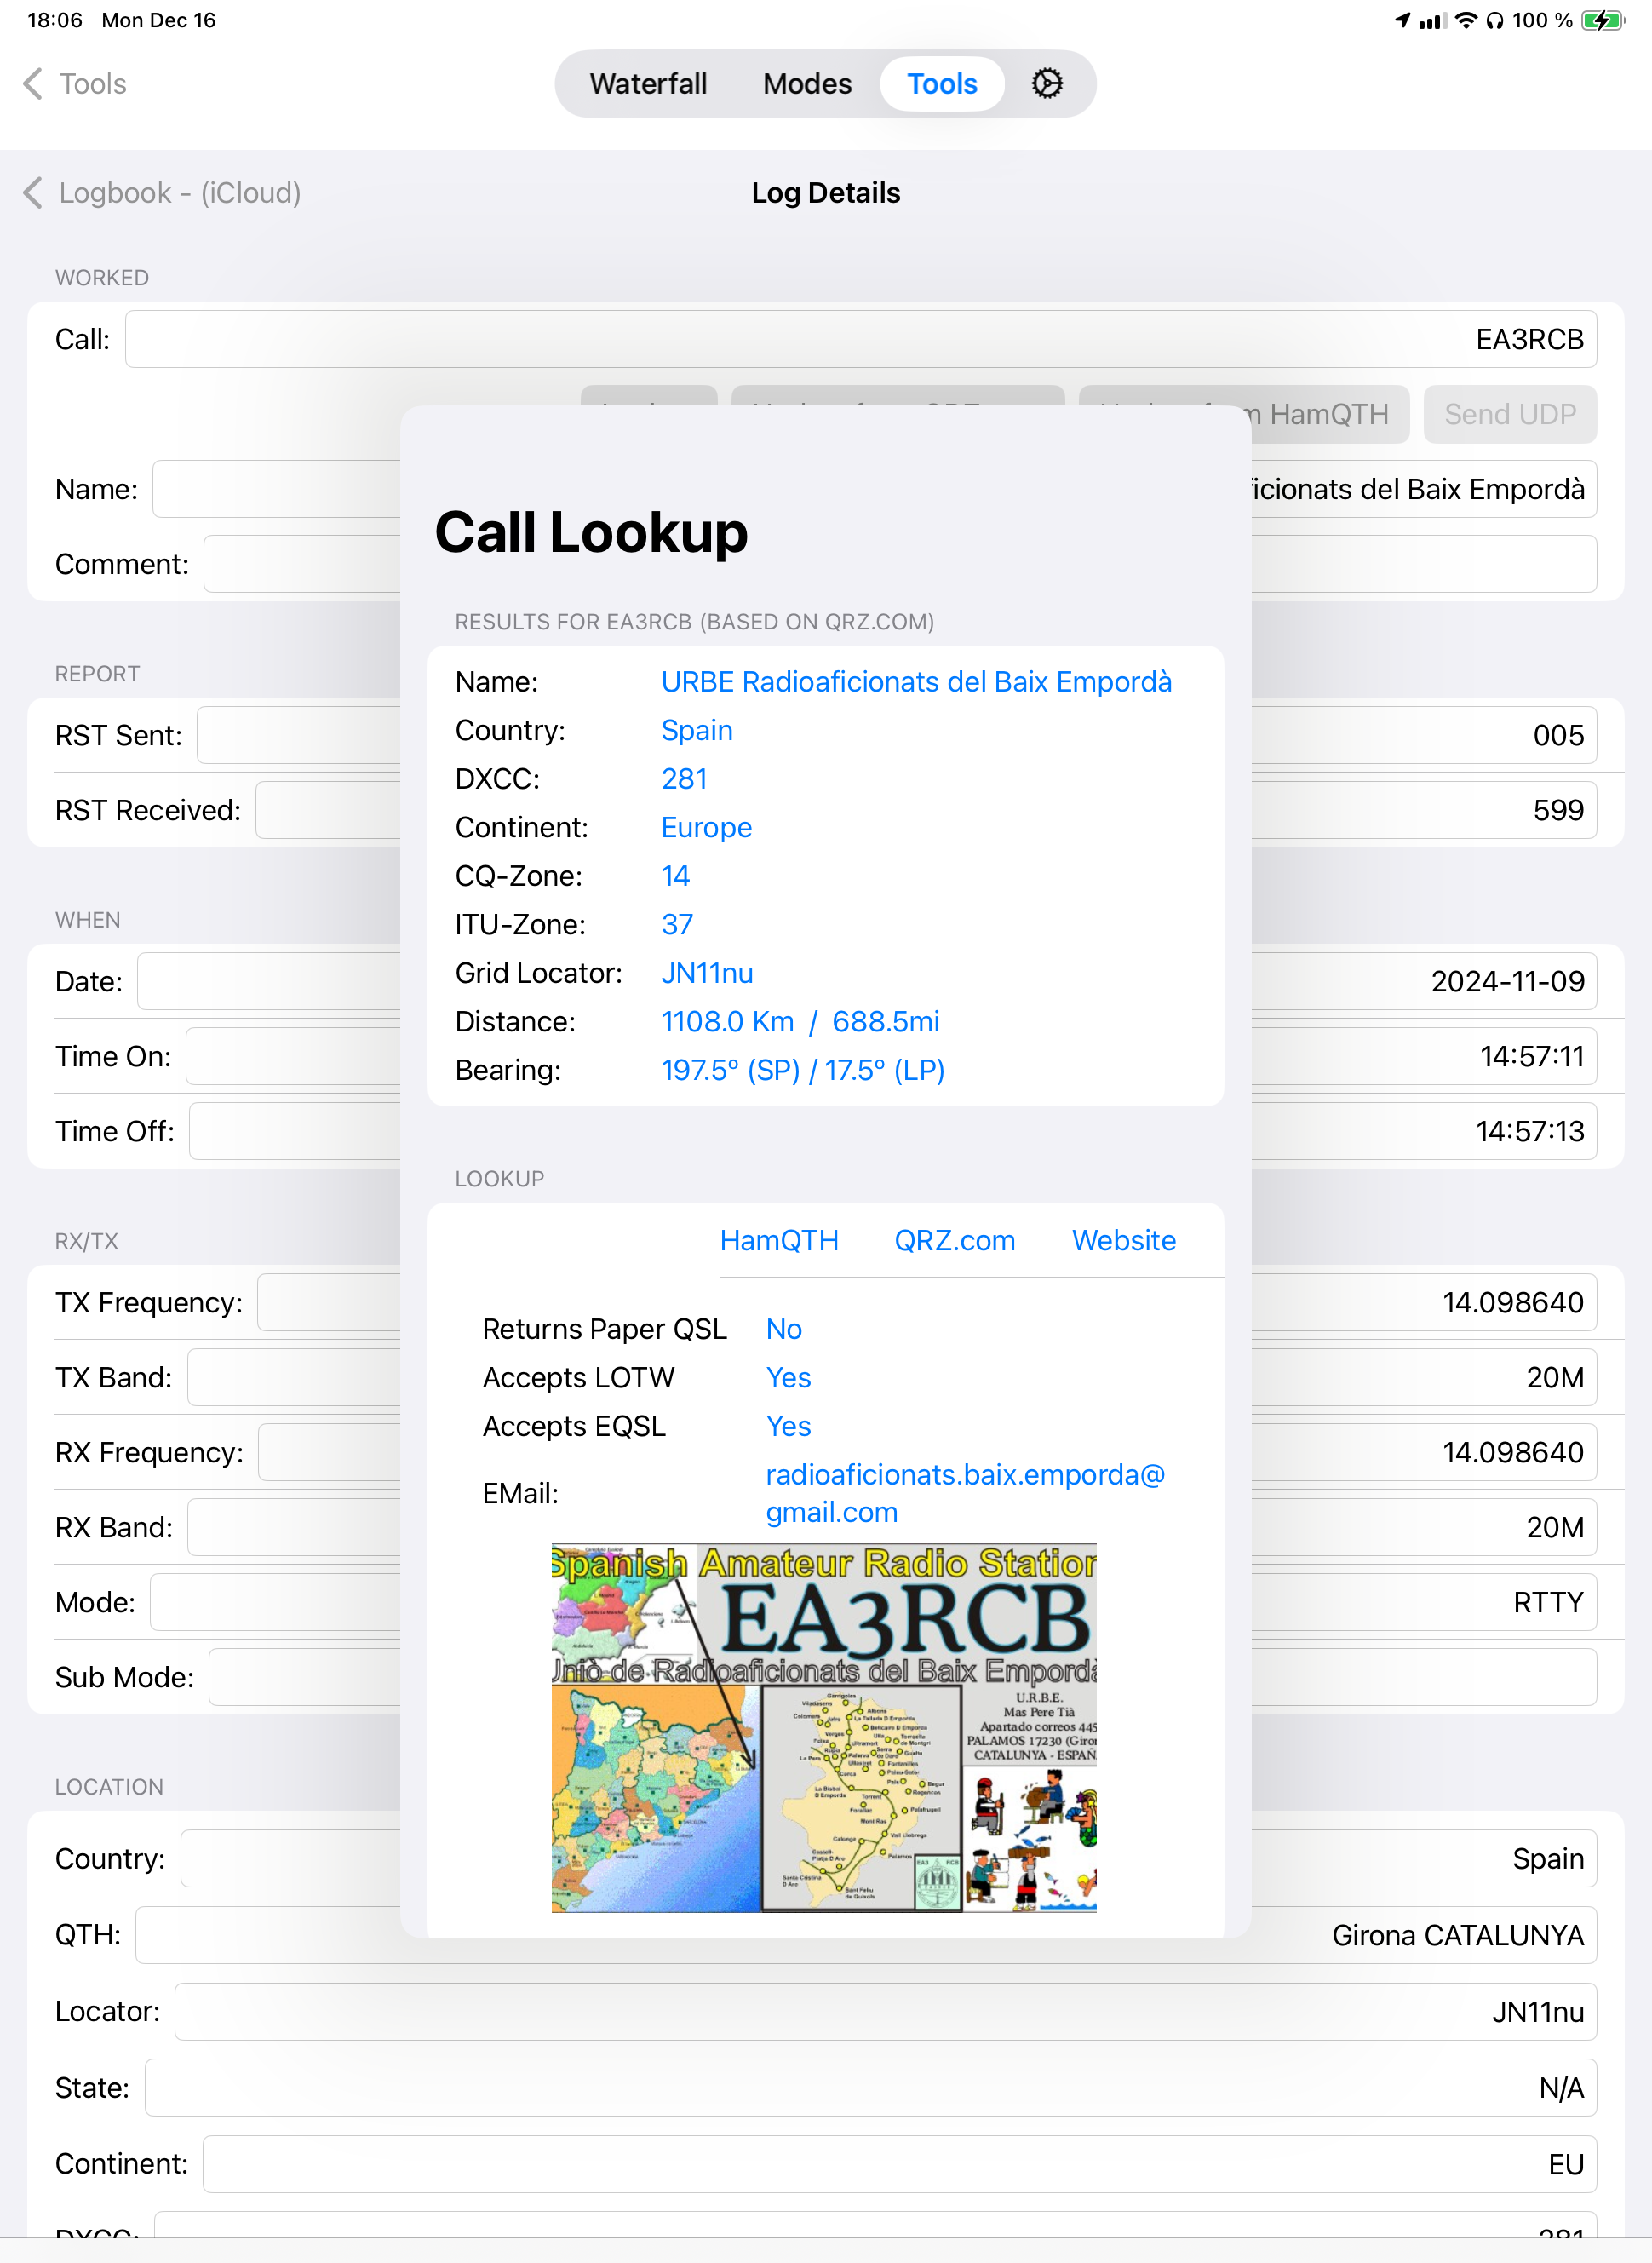
From here, you can alter all fields of the log manually or let them be filled using the HamQTH or QRZ.com lookup feature. For this, just tap on the corresponding button and you will see the details provided by these Call lookup services. Hit the Use to update Log button at the top to take over these values for all empty field of your Log.
There are several settings for customizing the logbook using the Settings button at the top.
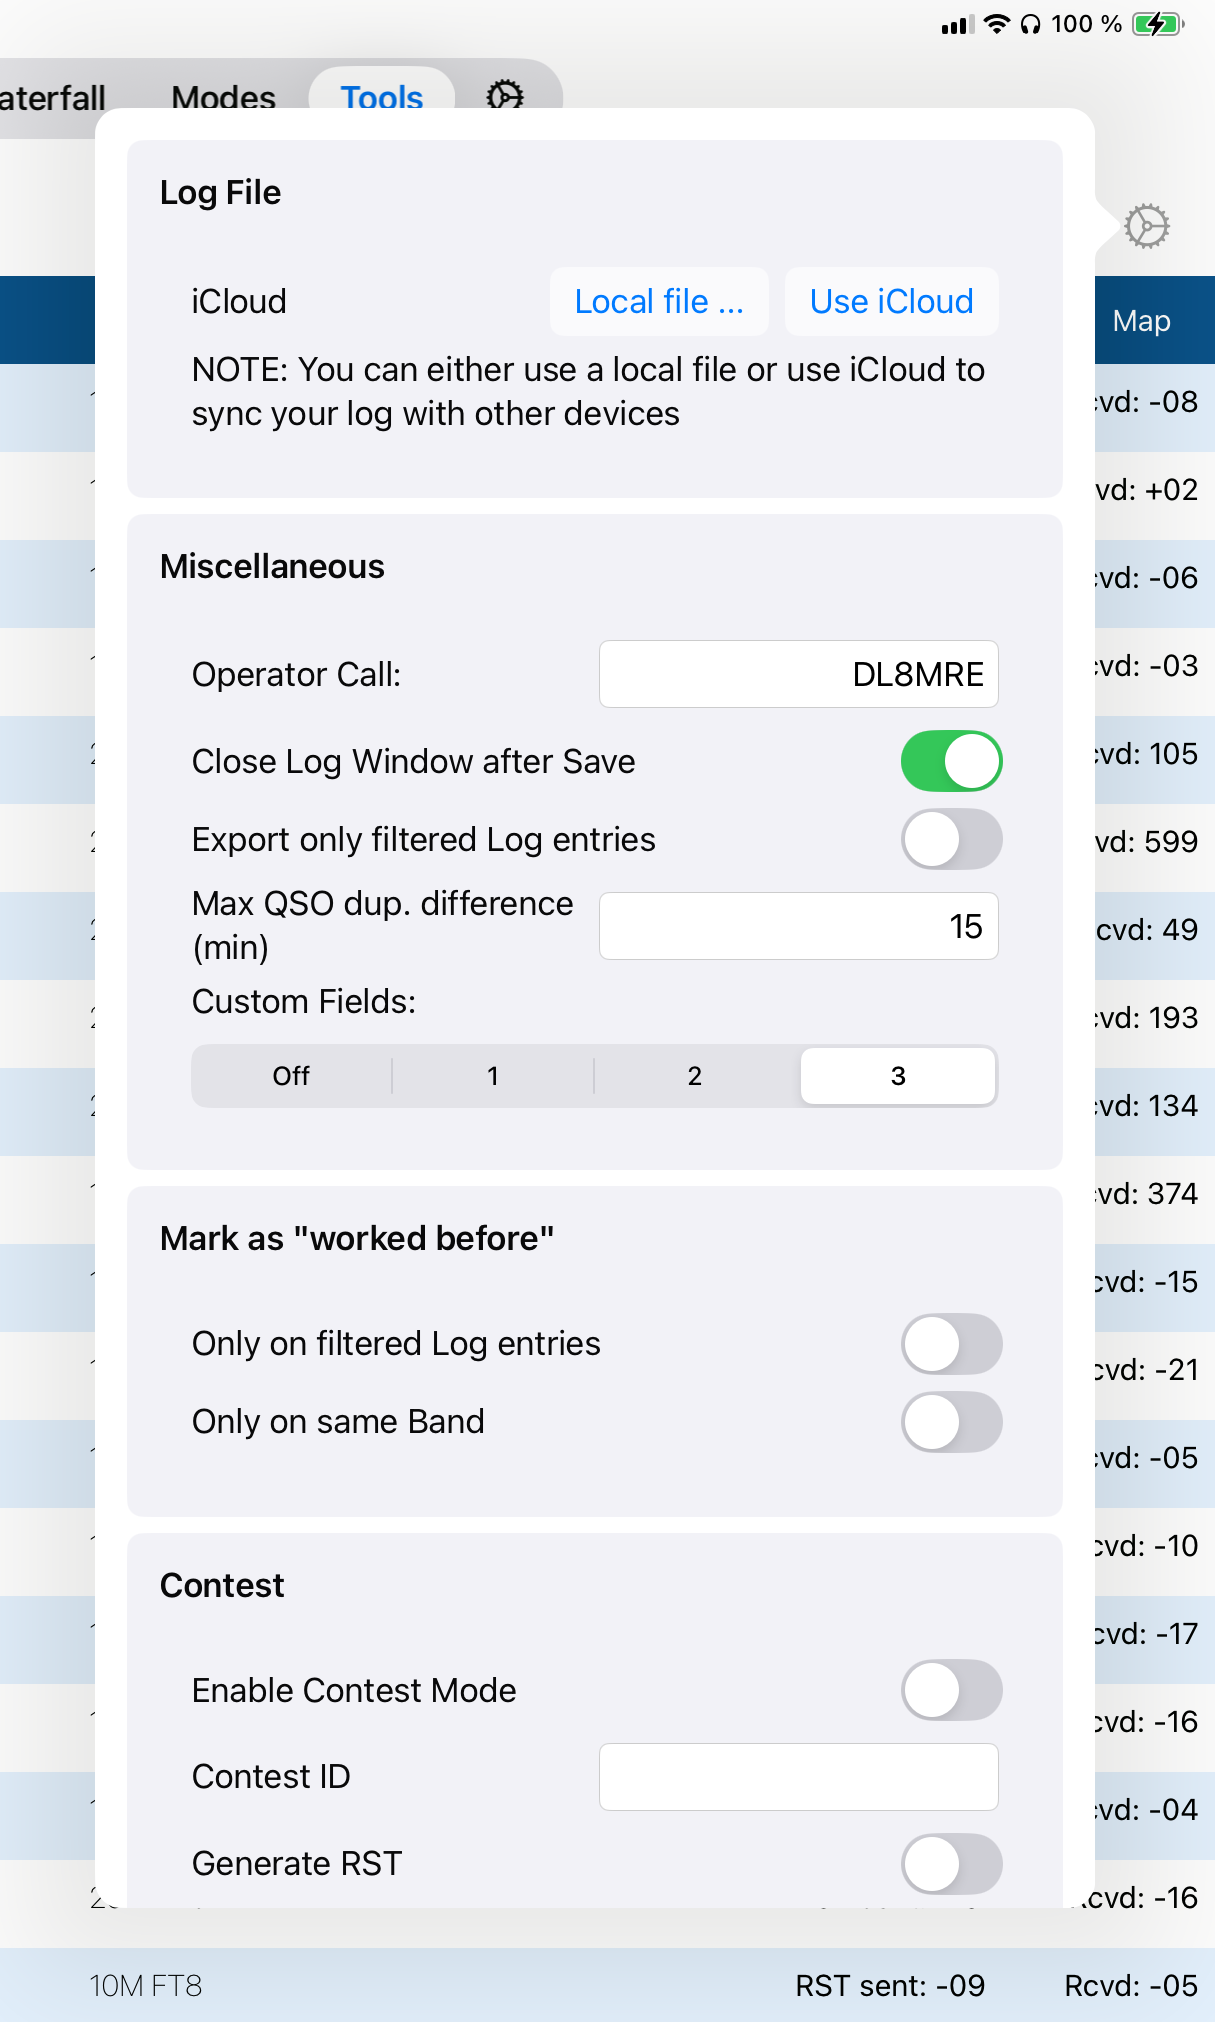
When enabled, your Logbook will be synchronized across your devices. This synchronization uses iCloud Drive which needs to be enabled on your Device and will work even with the Mac Version of this App or the SmartSDR Apps.
Other Tools like the FT8 Tool will display Call signs marked in a different color if you have worked a call before. In the above settings you can define when a Call sign should be regarded as “worked before”.
Under Contest, you can let the logging Tool automatically generate text for the RST entries.
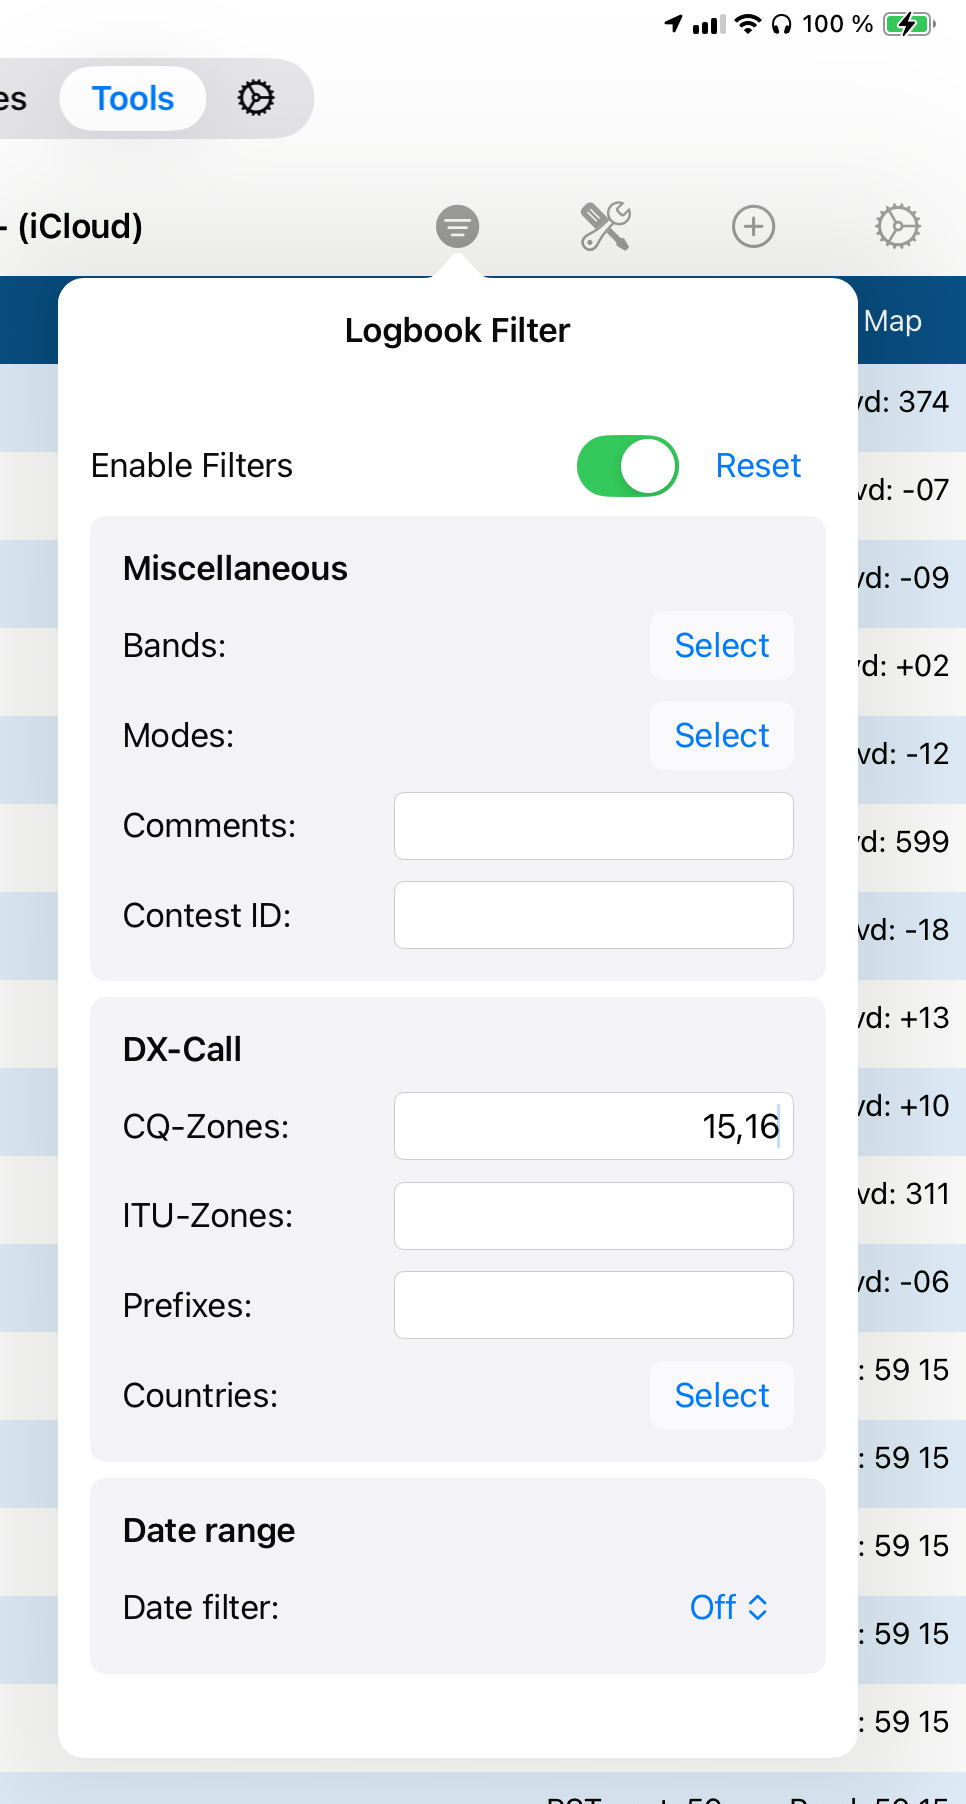
You can also filter the Logbook using the Filter button.
11.1. Logging a new QSO
For logging a new QSO, you have a couple of options:
From inside the Logbook Tool, tapping the + Icon
From View menu of the Waterfall tab and selecting “Log new QSO”
If a physical keyboard is attached to your iPad, by using the Option and L keys
The FT8 Tool will open the logging Window after finishing a QSO (only if auto logging is disabled)
The displayed logging window will be pre-populated with values based on the current VFO:
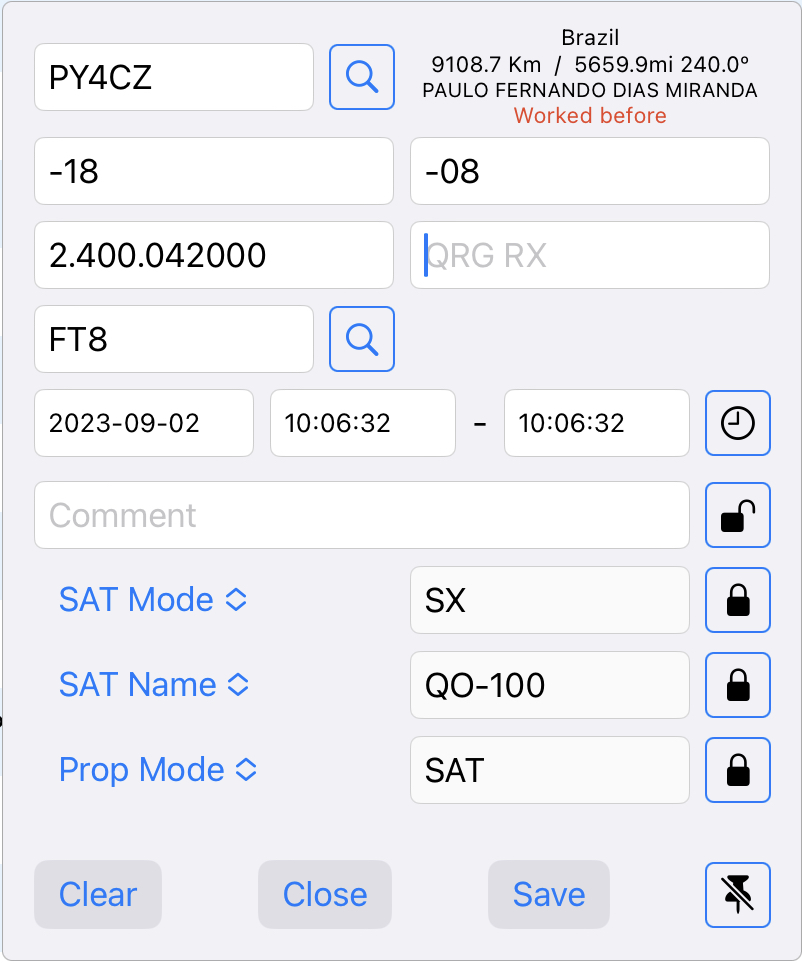
To log a new QSO (Contact), simply enter the call sign of your QSO partner and tap the “Save” button. This action will save the contact details to your Logbook.
To the right of the call sign entry field, you’ll find additional information about the entered call sign, including QTH (location), distance measured in both kilometers and miles, as well as details for both short and long path (LP) calculations. This area also indicates whether the call sign is already present in your logbook.
You can tap the Spy-Glass button for an in-depth lookup of the entered call sign, providing you with further details.
11.1.1. Time Stamps
The QSO Start Time automatically reflects the moment you opened the log entry window. To continuously update the QSO End Time, tap the black clock icon located to the right of the time display; this will cause the end time to update every second.
11.1.2. Field Locking
Certain fields feature a lock icon on their right side. Activating this lock ensures that the information you’ve entered into these fields remains constant, even after saving and moving on to a new QSO entry. This can be useful for information that remains consistent across multiple contacts.
11.1.3. Custom Fields
When you enable Custom Fields in the Logbook Settings, three additional input fields will appear. You can select the appropriate ADIF (Amateur Data Interchange Format) field for each from a dropdown menu on the left side.
Custom fields are especially useful for specialized operations like POTA (Parks on the Air), SOTA (Summits on the Air), SAT-Mode (Satellite Mode), or any other scenarios requiring you to log QSO values that are typically not needed.
11.1.4. Keep the log window open
Located at the bottom-right corner of the screen is a push-pin icon that controls the behavior of the window after saving a QSO. If the push-pin icon is crossed out, the window will automatically close once you tap the “Save” button. If the icon is not crossed out, the window will clear the fields for your next QSO entry but remain open, allowing for quick and consecutive logging.
11.2. Log submission to other Apps via UDP
If you are using your iPad on your local network and want to continue to use another Logging software on your Mac or even your Windows PC, you can use a feature of this App which submits all new log entries to other software via UDP.
This feature can be enabled in the App Setting. If enabled, whenever you are adding a new Log entry, this log entry will be submitted simultaneously to the other Logging program. In addition, there is a “UDP Broadcast” button on the Log detail screen which can be used to submit any older or amended log entry as well.
For UDP Log transmission, you need to enter the IP Address of the PC/Mac where your other Logging program is running and the required UDP Port. If the program is running on the same Mac, just enter 127.0.0.1 as IP Address.
Unfortunately, there are different standards for submitting log entries via UDP. This App supports two different standards:
1.) For N1MM or Log4OM format
This standard is understood by N1MM or Log4OM and others, mainly PC based logging programs.
2.) WSJT-X format
This standard is used by WSJT-X. Every logging software that can receive WSJT-X UDP logging information can be used.
The ports that need to be used for each standard depends on the Logging program. Some will let you enter an individual port number, some have a fixed port number. In any case, the port number used by the logging software needs to be identical to the port entered here.
When clicking the Test button, a sample log entry will be submitted so you can verify if the log entry will be received in your logging program.
11.3. Logbook export
When tapping the Folder Icon at the top you can chose how to import or export your logbook. It is recommended to create export files vie Email or iCloud Drive to keep a backup of your Logbook.
12. Call lookup
The Call lookup Tool can be used to learn more about a certain call-sign.
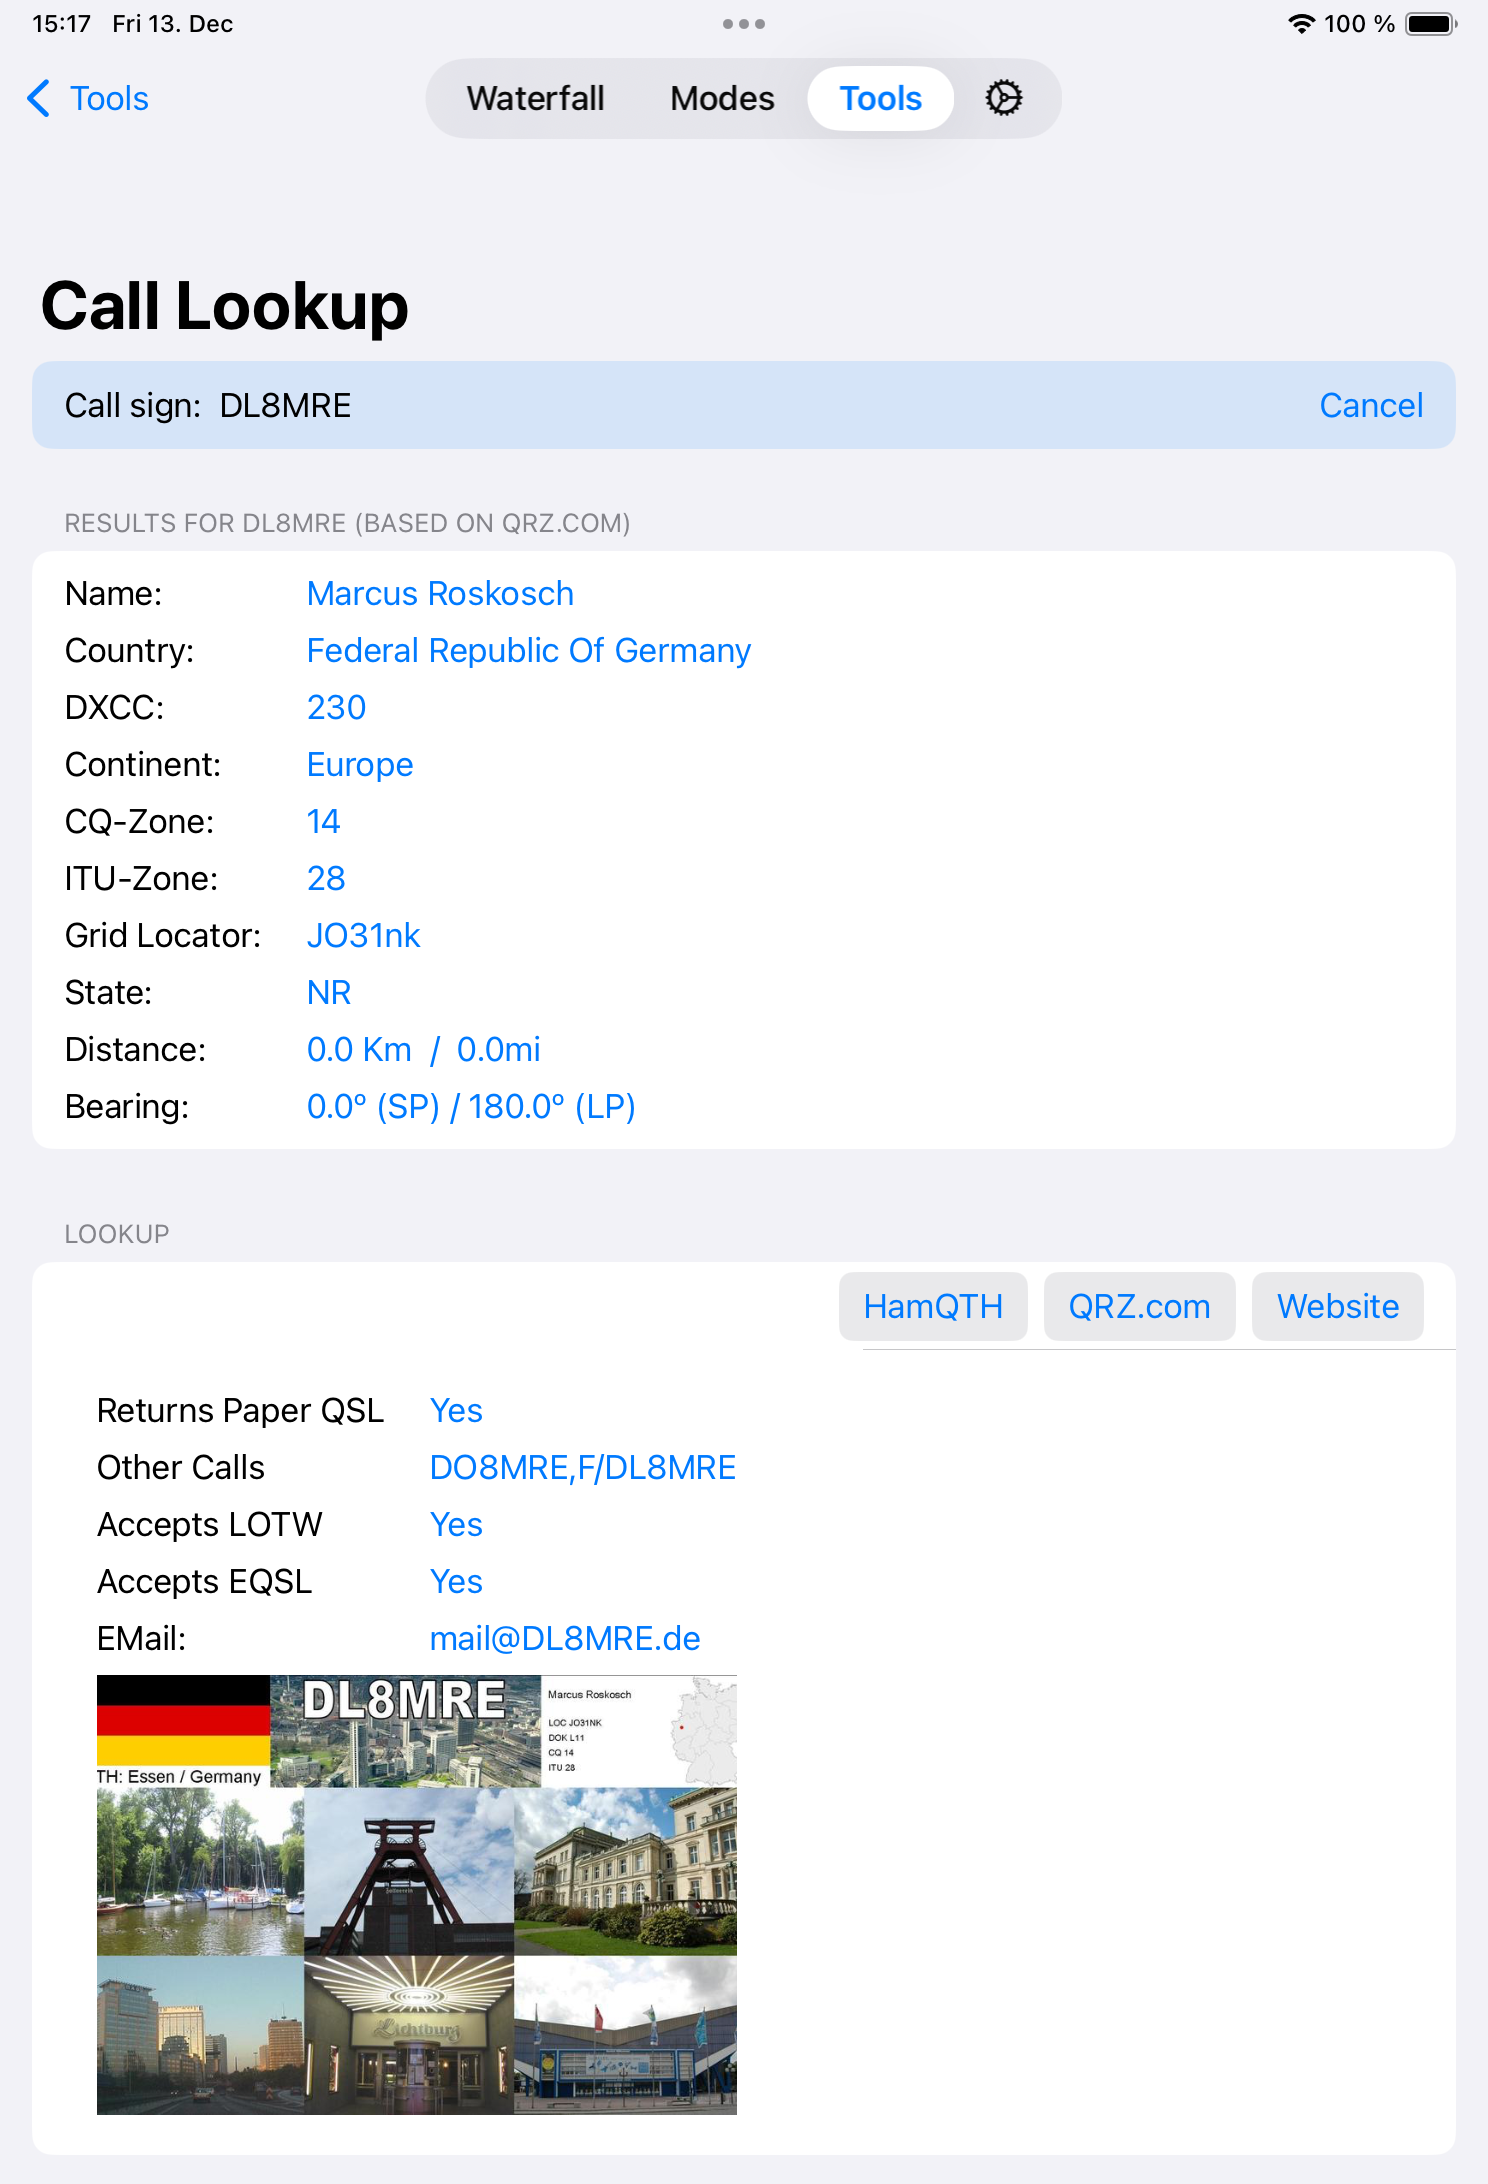
After entering the Call-sign in the top entry field, Basic information like Country, DXCC, CQ- and ITU-Zone will be displayed immediately. This information comes from an internal Database of the App which will be updated from time to time.
Note
This information is only accurate down to a country level. The location within a country will always be the location of the capital city of the country.
Further below you will get a list of previous QSOs to the entered Call-sign.
For more accurate and detailed information like the name, exact location or even Email address, you can use one of the integrated call lookup services like HamQTH or QRZ.com. If you have an account on one or both of these services, please enter your account information in the App Settings. In that case, you can use the HamQTH or QRZ.com lookup buttons for best results and most convenient display. If you don’t have accounts for these services, you can at least use the View on QRZ.com button which will show the QRZ.com website for the particular call-sign.
Once you have used the call lookup using HamQTH or QRZ.com, the results in the upper part will be updated.
This also includes Distance and Bearing.
13. Network Stats
This Tool can help to analyze network issues.
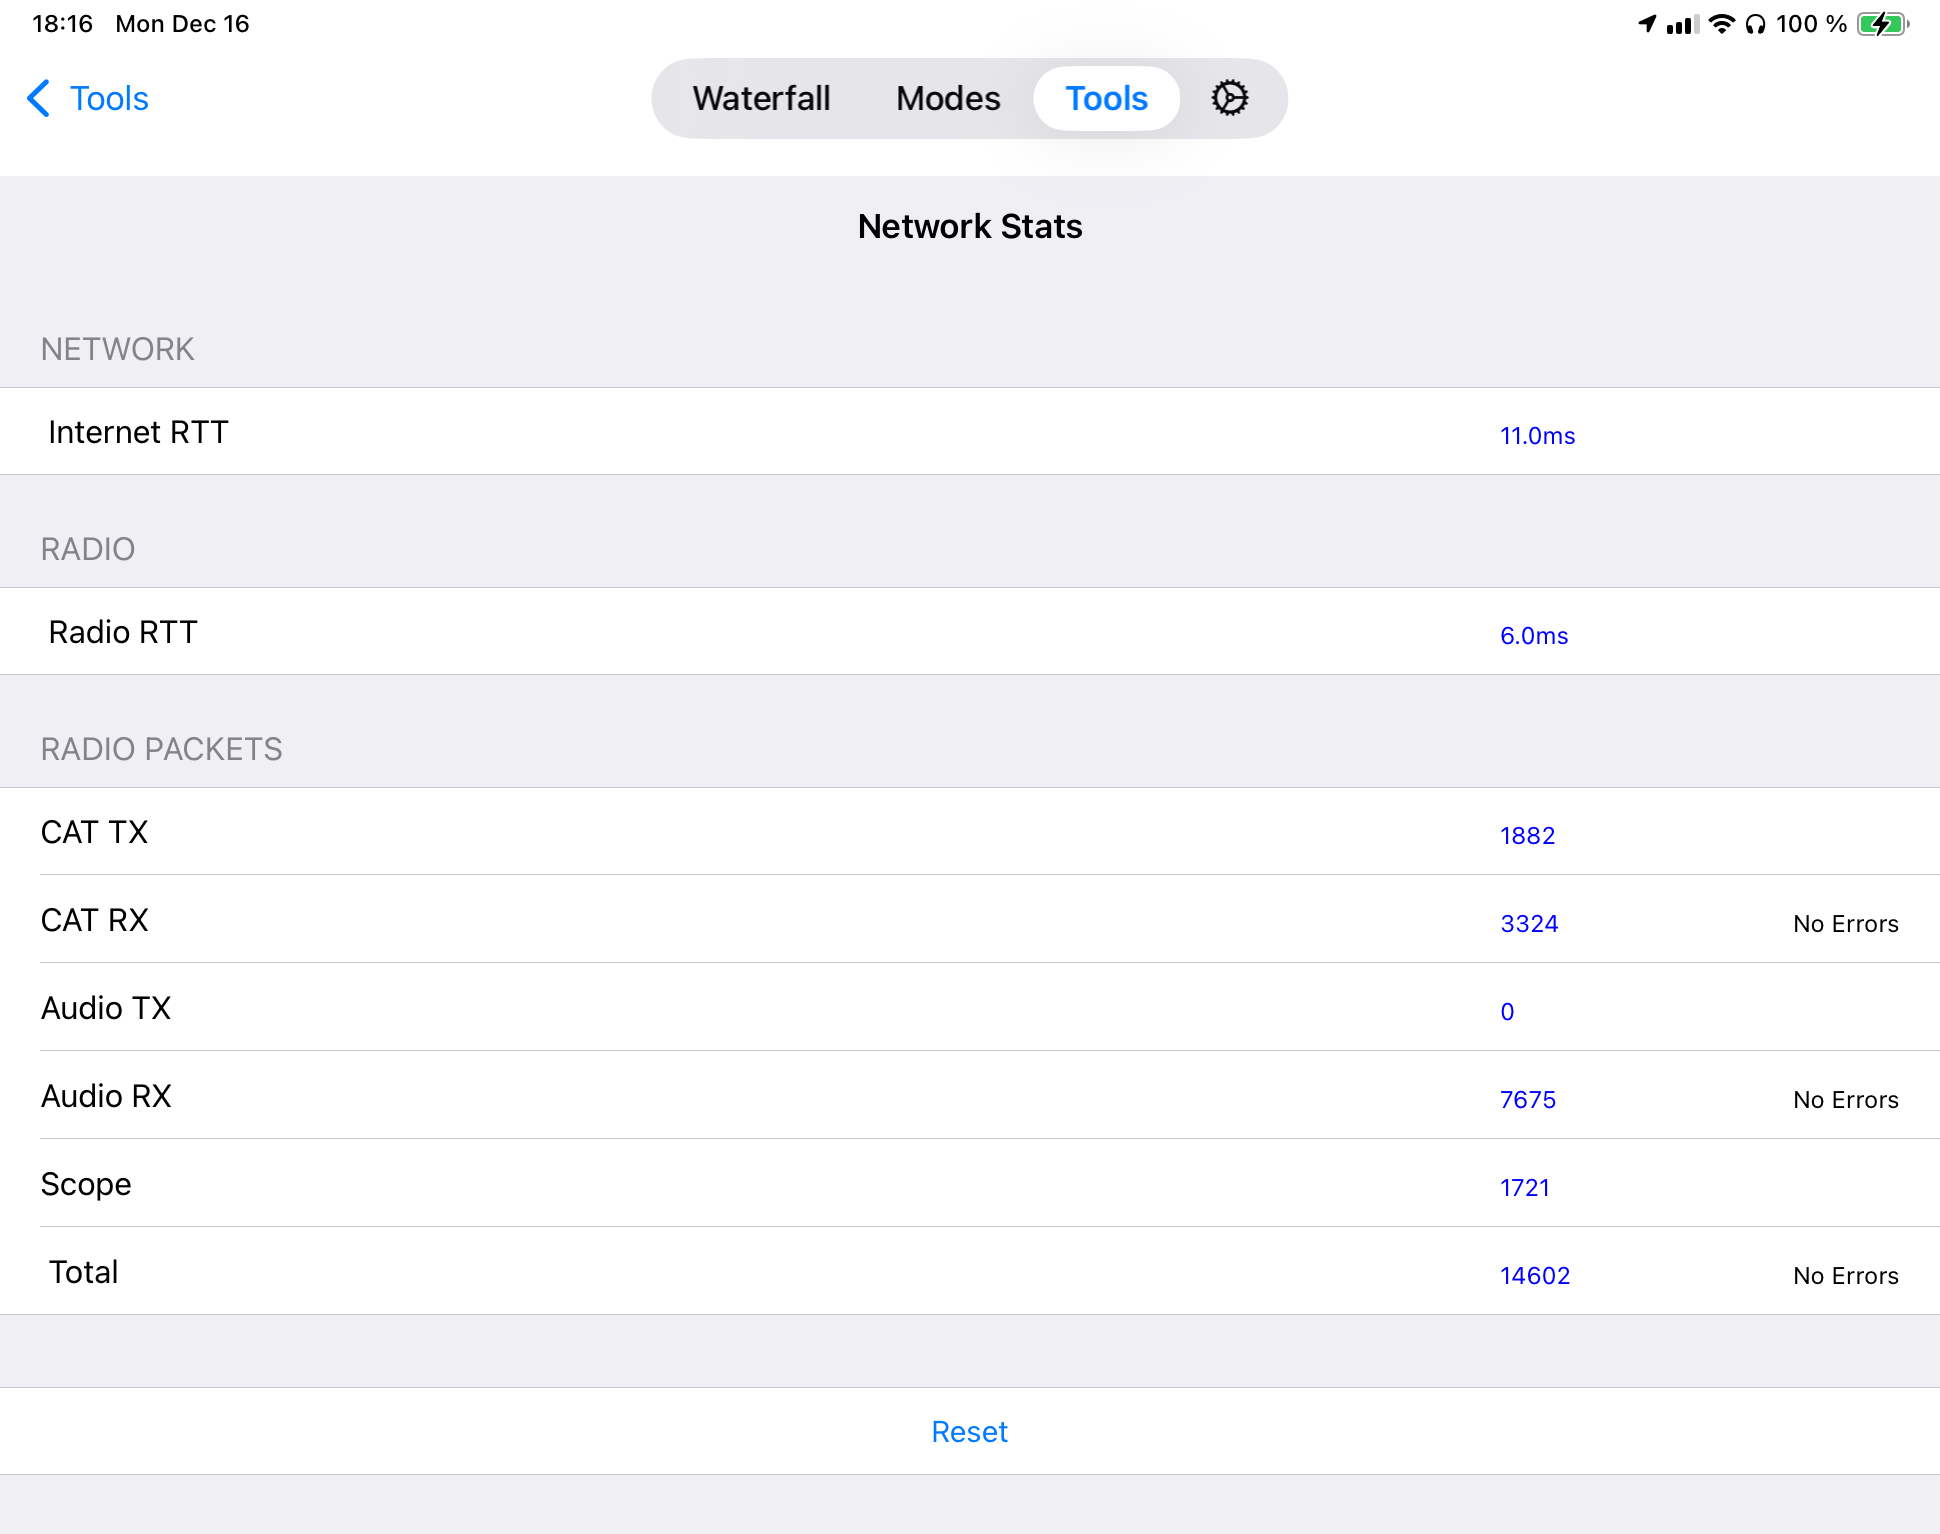
It displays information about the network traffic from and to your Radio.
Internet RTT is the Round-Trip-Time (the time to the server and back) to a server on the Internet. This value should be lower than 30 – 50ms. Higher values indicate general issues with your network connection. However, this value is only important for Call Lookups over the internet.
Radio RTT is the Round-Trip-Time to your Transceiver. These should be below 20ms on local networks. However, this value should always be lower or at least equal than the Internet RTT. If this value is significantly higher (e.g. 1.5 or twice as high as your Internet RTT) there are issues with your local network (e.g. wrong LAN Cables or wrong FullDuplex/HalfDuplex network settings or a WiFi issue in case you are using an IC-705.)
The Radio Packets section shows the number of packets received for certain packet types along with the Error count and percentage.
A certain Error percentage up to 0.05% is normal and usually covered by the automatic error correction and often not even noticeable. Errors may even temporary happen if the device is too busy (e.g. while temporary switching to another App). However, continuous Errors might be an indication of network issues.
You may also want to monitor the Error rate while you are transmitting. If the rate goes up while transmitting, you likely have an EMC / RFI problem.
The Reset button at the bottom can be used to set the error counter to zero which is useful to see if there are any changes after changing some settings.
In case of Network issues, please consult the Common Issues section of this Manual.
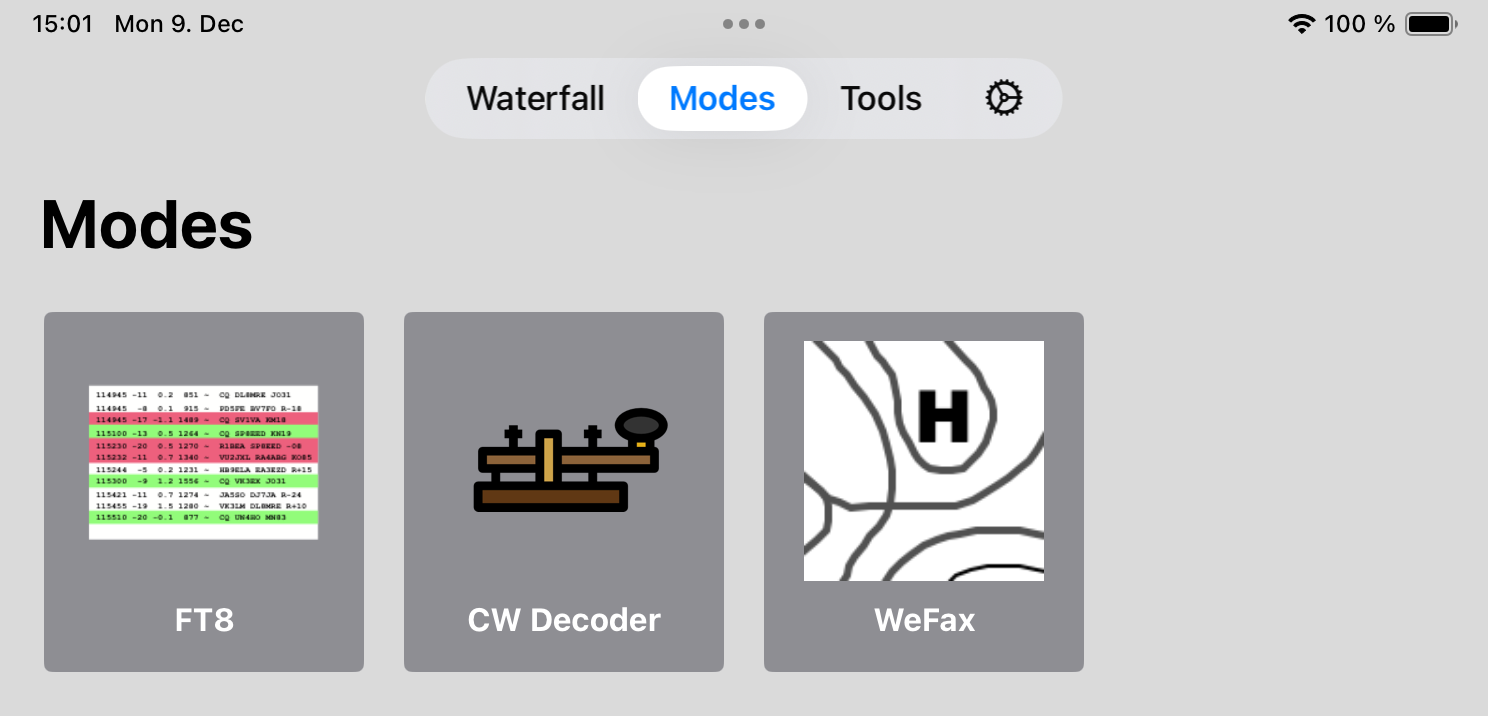
1. Modes
The Modes tab will be visible once you are connected to a Radio. It includes tools for operating in certain modes like CW or FT8.
2. CW
This CW Mode Tool can be used to work in CW along with a CW Decoder.
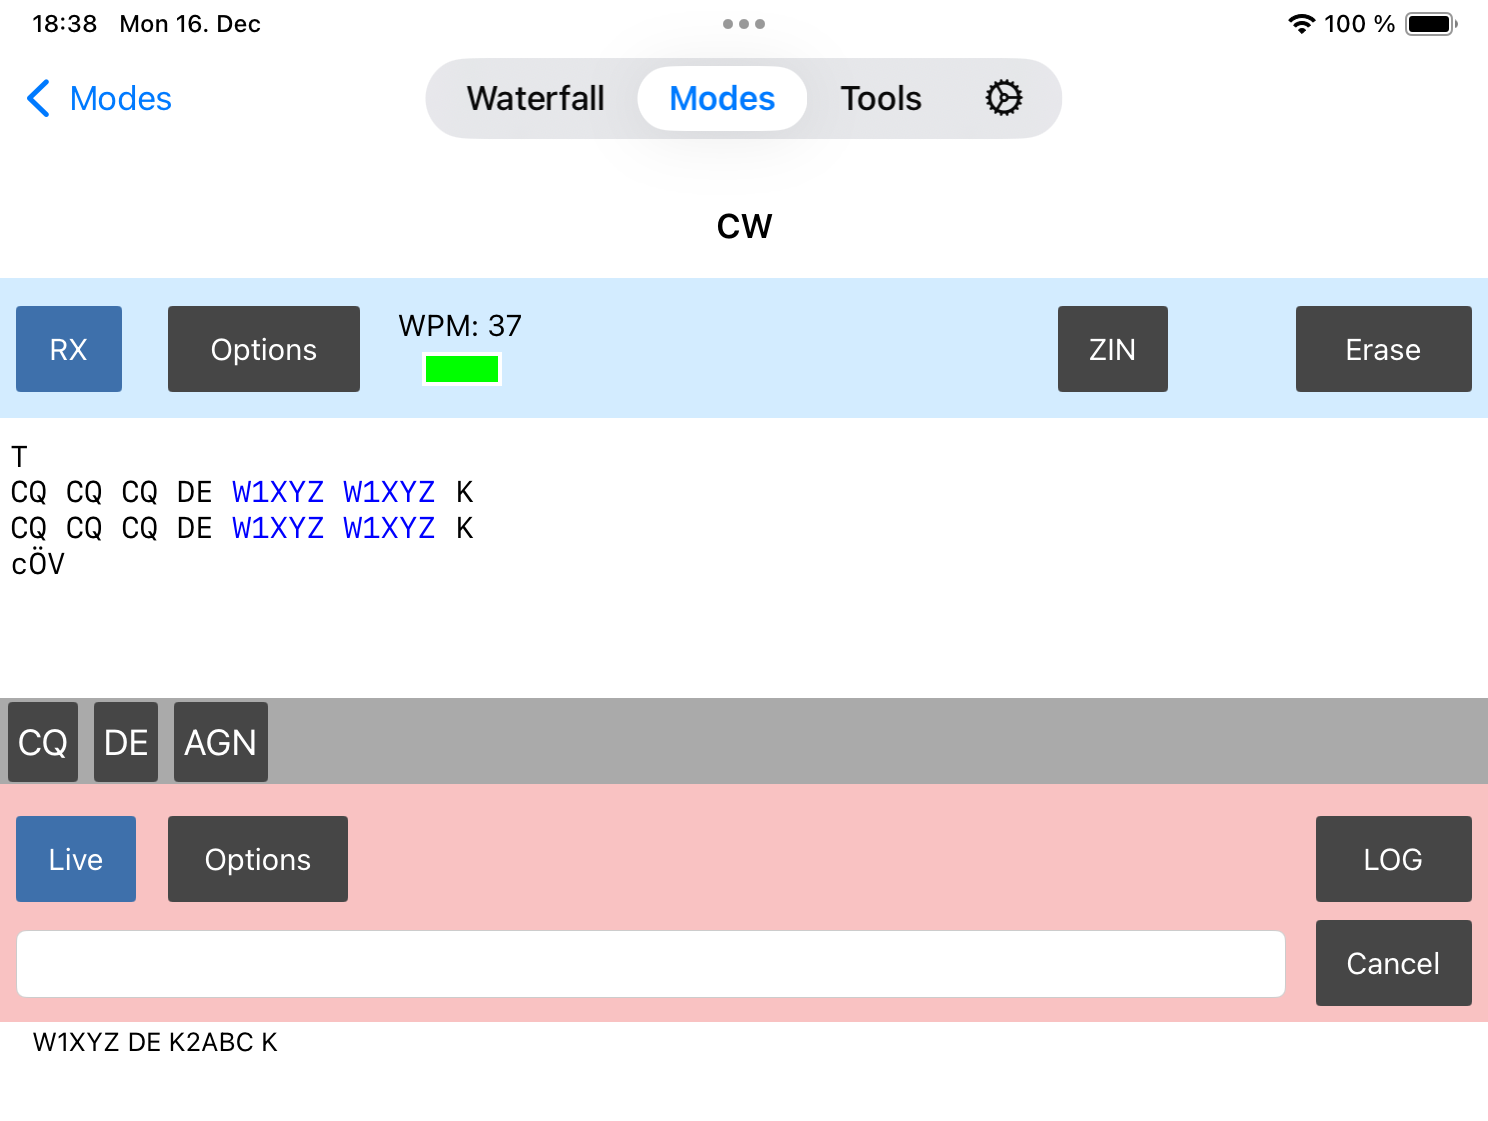
It consists, like the FT8 tool, of a RX section in the upper part where decoded CW will be displayed and a TX section at the lower part.
Once you hit the RX button, CW decoding will start at the currently selected frequency. To optimize CW decoding, you can change decoding options using the Options button in the upper part.
Depending on the noise on the frequency you may see random characters instead of well decoded CW. You can always hit the Erase button to clear the receive section. Hitting Erase twice will also clear the TX section like for the FT8 Tool.
The CW decoder will try it’s best to identify the speed of the other station which will be displayed at the top. Identifying the speed will require receiving at least two characters so the first characters of a submission might get lost or could be wrong. You can prevent this in case you already know the speed of the other station. In this case, you can enter the expected speed as Min. and Max. WPN in the RX Options.
If you have maintained CW Macros (in the Tools section of the App), these Macros will be displayed as buttons just below the decoding section.
The CW TX options can be maintained using the Options button of the TX section.
When Live mode is turned on, everything which is being entered will be sent immediately. If Live mode is off, everything will be sent once you hit the return key.
Each submitted line will be displayed below the entry field. You can click on a line to repeat the transmission of a previously sent line.
You can always hit the Cancel key to cancel any CW submission.
The Cancel key will also hide the keyboard so you will be able again to select the tabs at the bottom to switch between the waterfall or other tools.
Note
You can send pro-signs like BK by using the ^ prefix character (e.g. ^BK). This is only possible when not using the Live mode.
3. FT8
This tool allows to use and operate the popular FT8 and FT4 mode, invented by Nobel prize winner Joe Taylor, K1JT.
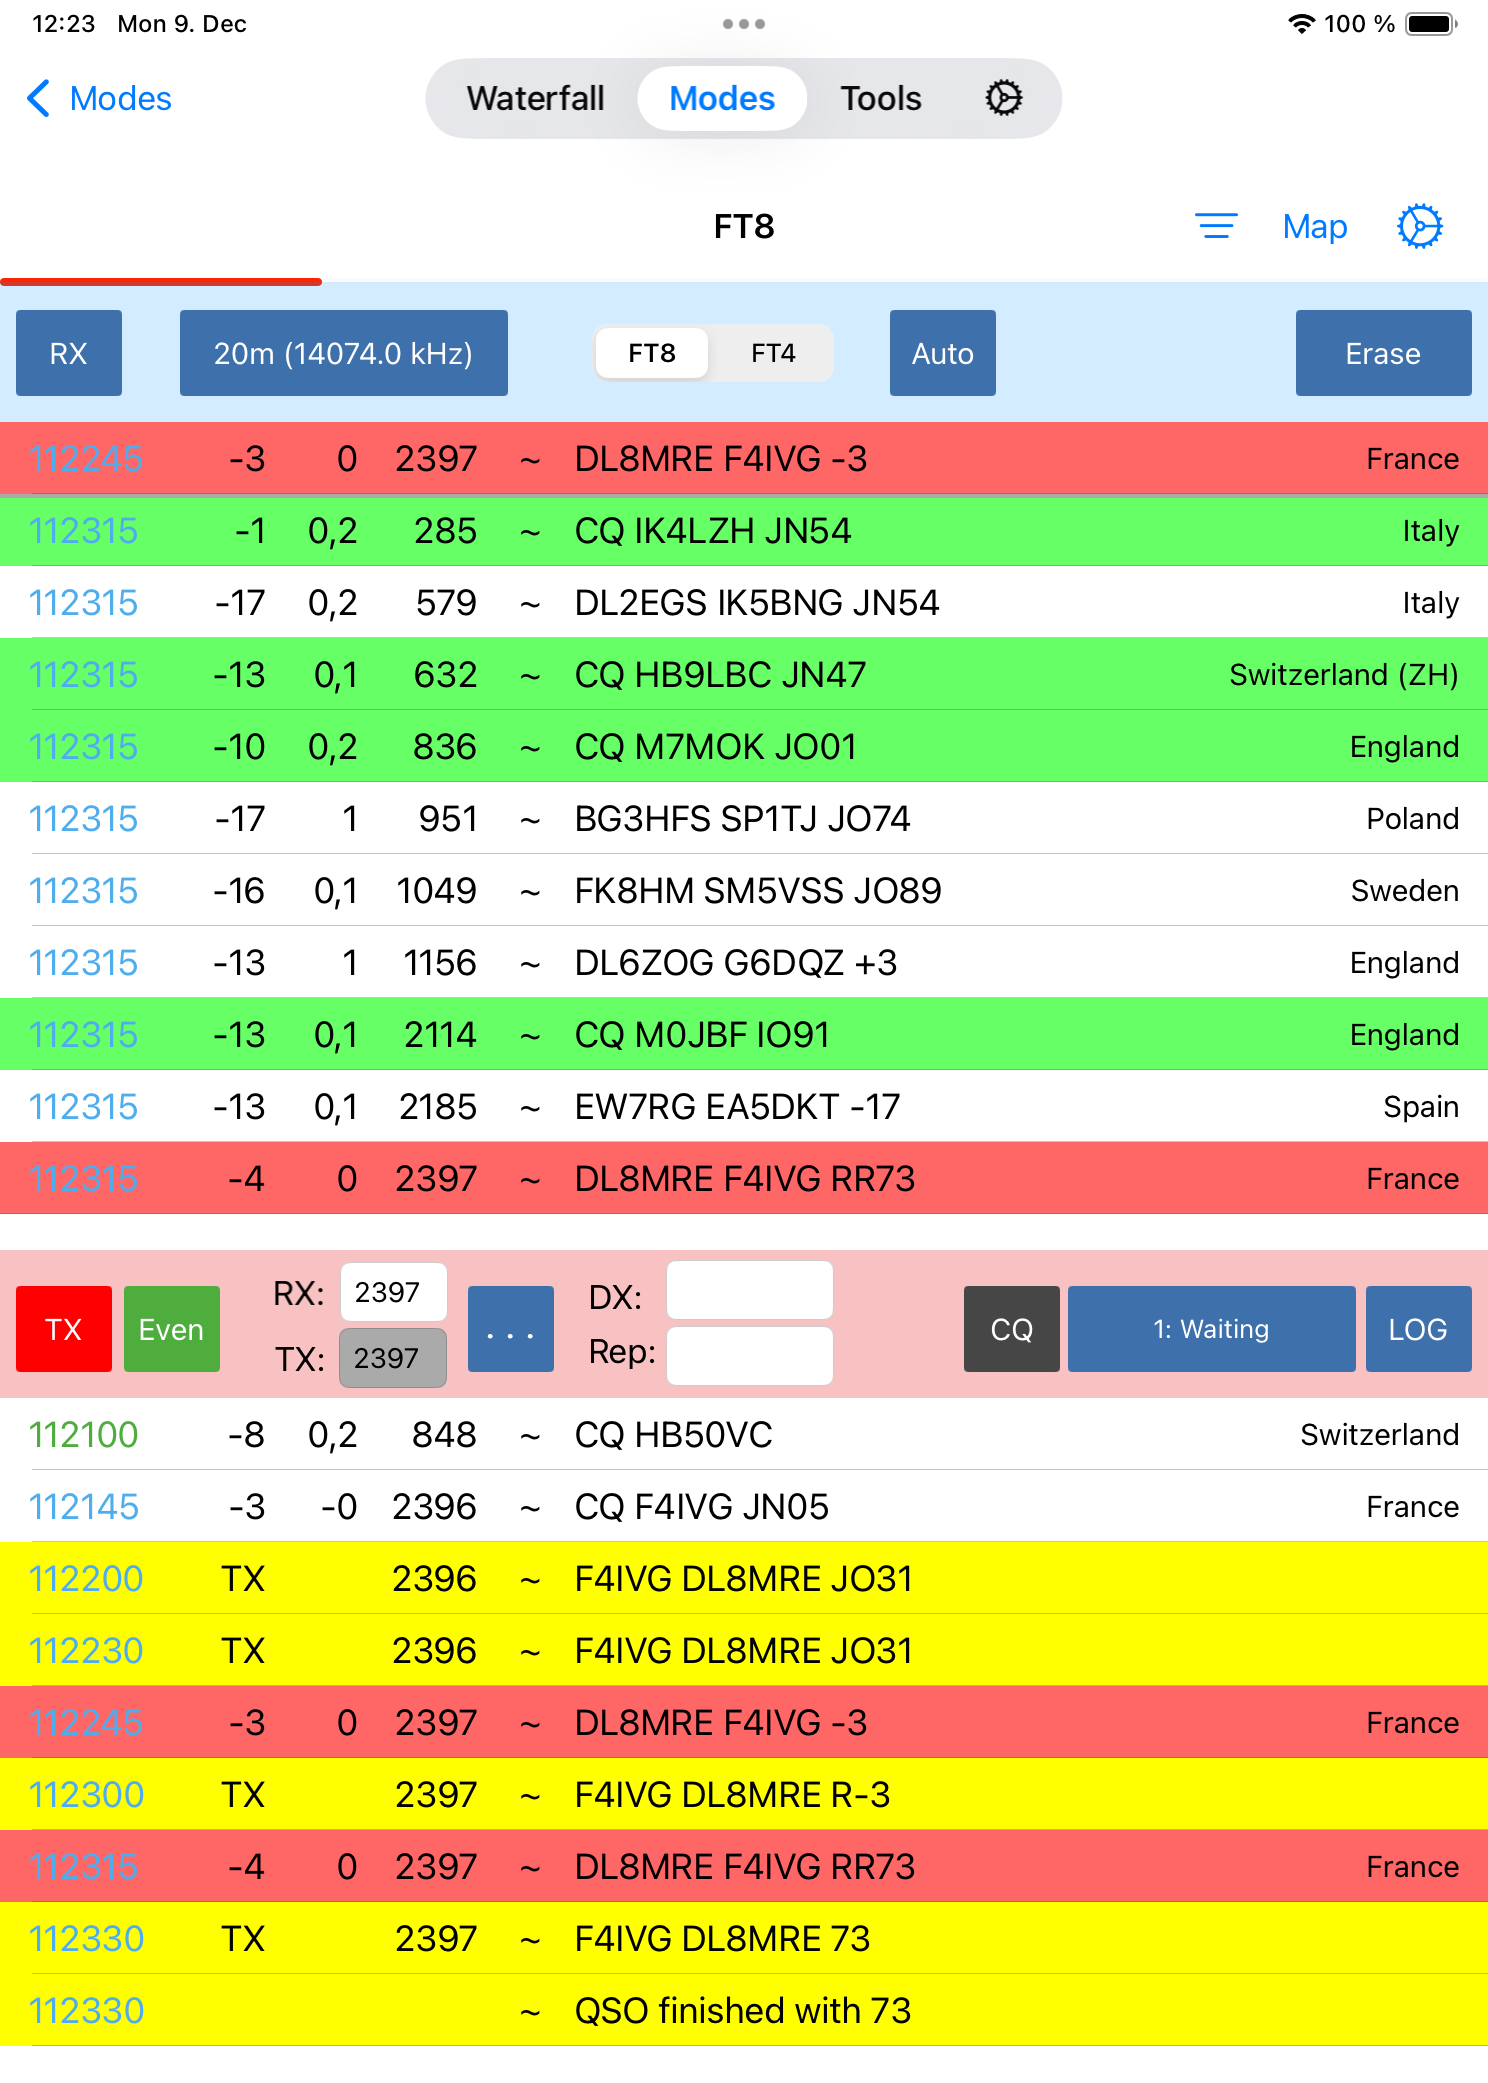
The screen above shows a typical FT8 QSO.
3.1. Foreword (please read)
I had the pleasure of meeting Joe in Dayton in 2019. His lecture was the catalyst for me to prioritize the integration of this feature into my SmartSDR iOS App. Grasping his method for encoding and decoding FT8 messages was a learning curve, involving a deep dive into FFT (fast Fourier transformation). I’m proud to say that all my Apps now boasts a comprehensive FT8/FT4 Tool.
We owe a debt of gratitude to Joe Taylor , the architect of this exceptional mode.
3.2. Requirements / Features
So far, the App only supports FT4 and FT8. Also, no Contest or DX-Pedition mode is supported. It just supports standard QSO’s which are about 95% of all FT4 and FT8 QSOs.
The App supports AUTO mode to automatically generate answer messages based on received messages. It also supports Auto Logging and prompts to log a QSO with all entries pre-filled based on the recent QSO. Worked before Calls will be marked to prevent working them again. CQ Calls will also be displayed on the Waterfall just like DX-Cluster Spots.
3.3. How to use
My approach was to offer FT8 with minimal or no configuration and operation effort. If you are already familiar with WSJT-X, you will immediately know how to operate in FT8 with my App. If you have never worked FT8 before or found it too complicated, just read the following basics and you should be set.
My hope is, to encourage more HAMs to join this fantastic new way to get in contact with each other by providing a simple and easy to use FT8 tool. Even if you found FT8 too complicated in the past, just give it a try with this tool. No cable fiddling, audio interfaces, strange settings or CAT commands.
Just open this tool and start your first FT8 QSO.
3.4. A few FT8 Basics
A typical FT8 QSO starts by somebody (say K1CQ) calling CQ, next somebody like you (say DC1ME) is answering. Both will then exchange their signal reports and optionally end the QSO by saying 73.
Here is how it typically looks like:
Caller |
You |
Meaning |
|---|---|---|
CQ K1CQ EN61 |
K1CQ is Calling CQ. His Grid locator is EN61 |
|
K1CQ DC1ME JO12 |
You are replying to him with your Grid locator |
|
DC1ME K1CQ -11 |
K1CQ responds to you with a signal report |
|
K1CQ DC1ME R-10 |
You, confirming his report and send your own report |
Now, there are two typical options:
Option 1 (the fastest and more common):
DC1ME K1CQ RR73 |
K1CQ confirmed the reception of your report and says best regards. The QSO is done now. No need to respond again |
Option 2 (more polite option which takes longer):
CDC1ME K1CQ RRR |
K1CQ confirmed the reception of your report |
|
K1CQ DC1ME 73 |
You say best regards |
|
DC1ME K1CQ 73 |
K1CQ send his best regards and the QSO is over |
If you would like to call CQ yourself instead, the procedure is the same. Just swap the Callsigns in the above table.
These so-called FT8 messages cannot be longer than 13 Characters. It takes 13 seconds to transfer these messages and they will be exchanged every 15 seconds. Thus, there can be 4 messages per minute. When sending at second zero or 30 it is called “even” or “first”. When sending at second 15 or 45, it is called “odd”.
Besides these aforementioned typical QSO messages, there is additional information that will be added to messages in Contests Mode or DXpedition mode. These modes are not supported by this FT8 tool.
CQ Callers may also add either DX or the desired destination to their CQ message if they just want to get an answer from certain stations.
For example:
CQ DX K1CQ EN61 |
K1CQ just wants to have DX QSOs |
CQ JA K1CQ EN61 |
K1CQ just want to have contact with Japan |
And that’s pretty much it. That’s all you need to know to operate in FT8 with this App.
If you want to learn more, just head to G4IFBs website which includes a fantastic FT8 Operating guide, written by Gary Hinson, ZL2IFB : www.g4ifb.com which is also available in other languages.
3.5. Using the FT8 tool
You can start the FT8 Tool from the Tools menu as usual.
There are two window parts, the Receive window with the blue header and the Transmit window with the red header. Both are explained more in details below.
3.6. Quick start
If you can’t wait and have no time to read further, the following sequence will perform a quick FT8 qso:
Select a Frequency (next of the RX Button)
Tap on RX and wait until the list fills
Double-tap on any of the entries of the list
… and wait, the whole QSO will be completed automatically and ending with the logging window as shown below:

… if all goes well of course. But there can be situations where something goes wrong or you want to call CQ yourself. The following chapters will describe everything more in detail.
3.7. The Receive Window
On the top half you will see the RX window with the blue header.
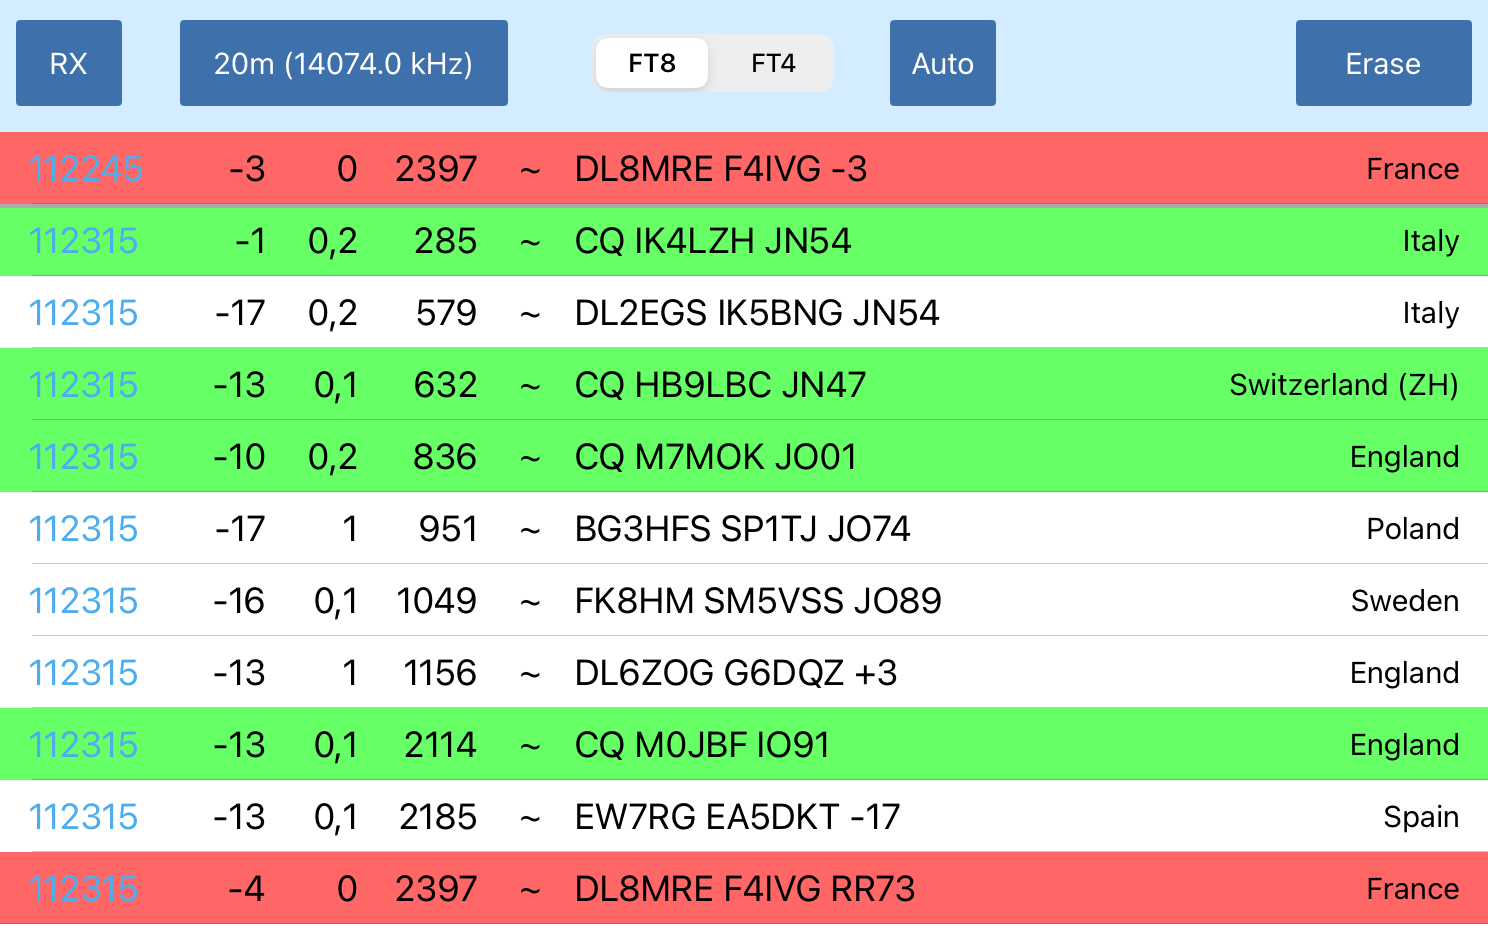
All received messages are displayed on this part of the screen. The following colors are being used:
Green background: Somebody is calling CQ
Gray background: You already worked that station
Red background: your call-sign appears in that message (or you are in TX mode and message was sent on your TX frequency)
3.7.2. The Frequency selection
If you tap on the Frequency selection next to the RX button, you can select the Band or Frequency you want to operate. These Frequencies are fixed and you should only operate on these predefined frequencies.
Note
The frequencies may differ depending on your location so please ensure that you set the correct IARU Region in the Preferences for the location from where you want to operate. Please also ensure that you did set your Callsign and your Grid (QTH) locator in the App Settings.
Hint
If you want to operate on another, not supported Frequency, for example to work DX-Pedition stations, you can always select Manual to tune to any frequency.
Once you hit RX, the Radio will not just tune to the right frequency. Also, all necessary parameters such as Mode, Filter width etc. will be set automatically. So should you accidentally have changed some settings, just tap the RX button twice to get the right settings back.
After at least 15 seconds, you may see the first FT8 conversations in the upper receiving part of the screen.
3.7.3. FT8 / FT4
Use these buttons to switch between FT8 and FT4
Note
iPhone users will find this selection under the Option button at the top
3.7.4. AUTO
Because QSOs are standardized in FT8 (except for the two options to finish a QSO either by RRR or RR73), FT8 QSOs can be automated.
Whenever a message has been received, it the App knows which message needs to be sent next.
If you turn on the AUTO button at the top (make it blue), the App will automatically select the next message to be sent depending on the received message (even in case of an RRR or RR73) and sent the appropriate message automatically in the next transmission phase.
If you need more flexibility or want to finish a broken QSO, just turn off AUTO and select the message you like to be send.
If you select Message 9 {Individual}, you can even enter anything else as message which you would like to send.
Note
iPhone users will find this selection under the Option button at the top
3.7.5. Filter
On a busy frequency, the receive list can quickly get full and you may easily miss some interesting calls. The App provides a filter, described more in details later, to limit the number of calls in the list. Tapping the Filter Icon will open the filter settings from where you can toggle activation of the filter with immediate effect to the list below.
3.7.6. Erase
Tapping the Erase button once, will clear the TX Window (described below) and all QSO fields like DX and Report. A double-tap will also clear the RX Window.
You may want to use this Button, once you have finished a QSO for example.
3.7.7. Tapping on an entry of the list
If you tap on an entry of the receiving list, Frequency, the odd/even setting, the Callsign and dB report will be transferred to the TX Window (see below).
If you would double-tap on the line, in addition, the TX button will be enabled so you will automatically start your transmission at the next odd or even slot.
3.8. The Transmit Window
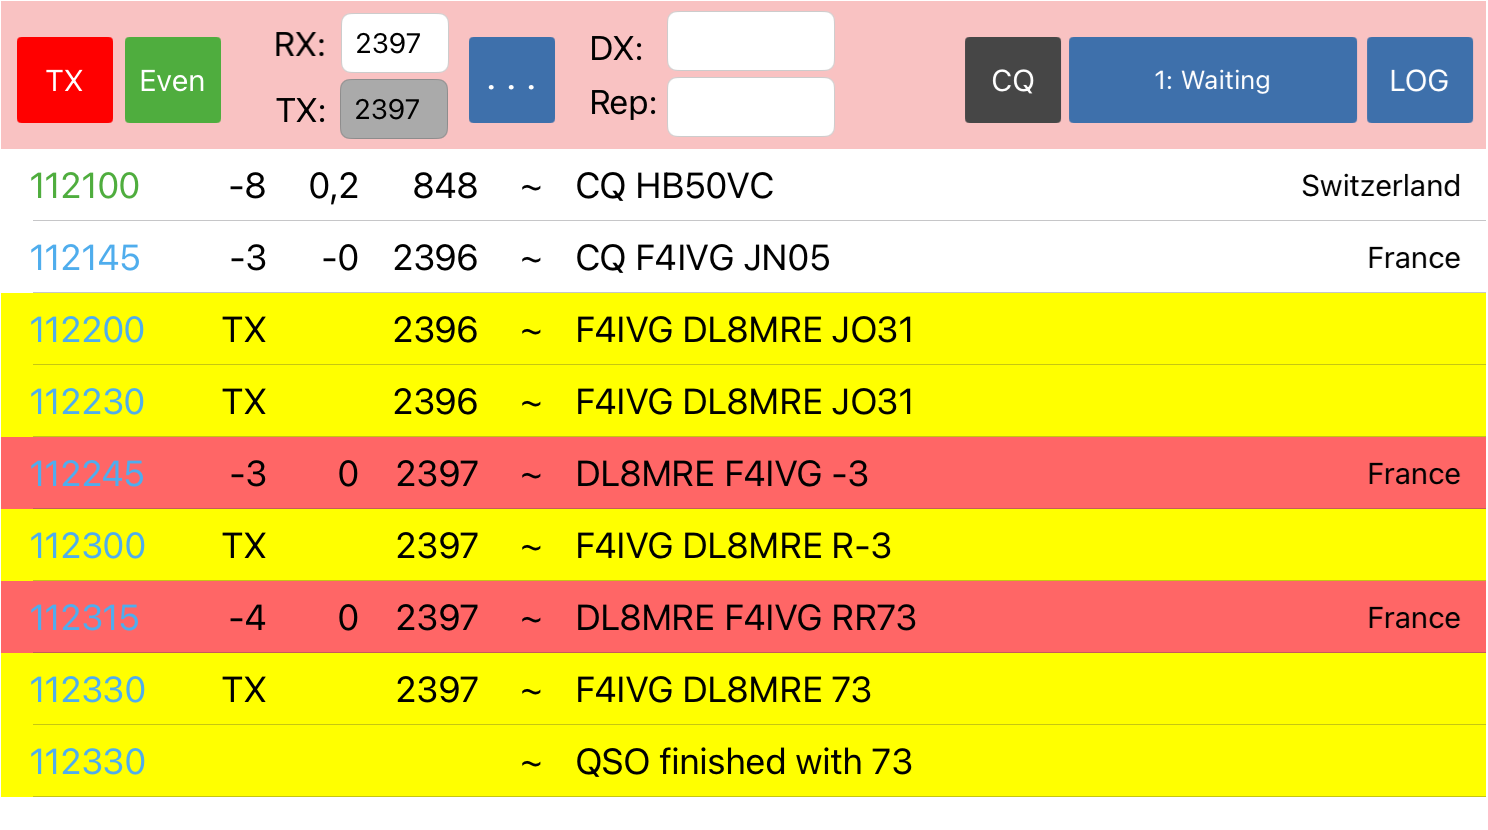
The list in this window contains all your sent messages in yellow and marked with “TX” instead of a dB value.
In addition, it contains all messages that have been received on your RX frequency or messages that are containing your callsign.
This way, you can better focus on your QSO partner and will also see if somebody else is transmitting on the same frequency so you can interrupt your QSO or transmission.
3.8.1. TX
If you tap on this button, transmission will start at the next odd- or even- time slot. If active, the button has a blue background, if you are currently transmitting, the button is red, otherwise it is gray, indicating a listen only mode.
3.8.2. Odd/Even
FT8/FT4 messages can either be sent at an even- or odd time slot. The other station is receiving and transmitting at the opposite time slot. This button indicates your transmission time slot. You can hit the button to change from even to odd or vice verse. If you are not in CQ mode and answering somebody from the receiving list by tapping (or double tapping) on an entry from the receiving list, this button will be set automatically (to the opposite of the calling station you tapped). So normally, you will only need this button if you are calling CQ yourself and want to start calling either in the even- or odd time slot. If the frequency is free, it is common to start in the even slot but that’s up to you.
The colors for odd (green) and even (blue) are corresponding with the colors of the UTC time in the lists.
3.8.3. RX: TX: Frequencies
The two entry fields are used to enter your RX and TX frequency in Hz relative to the Slice frequency. The values usually ranges from 100 to 2900 Hz.
If you tap on a line in the receive list, the frequencies will be taken over from the line you have tapped.
Usually, you may want to transmit on the same frequency where your destination is transmitting. Using the […] button right of the two frequency entry fields, you can either enable or disable TX being equal to RX.
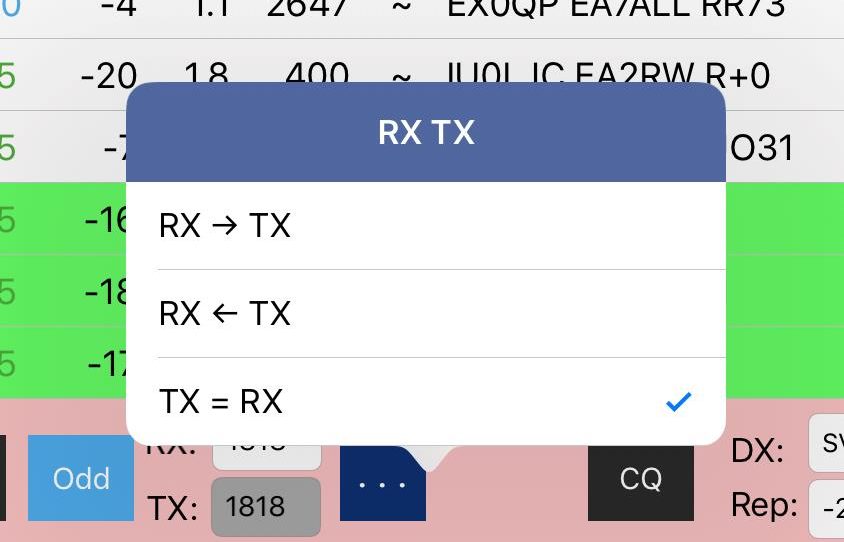
By tapping on TX = RX, the check-mark will be set or removed. If the check-mark is removed you can adjust TX and RX frequency individually. If it is checked, the TX frequency will always be equal to RX. Using the other options here will move the value of one field RX or TX to the other field.
Hint
Using the same RX and TX frequency is the regular operating mode when answering calls. Only if the other station can’t hear you, you may want to use a different TX frequency. On the other hand, when calling CQ you should always open the lock to allow different RX and TX frequencies (Split mode) as you would otherwise “steal” somebody’s frequency when he would answer on a different frequency.
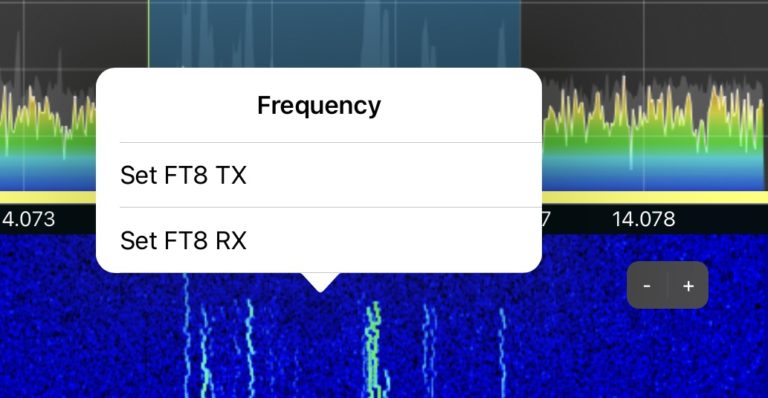
You can also select the FT8 frequency conveniently from the Waterfall by long-tapping at the desired frequency and selecting “Set FT8 TX”.
3.8.4. DX
This field is for the Call-sign of the other station and will be pre-filled when tapping on an entry of the receiving list.
3.8.5. Rep
This field is the dB report of the other station which will also be pre-filled.
3.8.6. CQ
Using this button, you can switch between CQ mode or answering mode. A blue button indicates the activated CQ mode.
3.8.7. Message selection
Right from the CQ button, you can select a message which will be sent in the next odd or even slot.
If you are in AUTO mode, you usually don’t need to change this message, only if you are in manual mode or want to correct / repeat a previously wrong interpreted or received message.
The “Short Messages (no grid) will no longer start with the message which includes your QTH locator (grid) and instead starts with the report message.
Note
A FT8 message can only get 15 characters long. If the message gets too long maybe because both call signs have extra characters, the QTH locator will be removed automatically.
3.8.8. LOG
Hitting the LOG button will open the logging window with all fields already pre-filled.
This button is not needed if you have enabled “Auto log after QSO” in the Settings of this FT8 Tool. In this case, the Log window will appear automatically at the end of a QSO.
You could even turn on “Don’t even show Log Window” and the QSO will be logged completely automated without any user intervention.
3.9. FT8 Settings
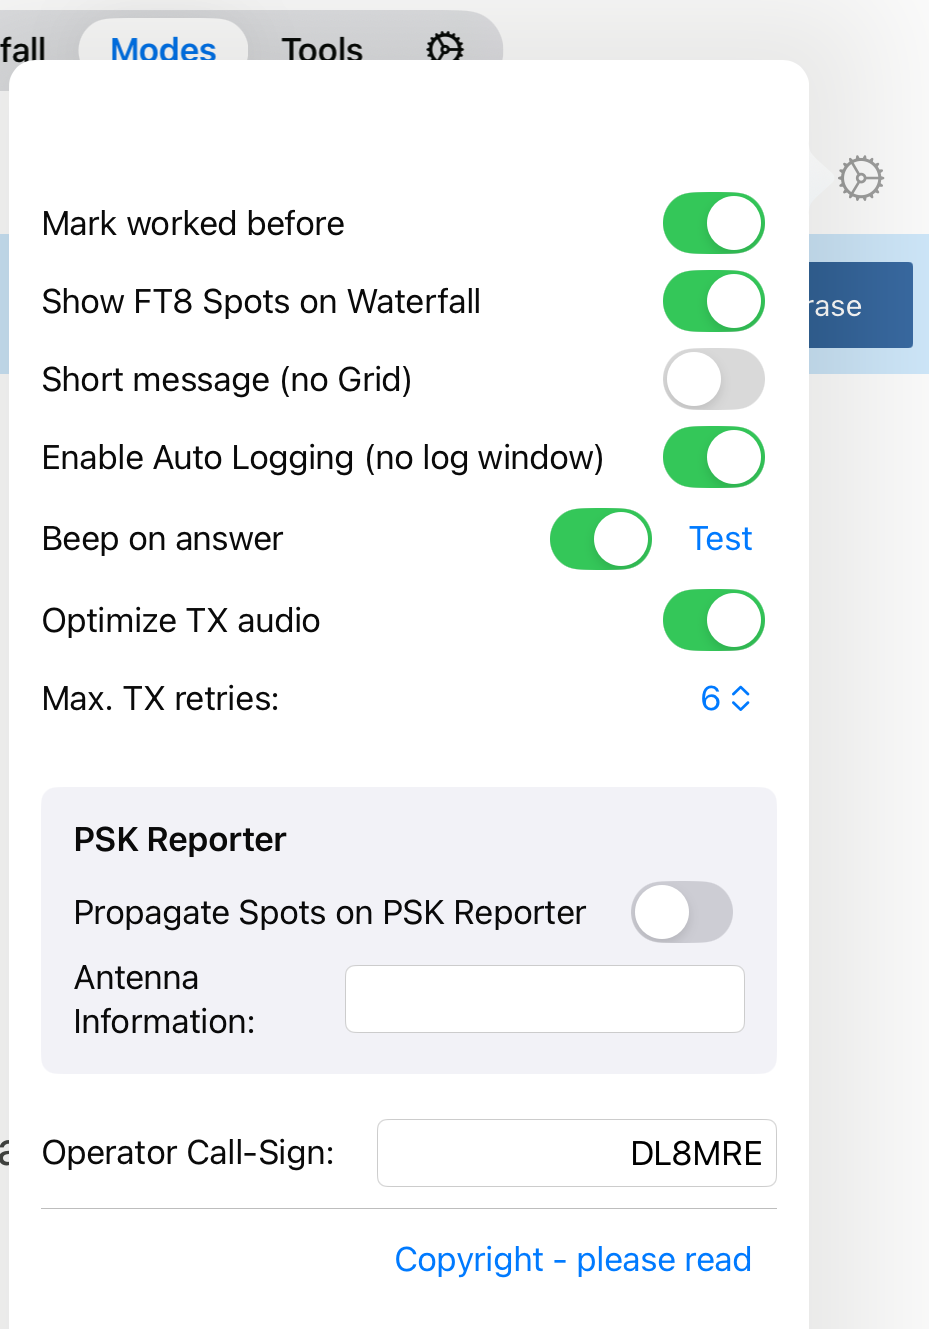
Most of these settings are self explanatory or you can just try them and will see what they do.
When TXing either while answering somebody else’s CQ or calling CQ yourself, the Max. TX retries value defines the number of tries so that you will not end up in an endless loop.
If you would enable Auto Log after QSO and even Auto Log without Log Window, all your QSOs will be logged automated without the need for any confirmation.
3.10. Filter Settings
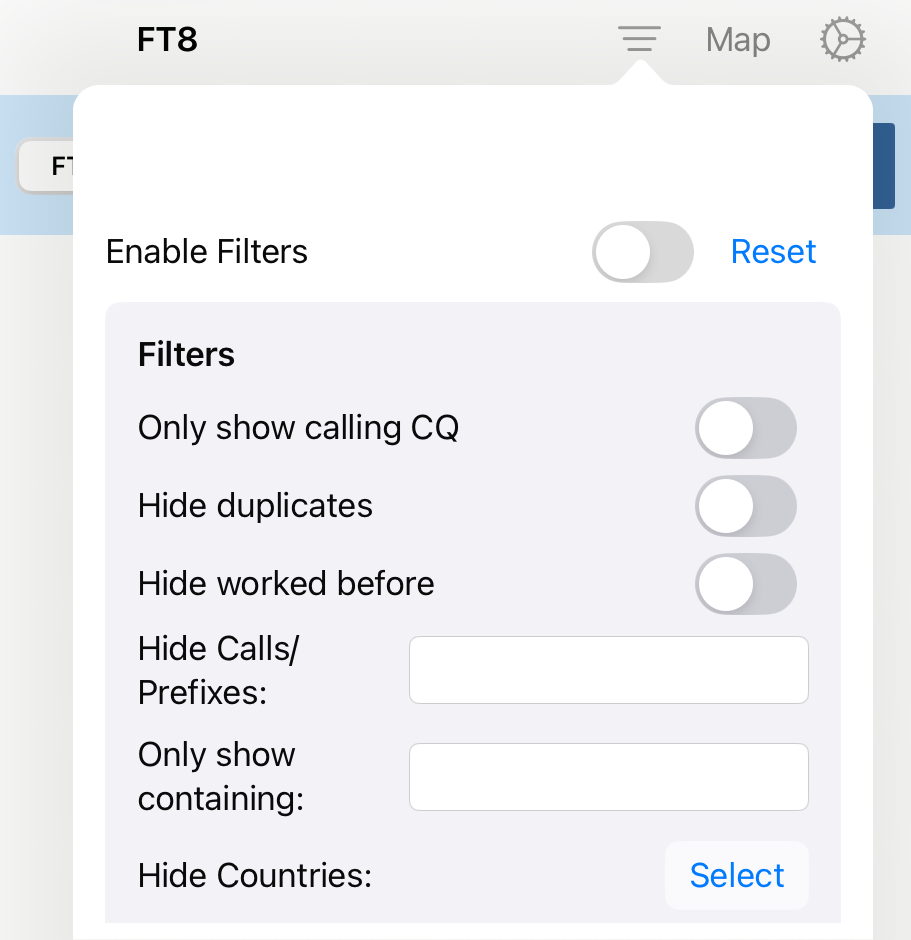
The filter settings help to reduce the number of lines in the receiving list. The filter can be enabled or disabled at the top of this settings screen.
3.11. Using FT8/FT4 for DXpeditions (Fox and Hound)
You can operate as a hound to work DXpeditions (the fox) with this app as follows: First, set the Band selector in the FT8 Tool to Manual and activate Split mode in FT8 by clicking the “…” icon and ensuring the TX = RX option is unchecked. This configuration allows you to monitor the DXpedition’s frequency, typically announced on their website, outside the standard FT8 or FT4 band range. Subsequently, transmit on the frequency where the DXpedition expects to receive your signal. Please note that if the DXpedition responds to your call with a multi-answer message, the app may not automatically log this response. In such cases, you’ll need to manually press the LOG button to log the QSO.
3.12. FT8 on your iPhone
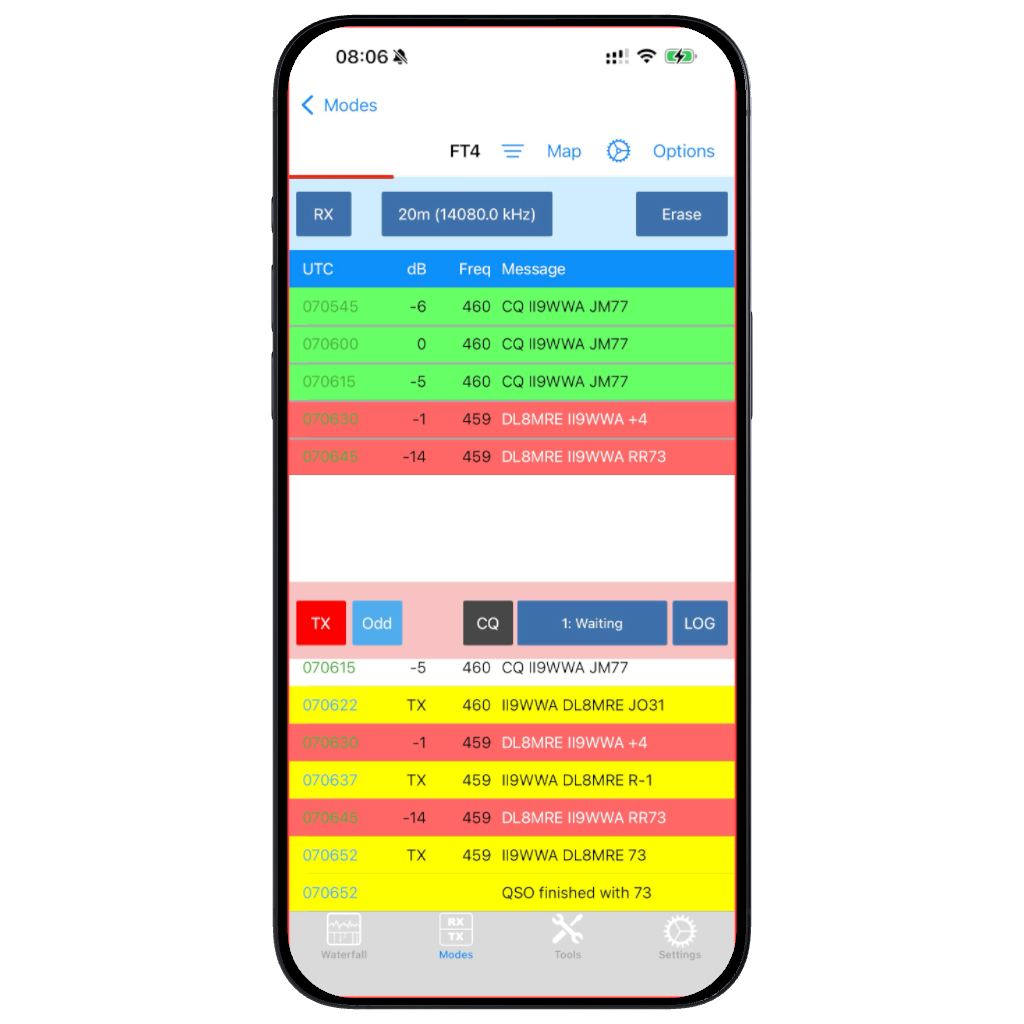
Working in FT8 (or FT4) on your iPhone is similar to what has been described previously. Only a few controls, such as the selection of FT8 or FT4 mode, the Auto button, Split mode settings, and some additional controls, have been moved to a separate screen. This can be accessed using the Options button, due to space constraints on iPhones.
4. WeFAX
This Tool allows to receive, display and store HF Fax or Weather-Fax (WeFax) transmissions often used for submitting weather maps and weather information.
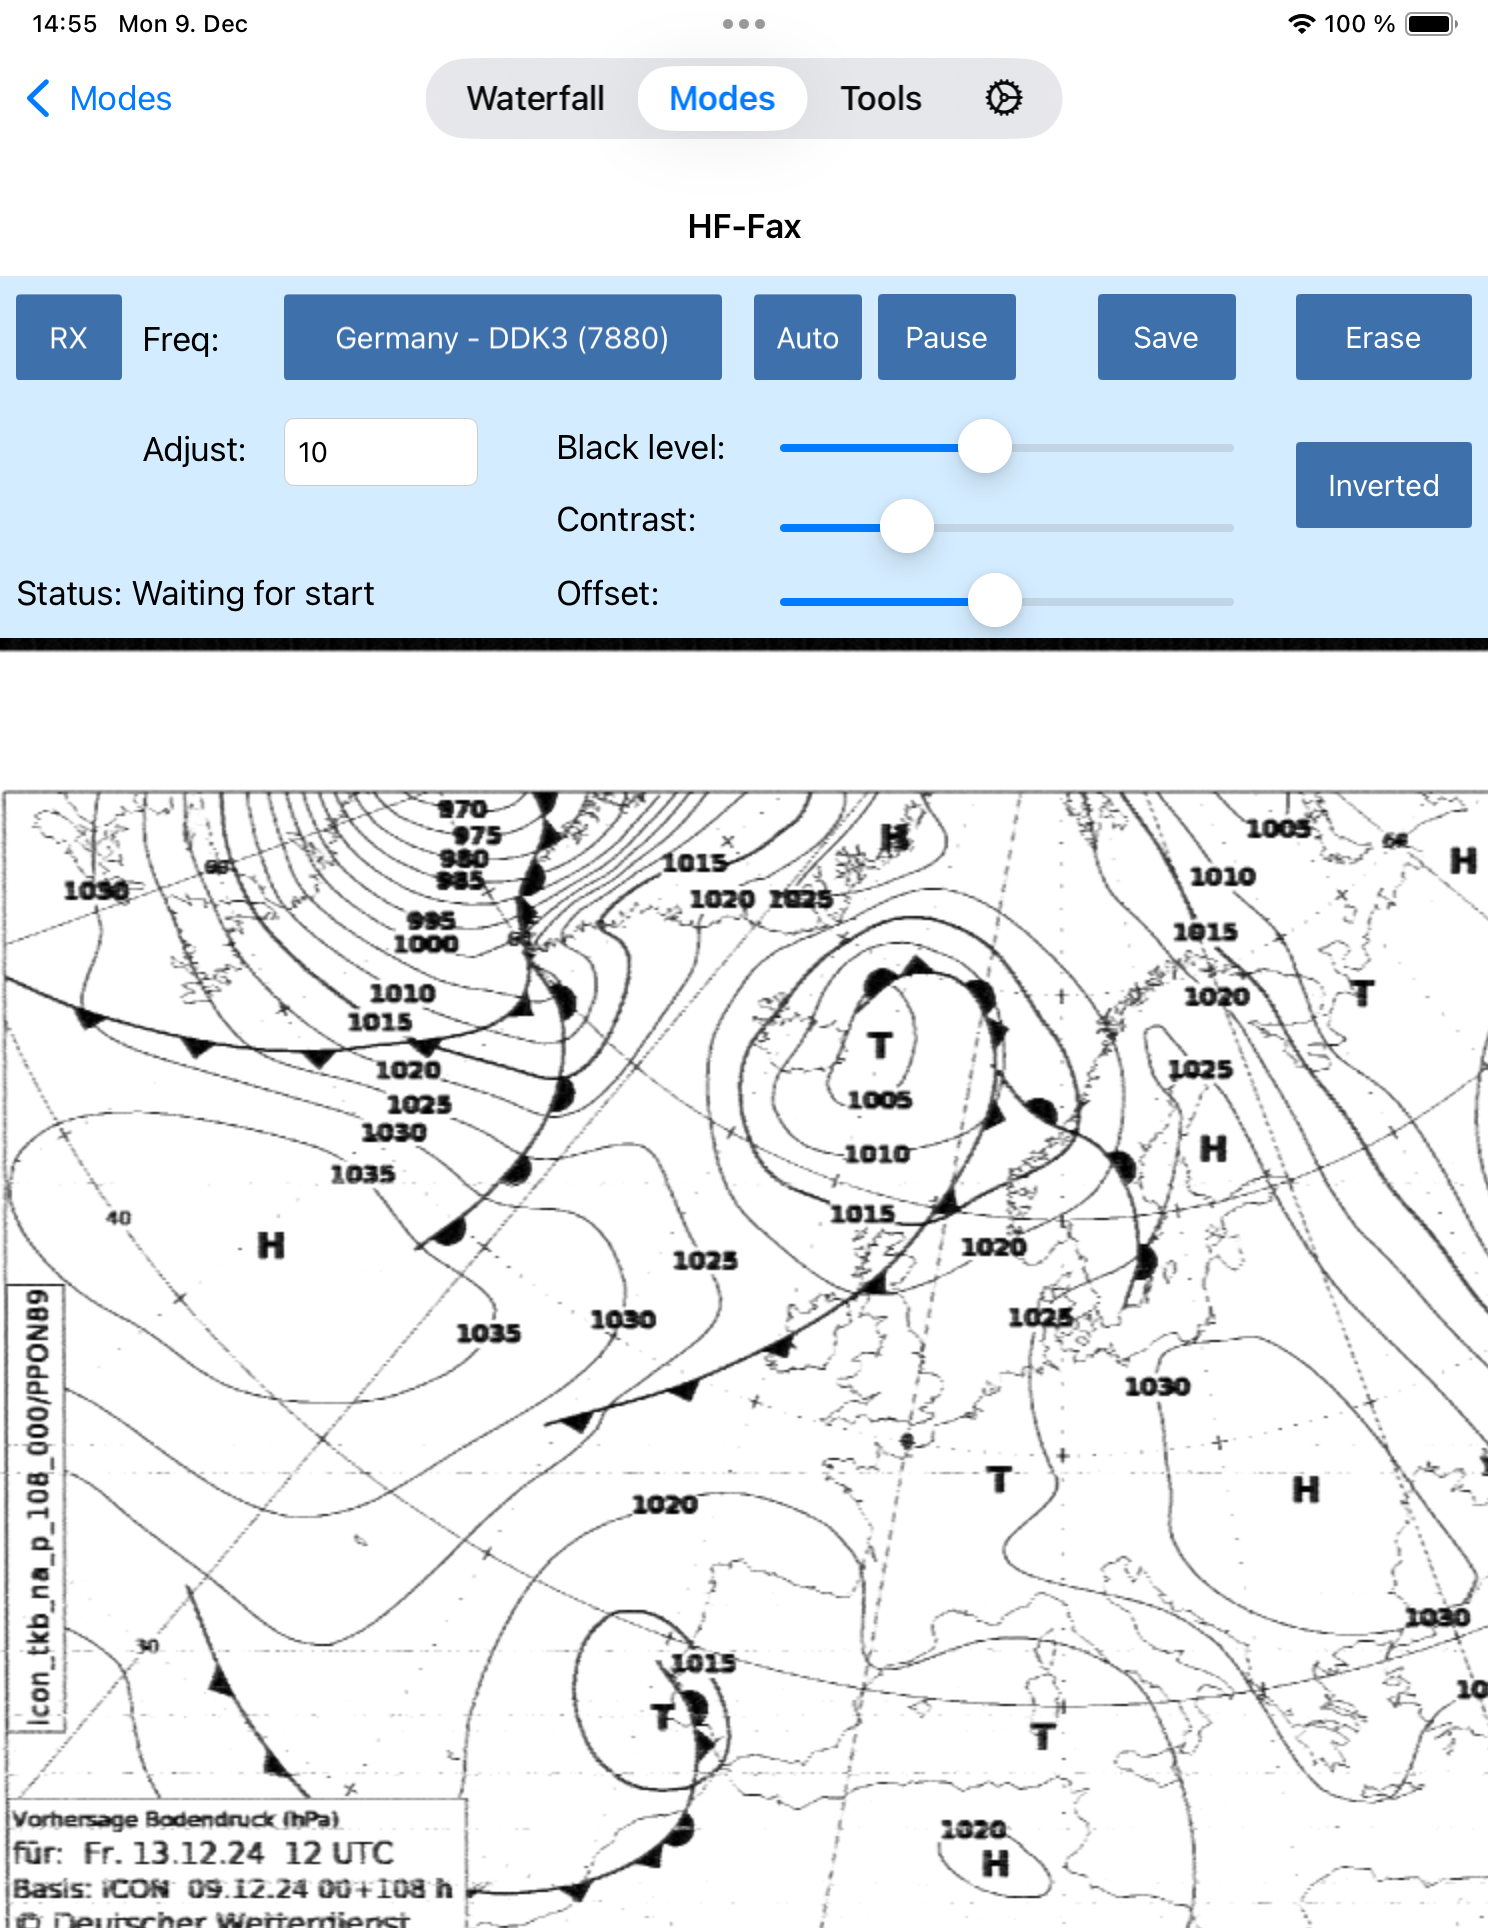
To use this tool, first either tune to the desired frequency manually and select “Manual” for the Freq: selection or select one of the predefined entries of the list.
For these preselected entries, values for RX Offset, LSB and Inverted will be set automatically.
Hitting the RX button will start receiving. If the “Auto” button is enabled, the Tool will wait for the synchronization signal until anything is displayed. Otherwise receiving starts immediate.
Using the Offset slider at the top, you can adjust the image offset if the start of the image has not been detected automatically.
The Adjust entry field can be used to adjust the slant of the image due to a clock inaccuracy.
The Erase button will clear the received image.
The Save button can be used to save the received image as .png file.
Note
This tool is only available for the iPad as it requires a larger screen.
5. SSTV
This tool enables the transmission, reception and storage of Slow-Scan TV (SSTV) images.
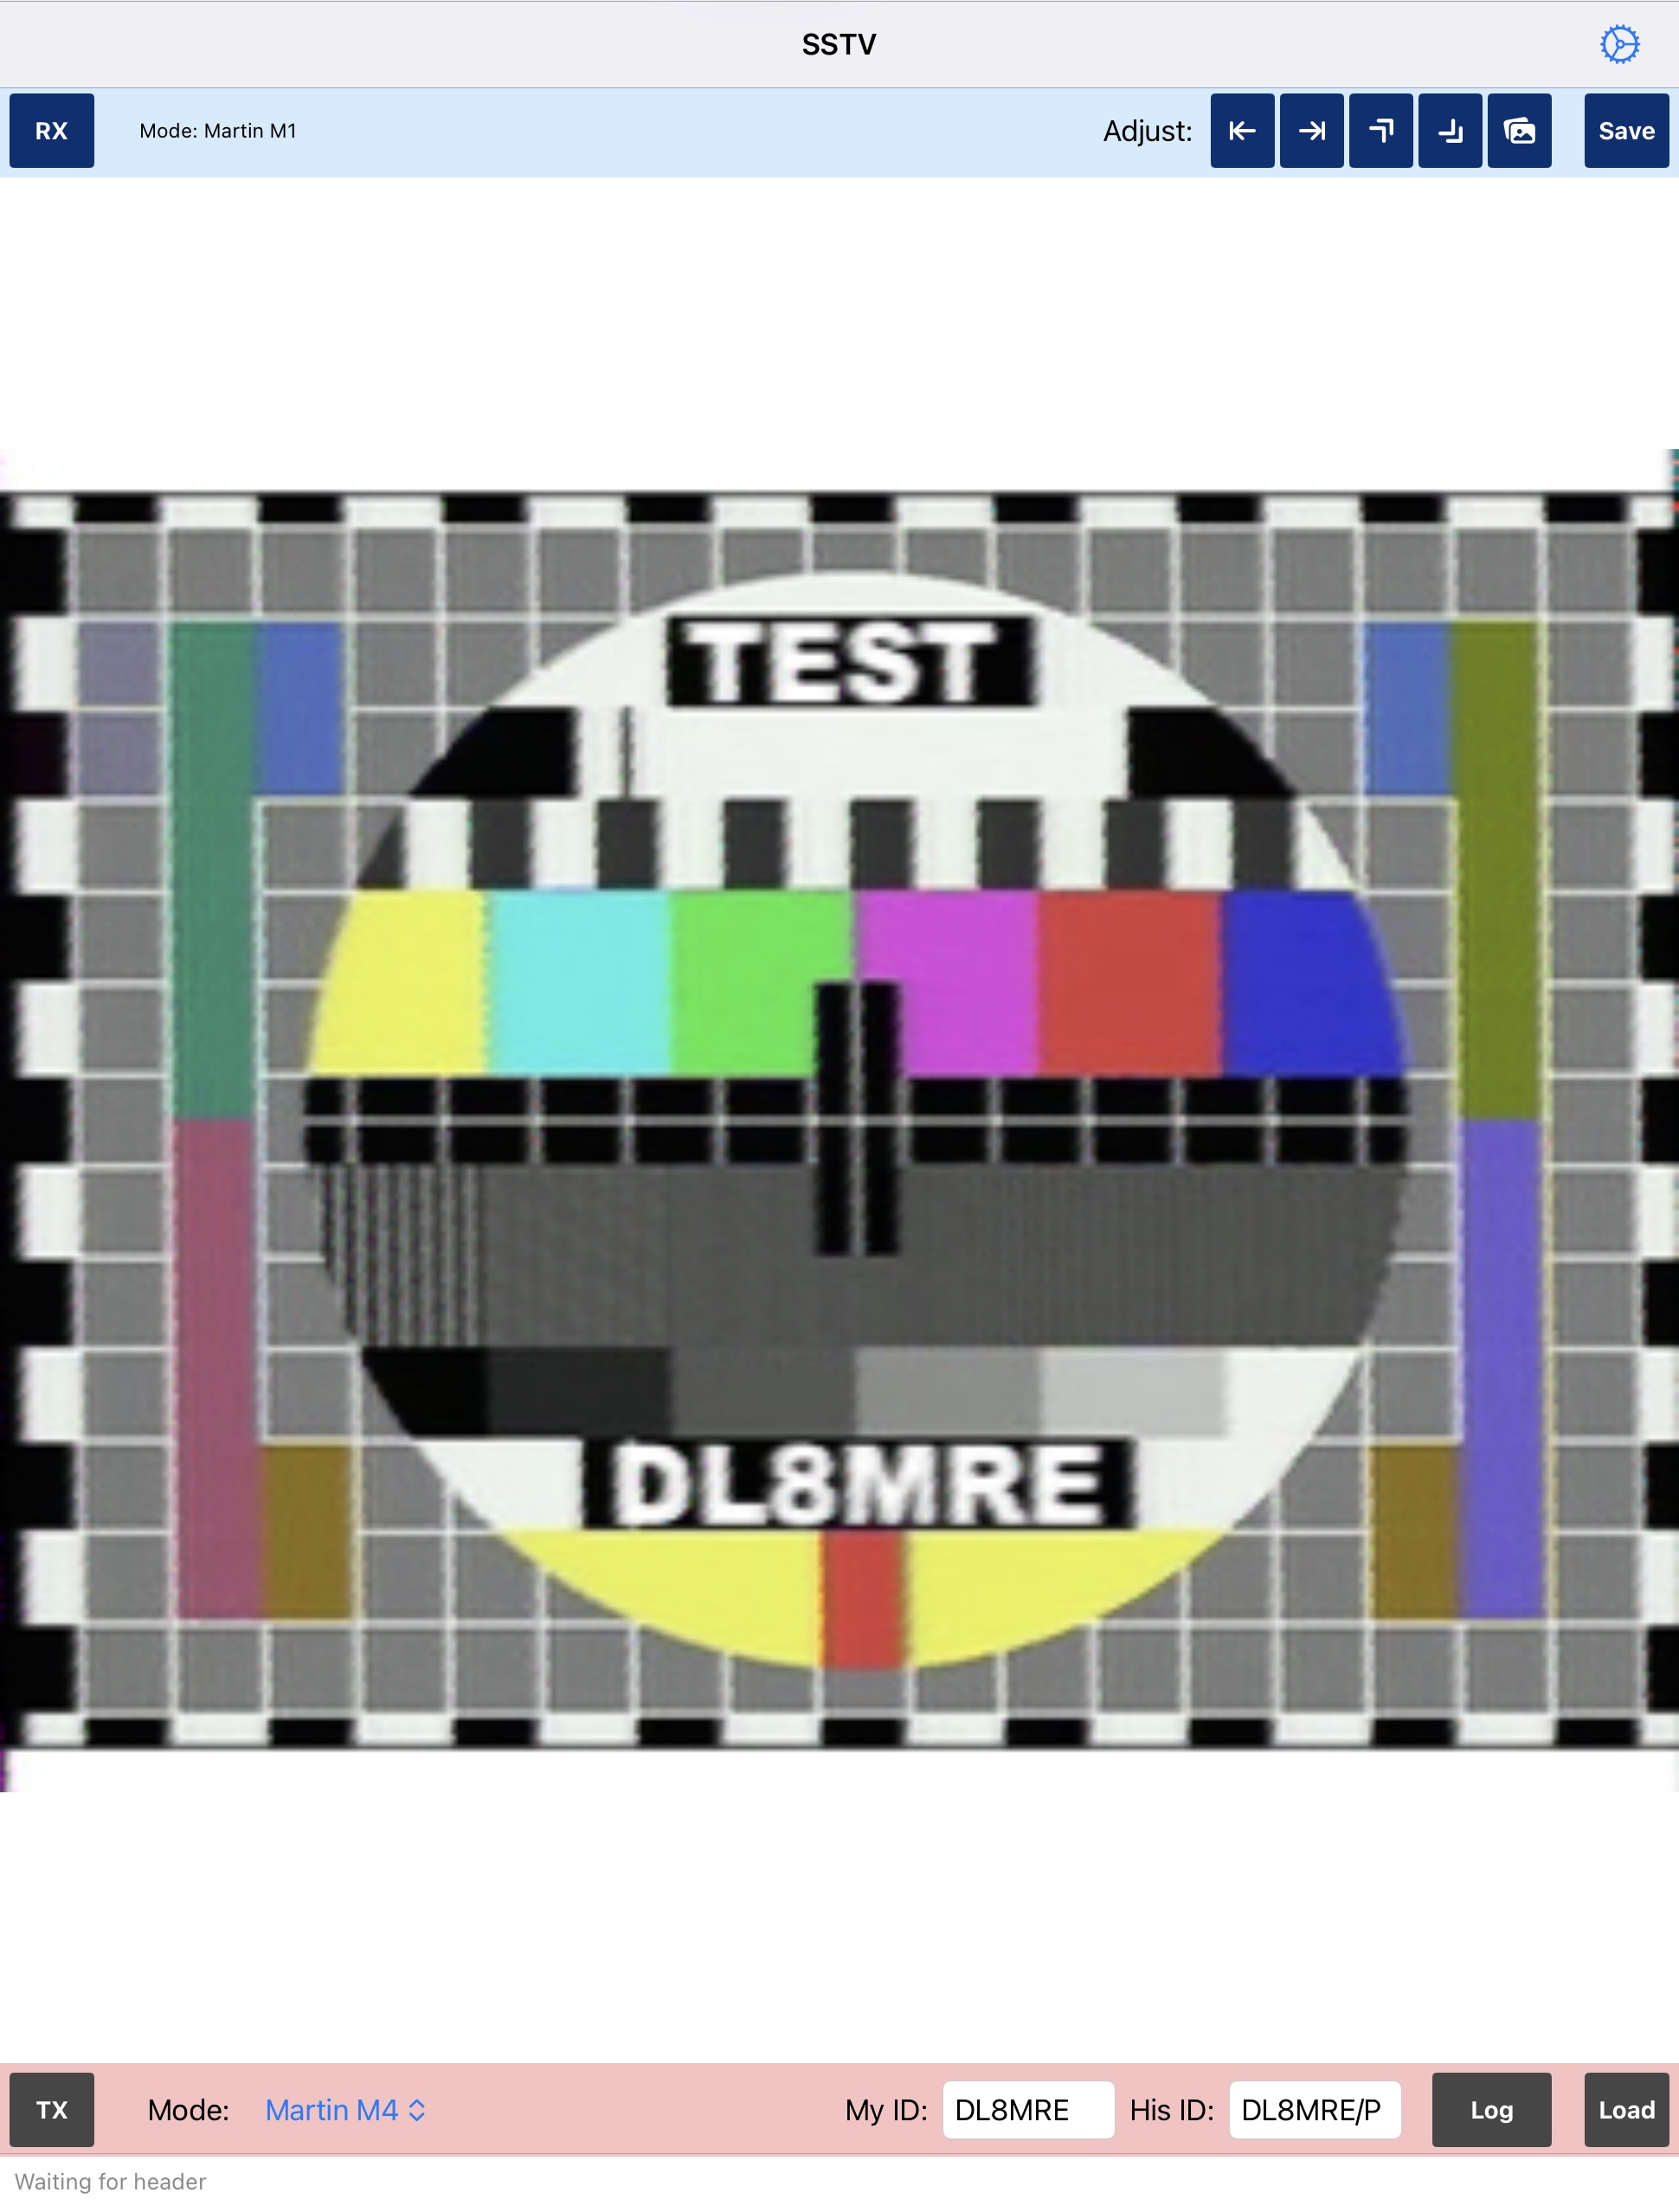
To utilize this tool, tune to a frequency where an SSTV signal is being transmitted.
Hint
The most popular SSTV frequency is 14.230 MHz (USB). Other frequencies include 21.340 MHz (USB), 7.171 and 7.110 MHz (LSB), 3.730 MHz (LSB) in the 10m Band, and 28.680 MHz (USB). Additionally, the International Space Station (ISS) occasionally transmits SSTV on 145.800 MHz (FM).
Change the mode accordingly. It is ideal to select the maximum filter width for best results.
Pressing the RX button will start the reception process. Once an SSTV header tone is detected, the app tries to automatically identify the mode of the transmission and begins receiving the image, which will be displayed line by line during reception.
Once an image has been fully received, you can adjust the ‘slant’ and offset by using the buttons at the top right side.
The Save button allows you to save the received image as a .jpg file.
To send (transmit) an image, load the image using the Load button, select the desired mode, and hit the TX button.
Hint
Martin M1 and Scottie S1 are the most popular and provide good quality. For quick submissions, try M4, which offers very low quality but doesn’t take very long.
Note
You can add an individual text to the image once it was loaded using the Watermark button at the top. The text can also contain variables such as {CALL} or {RECRST} which will be replaced before the picture will be transmitted. For a list of variables, please see chapter Macro Variables further below in the manual.
It is common to use your own call-sign as FSK ID, which will be transmitted at the end of the SSTV image transmission. For this, your call-sign is pre-populated in the My ID field. Once a picture has been received and a FSK ID was detected, it will be transferred to the His ID field.
Hitting the Log button will open the Logbook entry screen with Mode (SSTV), Frequencies, and FSK ID pre-populated.
The following SSTV formats are supported:
Name |
Size and Color |
Martin M1 |
320 x 256 GBR |
Martin M2 |
320 x 256 GBR |
Martin M3 |
320 x 128 GBR |
Martin M4 |
320 x 128 GBR |
Scottie S1 |
320 x 256 GBR |
Scottie S2 |
320 x 256 GBR |
Scottie DX |
320 x 256 GBR |
Robot 72 |
320 x 240 YUV |
Robot 36 |
320 x 240 YUV |
Robot 24 |
320 x 240 YUV |
Robot 24 B/W |
320 x 240 BW |
Robot 12 B/W |
320 x 120 BW |
Robot 8 B/W |
320 x 120 BW |
Pasokon P3 |
640 x 496 RGB |
Pasokon P5 |
640 x 496 RGB |
Pasokon P7 |
640 x 496 RGB |
PD-50 |
320 x 256 YUV |
PD-90 |
320 x 256 YUV |
PD-120 |
640 x 496 YUV |
PD-160 |
512 x 400 YUV |
PD-180 |
640 x 496 YUV |
PD-240 |
640 x 496 YUV |
PD-290 |
800 x 616 YUV |
Wraase SC-2 120 |
320 x 256 RGB |
Wraase SC-2 180 |
320 x 256 RGB |
1. Remote Access
With this app, you can remotely connect to your K4 from outside your home network via the internet. To achieve this, you must configure your router to allow traffic through a specific port.
Please note that the process for configuring port forwarding can vary significantly between routers, and therefore, only general guidance can be provided here.
To configure your router, navigate to its configuration webpage and look for the section where you can define port forwarding rules.
You will need to open port 9205 for the TCP Protocol directing to the IP address of your radio.
Note
In case you have already configured your router for K4 to K4 remote using port 9204 you will have to do the same for port 9205.
For some routers, you may be required to specify a source (or input) port and a destination (or output) port. In this instance, both the source and destination ports should be the same.
Note
Opening ports effectively means that when someone connects to the IP address of your router using one of these ports (source ports) via the internet, the router will redirect the traffic to the internal IP address of your radio on the destination ports. This is essential because the internal IP address of your radio is not accessible from the outside. Once these ports are opened, connections to your radio can only be made through these specific ports.
After completing these steps, you’ll be ready to connect to your transceiver remotely over the internet.
The only additional information you need is your public IP address, which is assigned to your router by your Internet Service Provider (ISP).
You can find your public IP address in your router’s status information or by visiting a ‘what is my IP’ website, such as https://whatismyip.com.
Since most ISPs assign dynamic IP addresses that change over time, you might consider using a Dynamic DNS service like https://dyn.com or a similar service supported by your router. These services offer a consistent hostname (e.g., xxxxx.dyndns.org) that corresponds to your fluctuating public IP address.
To connect the app to your radio remotely over the internet, use the same information you entered for your local connection, but replace the local IP address of the radio with the public IP address.
For convenience, add another radio to the “Available Radio” list in the App by using the Add button again. Name this new entry distinctively to differentiate it from your local access radio (e.g., “K4 over internet”), and use the public IP address or Dynamic DNS address and the same settings as your local radio.
1.1. Testing Remote Access
Before attempting to connect to your radio over the internet, it’s wise to perform a test to ensure that port forwarding and your public IP or Dynamic DNS address are configured correctly.
Try connecting to the newly added radio while still connected to your home Wi-Fi network. Although it may seem redundant, as you could connect directly, this step is crucial to verify that the port forwarding and public IP or Dynamic DNS address are functioning correctly. After confirming this, attempt to connect using a different network, such as cellular data or another Wi-Fi network.
Important
If you are using an iPhone as a hotspot, you must disable “Low Data Mode,” “Private Wi-Fi Address,” and “Limit IP Address Tracking” in your device’s Wi-Fi settings to ensure proper connectivity.
2. Macro Variables
You can use variables like {CALL} in CW Macros.
These variables will be replaced by values from your settings or log before being sent.
The following Macro Variables are available:
{CALL} |
Will be replaced by the Call-sign currently entered in the Log Window |
{CALLSPELL} |
Will be replaced by the Call-sign currently entered in the Log Window spelled letter by letter |
{SENTRST} |
Will be replaced by the RST Sent value of the Log Window |
{RECRST} |
Will be replaced by the RST Received value of the Log Window |
{NR} |
Will be replaced with the Contest Serial number, maintained in the Settings of the Logbook |
{COMMENT} |
Will be replaced by the Comment value of the Log Window |
{MYCALL} |
Will be replaced by your own Call-sign, maintained in the App Settings |
{TXFREQ} |
Will be replaced by current TX Frequency |
{RXFREQ} |
Will be replaced by current RX Frequency |
{FREQ} |
Same as {RXFREQ} |
{TXBAND} |
Will be replaced by current TX Band |
{RXBAND} |
Will be replaced by current RX Band |
{DATE} |
Will be replaced by the Date entered in the Log Window |
{TIME} |
Will be replaced by the current Time entered in the Log Window |
{ENTER} |
Will send a new-line character |
\n |
Same as {ENTER} |
{NOW} |
Will be replaced by the current time in UTC |
{GRID} |
Will be replaced by your Grid locator, maintained in the App Settings |
{LOG} |
Will cause the current QSO to be logged |
Common K4 Issues
No Waterfall
In case you don’t have Audio or Waterfall, double check if you are using at least Radio firmware R37 and no beta version.
For the app Radio connection settings check if you are using port 9205.
No CW side tone or two side tones at once
Both the radio and the app can generate a local side tone. You need to choose the side tone you prefer but not both simultaneously. The app-generated side tone is closer to the paddle if you have one connected to the app. The radio-generated side tone experiences some latency, which includes the time taken for data to travel over the network to key the radio and the (longer) time for audio to return from the radio to the app.
The local app side tone can be enabled and adjusted in the CW Decoder tool under settings, along with various other CW-related settings. For this reason, it’s best to have the CW Decoder tool open and activated (by hitting the RX button) whenever you want to operate in CW mode, whether or not you also wish to decode CW. You can, of course, switch to the Waterfall screen whenever you like and let the CW tool run continuously.
Note
Just don’t forget to hit RX in the CW tool again to end the CW decoder if you want to switch to other modes.
To enable or adjust the radio-generated (delayed) side tone, use the MON button. First, right-click (or long press on iOS) this button to access the MON options. Here, select CW at the top. Next, you can adjust the CW side tone volume using the slider below. If CW is selected for MON, you can simply enable or disable the radio side tone by pressing the MON button.
Common Issues
Latest Version
The App is designed to be fully compatible with the latest iOS version. If you are experiencing any issues, please ensure that you have the latest version of the App and the most recent iOS update installed.
App Doesn’t Connect to the Radio
If you have followed the instructions on how to set up your transceiver for the app, but the app still can’t connect, there could be several reasons for this issue.
The most common issue is a typo in the settings or the instructions not being followed precisely.
Before attempting to establish remote access (which means connecting to your radio from the internet), ensure that you have a reliable local connection. Start with a local setup and use the Network Stats tool to verify that the error rate is below 0.05%. Once achieved, proceed to set up a remote connection as outlined in the Remote Access section. That chapter also provides guidance on testing your remote access connection.
If you encounter connection problems, you may receive an error message. If the error message states “error 0”, it indicates that your radio cannot be connected at all. This could be due to an incorrect IP address or the radio not being connected to your network. An “error 1” usually signifies that you have entered invalid connection values (e.g., a letter or space for the port or an invalid address).
If you get a Network Error 96, you may have entered a wrong username and password combination.
If you get a Timeout error, you may have entered a valid but wrong IP Address. If you get a Network Error -65554 you may have entered something wrong as IP Address (e.g. entered illegal characters or spaces).
Below are a few potential causes of connection issues:
Rejected Local Network access
A common mistake is to mistakenly answer “no” to a iOS prompt asking whether to allow a local network connection. Once this is done, the app can no longer connect to your radio. To resolve this, go to iOS Settings > Privacy & Security > Local Network. Then search for the app and ensure that the switch enabling local network access is turned on.
DHCP Issues with Mesh Networks
Mesh networks can cause various network issues or delays. Whenever possible, use a LAN (wired) connection or a direct WiFi connection. Improperly configured mesh networks can lead to DHCP server (usually your router) connectivity issues or, worse, two DHCP servers in one network, which is problematic.
WiFi Issues
WiFi can be prone to connectivity issues. You can gauge the presence of issues or the success of your troubleshooting efforts by using the Network Stats tool and checking that the error rate remains below 0.05%.
If a high error rate occurs only while transmitting (TXing), you may be experiencing RF interference (RFi). To test this, reduce your TX power to 1% and observe whether the situation improves.
Review your WiFi router settings for options that might enhance reliability. Some routers can automatically choose an optimal WiFi channel. While convenient, this can be unreliable if the router switches channels during radio operation. It’s better to manually select a free channel, though you may need to revisit this setting if problems reoccur.
WiFi roaming can also cause issues, especially if your device remains connected to a suboptimal access point in a multi-AP environment.
The performance of 5GHz and 2.4GHz WiFi bands varies; neither is inherently superior. Each has its pros and cons, and it might be beneficial to disable one to determine which works best for your setup.
